Dodge Journey: Installation

Fig. 101: Check For Stretched Bolts
- - STRETCHED BOLT
- - THREADS ARE NOT STRAIGHT ON LINE
- - THREADS ARE STRAIGHT ON LINE
- - UNSTRETCHED BOLT
NOTE: The cylinder head bolts (4) are tightened using a torque plus angle procedure.
The bolts must be examined BEFORE reuse. If the threads are necked down the bolts must be replaced
Necking can be checked by holding a straight edge against the threads. If all the threads do not contact the scale, the bolt must be replaced.
CAUTION: When cleaning cylinder head and cylinder block surfaces, DO NOT use a metal scraper because the surfaces could be cut or ground. Use ONLY a wooden or plastic scraper.
1. Clean sealing surfaces of cylinder head and block.
2. Lubricate bolt threads with clean engine oil and install bolts.
3. Install new head gasket over locating dowels.
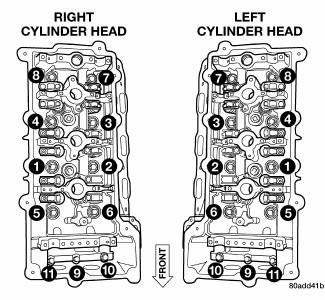
Fig. 102: Cylinder Head Tightening Sequence
4. Install cylinder head to block, assuring head is properly positioned over locating dowels.
5. Tighten bolts in sequence shown in illustration, using the following steps and torque values:
- Step 1: Bolts 1-8 to 48 N.m (35 ft. lbs.)
- Step 2: Bolts 1-8 to 75 N.m (55 ft. lbs.)
- Step 3: Bolts 1-8 to 75 N.m (55 ft. lbs.)
- Step 4: Bolts 1-8 to +90º Turn Do not use a torque wrench for this step.
- Step 5: Bolts 9-11 to 28 N.m (250 in. lbs.)
6. For left cylinder head installation:
- Install engine oil dipstick tube.
- Install generator.
7. For right cylinder head installation:
- Install cylinder head ground strap.
- Connect EGR valve electrical connector (if equipped).
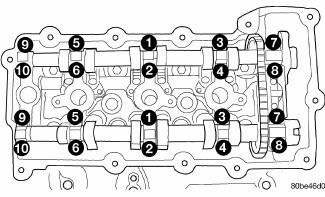
Fig. 103: Camshaft Bearing Cap Tightening Sequence
8. Install all valvetrain components and camshafts. Tighten camshaft bearing caps in sequence shown in illustration to 12 N.m (105 in. lbs.).
9. Install primary timing chain, guides and sprockets.
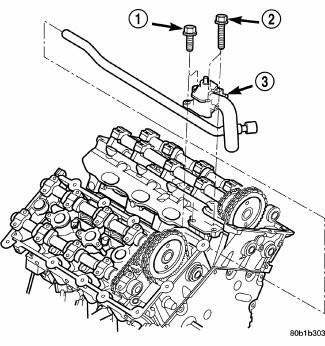
Fig. 104: WATER OUTLET CONNECTOR
- - BOLT (2)
- - BOLT (2)
- - WATER OUTLET CONNECTOR
10. Install coolant outlet connector (3).
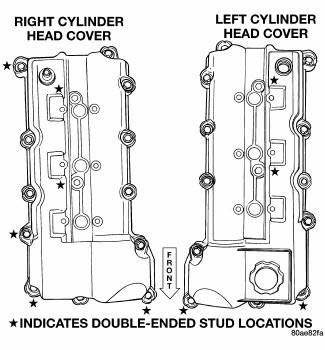
Fig. 105: Cylinder Head Covers
11. Install cylinder head covers.
12. Connect camshaft position sensor and crankshaft position sensor connectors.
13. Install timing chain cover.
14. Install crankshaft vibration damper.
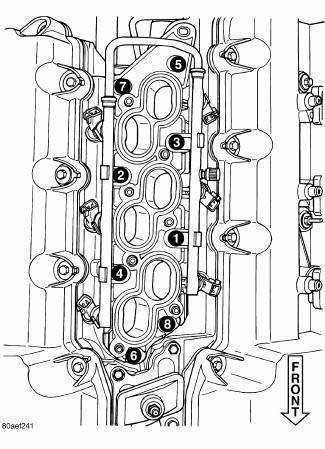
Fig. 106: Lower Intake Manifold Tightening Sequence
15. Install lower and upper intake manifolds.
16. Connect oil pressure sensor connector. Install oil pressure sensor heat shield.
17. Install the maniverter.
18. Install exhaust cross-under pipe.
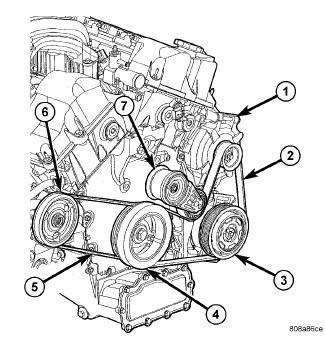
Fig. 107: Accessory Drive Belt System - 2.7L
- - GENERATOR
- - IDLER/TENSIONER
19. Install accessory drive belts.
20. Fill cooling system.
21. Connect negative cable to remote jumper terminal.
 Cleaning, inspection
CLEANING
To ensure engine gasket sealing, proper surface preparation must be
performed, especially with the use of
aluminum engine components and multi-layer steel cylinder head gaskets.
NOTE: ...
 Camshaft, engine
DESCRIPTION
Fig. 108: Camshaft & Valvetrain Components
- CAMSHAFT BEARING CAP - INTAKE
- CAMSHAFT BEARING CAP - EXHAUST
- CAMSHAFT - EXHAUST
- ROCKER ARM
- HYDRAULIC LIFTER
- CYLI ...
See also:
Module, power, rear blower motor
DESCRIPTION
Fig. 59: Rear Blower Power Module Description
A blower motor power module is used on this model when equipped with the
automatic temperature control
(ATC) rear heating-A/C system. M ...
TIRES — GENERAL INFORMATION
Tire Pressure
Proper tire inflation pressure is essential to the safe and
satisfactory operation of your vehicle. Three primary
areas are affected by improper tire pressure:
Safety
WARNING:
• ...
Duct, floor distribution, rear
REMOVAL
Fig. 159: Rear Floor Distribution Duct
1. Remove right quarter trim panel.
2. Remove the push-pin retainer (2) that secures the rear floor distribution
duct (1) to the right inner qu ...
