Dodge Journey: Pan, oil
Removal
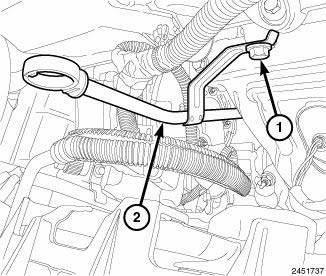
Fig. 259: Identifying Oil Dipstick Tube & Bolt
1. Disconnect and isolate the negative battery cable.
2. Remove the bolt (1) and the engine oil dipstick tube (2).

Fig. 260: Belly Pan
3. Raise and secure the vehicle on a hoist. 4. Remove the belly pan (2), if equipped.

Fig. 261: Right Lower Splash Shield
5. Remove the right lower splash shield (2).
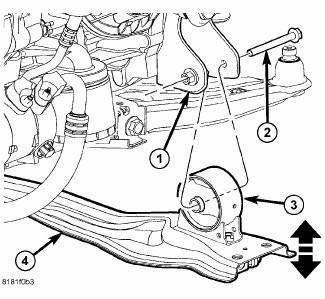
Fig. 262: Front Engine Mount Through Bolt
6. Drain the engine oil and remove the oil filter.
7. Remove the fore/aft crossmember (4).

Fig. 263: Structural Collar
8. Remove the structural collar (3).

Fig. 264: Exhaust Cross-Under Pipe
9. Remove the exhaust cross-under pipe (3).
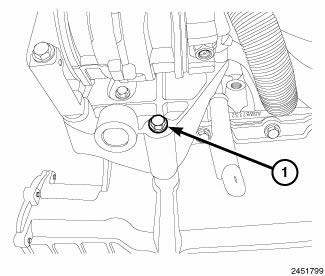
Fig. 265: A/C Compressor Mounting Bracket Lower Bolt
10. Remove the lower bolt (1) attaching the A/C compressor mounting bracket to the oil pan.
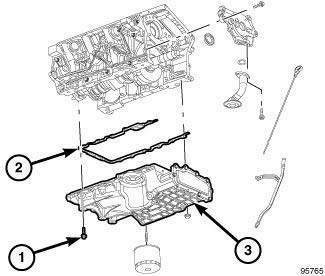
Fig. 266: Oil Pan Attaching Fasteners
CAUTION: Assure removal of the two bolts attaching the timing cover to the oil pan, as damage to the timing cover and/or oil pan may occur.
11. Remove the oil pan attaching fasteners (1). Remove the oil pan (3) and gasket (2).
Installation

Fig. 267: Oil Pan Attaching Fasteners
1. Clean the oil pan and oil pan sealing surfaces. Inspect the oil pan and timing chain cover gaskets. Replace as necessary.
2. Apply an 1/8 inch bead of Mopar Engine RTV GEN II to the front T-joints (oil pan gasket to timing cover gasket interface) and the rear T-joints (oil pan gasket to crankshaft rear oil seal retainer gasket interface).
3. Install the oil pan gasket (2) to the engine block.
NOTE: To prevent oil leaks at oil pan to timing chain cover, the following tightening sequence procedure must be performed.
4. Install the oil pan (3) and fasteners (1) using the following tightening sequence:
- Install the oil pan bolts and nuts finger tight only-just tight enough to compress the gasket's rubber seal .
- Install the timing chain cover to oil pan bolts and tighten to 12 N.m (105 in. lbs.).
- Tighten the oil pan bolts to 28 N.m (250 in. lbs.).
- Tighten the oil pan nuts to 12 N.m (105 in. lbs.).

Fig. 268: A/C Compressor Mounting Bracket Lower Bolt
5. Install the lower bolt (1) attaching the A/C compressor mounting bracket to the oil pan. Tighten bolt to 28 N.m (21 ft. lbs.).

Fig. 269: Exhaust Cross-Under Pipe
6. Install the oil filter and drain plug.
7. Install exhaust cross-under pipe.
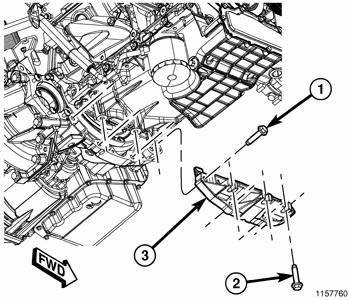
Fig. 270: Structural Collar
8. Install structural collar (3).

Fig. 271: Front Engine Mount Through Bolt
9. Install the fore/aft crossmember (4).
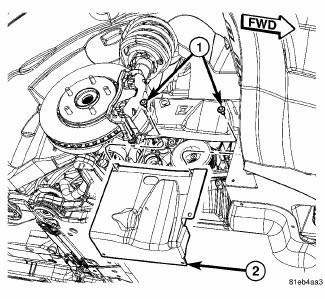
Fig. 272: Right Lower Splash Shield
10. Install the right lower splash shield (2).
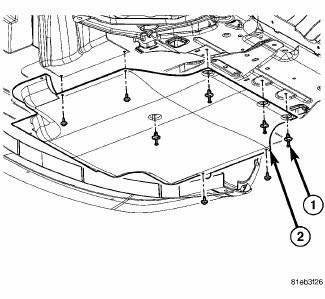
Fig. 273: Belly Pan
11. Install the belly pan (2), if equipped.

Fig. 274: Identifying Oil Dipstick Tube & Bolt
12. Install the engine oil dipstick and tube (2). Tighten bolt to 20 N.m (15 ft. lbs.).
13. Fill the engine crankcase with the proper oil to the correct level.
14. Connect the negative battery cable.
 Oil
Oil
Description
For engine oil type and capacity, refer to Vehicle Quick Reference/Capacities
and Recommended Fluids -
Description .
Standard Procedure
STANDARD PROCEDURE - ENGINE OIL AND FILTER CHA ...
 Pump, engine oil
Removal
Fig. 275: Oil Pump & Pick-up Tube
- BOLTS
- O-RING
- PICK-UP TUBE
- BOLT
- OIL PUMP
NOTE: The oil pump pressure relief valve can be serviced by removing
the oil pan ...
See also:
Rod, piston and connecting
Description
Fig. 206: Piston & Connecting Rod
- "F" TOWARD FRONT OF ENGINE
- RING COMPRESSOR
- SPECIAL TOOL 8189
- OIL SQUIRT HOLE
The pistons (1) are made of a high stre ...
LIFTGATE
The liftgate can be unlocked or locked with the Remote
Keyless Entry (RKE) transmitter or by activating the
power door lock switch located on either front door trim
panel.
NOTE: The liftgate canno ...
FLUID CAPACITIES
FLUID CAPACITIES ...
