Dodge Journey: Camshaft, engine
DESCRIPTION
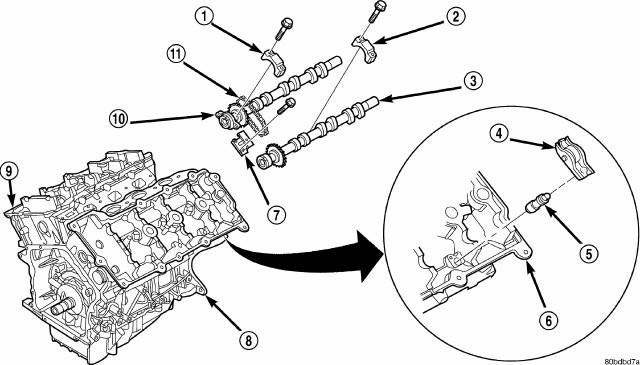
Fig. 108: Camshaft & Valvetrain Components
- - CAMSHAFT BEARING CAP - INTAKE
- - CAMSHAFT BEARING CAP - EXHAUST
- - CAMSHAFT - EXHAUST
- - ROCKER ARM
- - HYDRAULIC LIFTER
- - CYLINDER HEAD
- - CAMSHAFT (SECONDARY) CHAIN TENSIONER
- - CYLINDER BLOCK
- - CYLINDER HEAD
- - CAMSHAFT - INTAKE
- - CAMSHAFT (SECONDARY) TIMING CHAIN
The assembled fabricated camshafts (3,10) are composed of five bearing journals machined into a hollow steel tube. Six steel lobes, a secondary timing drive sprocket, and a primary sprocket/thrust flange are pressed onto the camshaft tube using a unique assembly process. Camshaft end play is controlled by the primary camshaft sprocket attachment flange on the intake camshafts (10) and by a thrust flange on the exhaust camshafts.
OPERATION
The camshaft has precisely machined (egg shaped) lobes to provide accurate valve timing and duration. The camshaft is driven by the crankshaft via drive sprockets and chains.
REMOVAL
NOTE: The engine can be equipped with either conventional roller-type (early production) or silent type (late production) secondary timing chains.
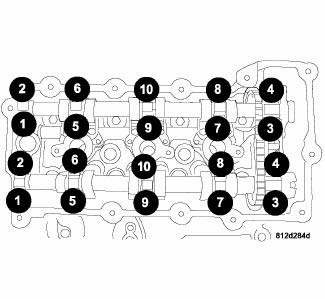
Fig. 109: Camshaft Bearing Cap Removal
1. Remove the primary timing chain.
2. Remove secondary chain tensioner mounting bolts.
NOTE: Camshaft bearing caps should have been marked during engine manufacturing. For example, number one exhaust camshaft bearing is marked "1E & gt;"
3. Slowly loosen camshaft bearing cap bolts in the sequence shown in illustration.
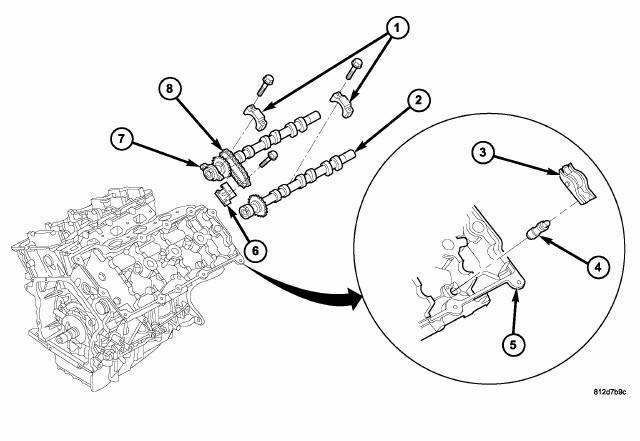
Fig. 110: Camshaft & Valvetrain Components
4. Remove camshaft bearing caps (1).
5. Remove intake camshaft (7), exhaust camshaft (2), secondary timing chain (8), and secondary timing chain tensioner (6) together as an assembly.
6. Remove secondary timing chain tensioner (6) and secondary timing chain (8) from camshafts (2) and (7).
7. Inspect camshafts.
INSPECTION
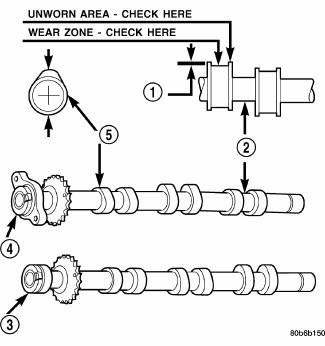
Fig. 111: Camshaft Inspection
- - ACTUAL WEAR
- - BEARING JOURNAL
- - EXHAUST CAMSHAFT
- - INTAKE CAMSHAFT
- - LOBE
1. Inspect camshaft bearing journals (2) for damage and binding. If journals are binding, check the cylinder head for damage. Also check cylinder head oil holes for clogging.
2. Inspect camshaft sprockets for excessive wear. Replace camshafts if necessary.
3. Check the cam lobe surfaces for abnormal wear and damage. Replace camshaft if defective. Measure the actual wear and replace, if out of limits-standard value is 0.0254 mm (0.001 in.); wear limit is 0.254 mm (0.010 in.).
INSTALLATION
CAUTION: When the timing chain is removed and the cylinder heads are installed, DO NOT rotate the camshafts or crankshaft without first locating the proper crankshaft position. Failure to do so will result in valve and/or piston damage.
NOTE: The engine can be equipped with either conventional roller-type (early production) or silent type (late production) secondary timing chains.
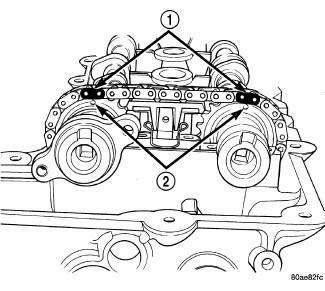
Fig. 112: Camshaft Chain Timing
- - PLATED CHAIN LINKS
- - CAMSHAFT TIMING MARKS (DOTS)
1. For engines equipped with roller chains (early production), assemble camshaft chain on the cams ensuring that the plated links (1) are aligned with the timing dot (2) on the camshaft sprockets.
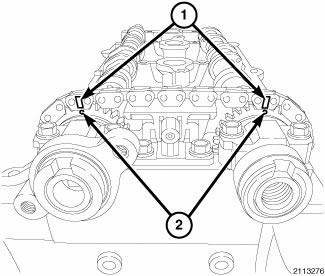
Fig. 113: Identifying Marked Links & Timing Dot On Camshaft Sprockets
2. For engines equipped with silent chains (late production) assemble camshaft chain on the cams ensuring that the marked links (1) are aligned with the timing dot (2) on the camshaft sprockets.
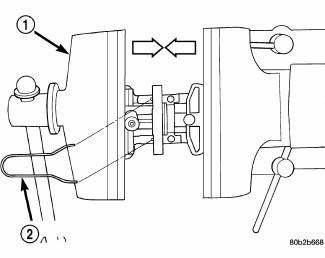
Fig. 114: Locking Camshaft (Secondary) Chain Tensioner
- - VISE
- - LOCK PIN
3. If camshaft chain tensioner is already in the compressed and locked position, proceed to step four.
4. When the camshaft chain tensioner is removed, it is necessary to compress and lock the tensioner using the following procedures:
- Place tensioner (1) into a soft jaw vise.
- SLOWLY compress tensioner until fabricated lock pin (2) or the equivalent can be inserted into the locking holes.
- Remove compressed and locked tensioner from the vise.
5. Insert the compressed and locked camshaft chain tensioner in-between the camshafts and chain.

Fig. 115: Camshaft Chain Timing
- - PLATED CHAIN LINKS
- - CAMSHAFT TIMING MARKS (DOTS)
6. For engines equipped with roller chains (early production), rotate the cams so that the plated links (1) and dots (2) are facing the 12:00 O'clock position.

Fig. 116: Identifying Marked Links & Timing Dot On Camshaft Sprockets
7. For engines equipped with silent chains (late production), rotate the cams so that the marked links (1) and dots (2) are facing the 12:00 O'clock position.
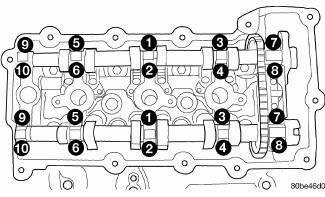
Fig. 117: Camshaft Bearing Cap Tightening Sequence
8. Install cams to cylinder head. Verify that rocker arms are correctly seated and in proper positions.
9. Install camshaft bearing caps. Verify that bearing caps are installed in same position as removed.
10. Tighten cam bearing cap bolts gradually in sequence shown in illustration to 12 N.m (105 in. lbs.).
11. Install secondary chain tensioner bolts and tighten to 12 N.m (105 in. lbs.).
12. Remove locking pin from secondary tensioners.
13. Verify end play of camshafts are within specification. See Engine - Specifications.
14. Install the primary timing chain.
 Installation
Fig. 101: Check For Stretched Bolts
- STRETCHED BOLT
- THREADS ARE NOT STRAIGHT ON LINE
- THREADS ARE STRAIGHT ON LINE
- UNSTRETCHED BOLT
NOTE: The cylinder head bolts (4) are tighte ...
 Cover(s), cylinder head, left
REMOVAL
1. Disconnect negative battery cable.
2. Disconnect electrical connectors from ignition coils and capacitor.
Reposition electrical harness.
3. Remove ground strap from cylinder head c ...
See also:
Description, Operation
DESCRIPTION
Several combinations of radio receivers and speaker systems are offered. The
audio system uses an ignition
switched source of battery current so that the system will only operate when ...
Pulley, idler
Removal
2.4L ENGINE
Fig. 30: ACCESSORY DRIVE BELT IDLER PULLEY - 2.4L
- UPPER PULLEY
- LOWER PULLEY
1. Remove accessory drive belt.
2. Remove upper idler pulley (1) and bolt.
3. Re ...
Description
Fig. 297: Underbody Lines
Models equipped with the rear heating-A/C system use metal lines attached to
the vehicle underbody to carry
refrigerant and engine coolant to and from the rear A/C evap ...
