Dodge Journey: Cleaning, inspection
CLEANING
To ensure engine gasket sealing, proper surface preparation must be performed, especially with the use of aluminum engine components and multi-layer steel cylinder head gaskets.
NOTE: Multi-Layer Steel (MLS) head gaskets require a scratch free sealing surface.
Remove all gasket material from cylinder head and block. Be careful not to gouge or scratch the aluminum head sealing surface.
Clean all engine oil passages.
INSPECTION
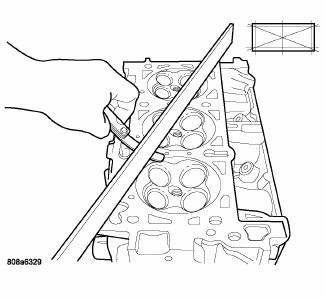
Fig. 100: Checking Cylinder Head Flatness-Typical
1. Before cleaning, check for leaks, damage and cracks.
2. Clean cylinder head and oil passages.
3. Check cylinder head for flatness.
4. Cylinder head must be flat within:
CAUTION: 0.20 mm (0.008 in.) MAX is a combined total dimension of the stock removal limit from cylinder head and block top surface (Deck) together.
- Standard dimension = less than 0.05 mm (0.002 inch.)
- Service Limit = 0.2 mm (0.008 inch.)
- Grinding Limit = Maximum of 0.2 mm (0.008 inch.) is permitted.
 Removal
Fig. 93: Accessory Drive Belt System - 2.7L
- GENERATOR
- IDLER/TENSIONER
1. Perform fuel pressure release procedure before attempting any repairs.
2. Disconnect negative cable from rem ...
 Installation
Fig. 101: Check For Stretched Bolts
- STRETCHED BOLT
- THREADS ARE NOT STRAIGHT ON LINE
- THREADS ARE STRAIGHT ON LINE
- UNSTRETCHED BOLT
NOTE: The cylinder head bolts (4) are tighte ...
See also:
Installation
NOTE: Perform 1 through 5 on each side of the vehicle to complete pad
set installation,
then proceed to 6.
NOTE: Make sure that the audible wear indicator (if equipped) is placed
toward ...
Plug, glow
DESCRIPTION
Fig. 26: Glow Plug
Glow plugs are used to help start a cold or cool engine. The glow plugs will
heat up and glow to heat the
combustion chamber of each cylinder. An individual glow ...
SEATS
Seats are a primary part of the Occupant Restraint System
of the vehicle. They need to be used properly for safe
operation of the vehicle.
WARNING:
• DO NOT allow people to ride in any area of y ...
