Dodge Journey: Mechanism, gearshift
REMOVAL

Fig. 193: Shift Cables To Shifter
1. Detach gear shift boot from console.
2. Remove the center console assembly.
3. Remove rear power window switch (if equipped) and disconnect harness from console.
4. Remove cables (2) from shift levers (3).
5. Remove the cables (1) from the bracket (5).

Fig. 194: Manual Transaxle Shifter
6. Remove the shifter assembly nuts (2) and remove shifter (3) from vehicle.
INSTALLATION
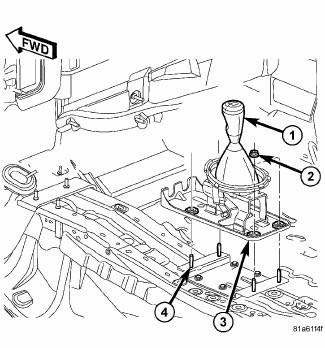
Fig. 195: Manual Transaxle Shifter
1. Install shifter assembly (3), Install and tighten nuts (2) to 7 N.m (61 in. lbs.).
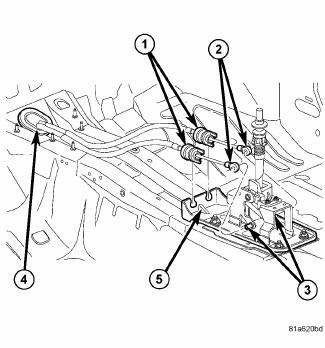
Fig. 196: Shift Cables To Shifter
2. Install cables (2) to shifter levers (3) and secure cable to shifter bracket (5).
3. Install center console assembly.
4. Install rear power window switch (if equipped) and fasten harness to console
5. Attach gearshift boot to center console assembly.
6. Verify that shift pattern is aligned properly.
 Lever, shift
REMOVAL
Fig. 183: Air Cleaner And Inlet Tube
Remove the engine cover.
1. Disconnect battery negative cable.
2. Remove air inlet tube (2) and air cleaner assembly (4).
Fig. 184: Nut Crosso ...
 Seal, axle drive shaft
REMOVAL
Fig. 197: Axle Shaft Seal Removal
1. Remove axle shaft.
2. Insert a flat-blade pry tool (2) at outer edge of axle shaft seal (1).
3. Tap on the pry tool (2) with a small hammer and ...
See also:
Input shaft, transmission
DISASSEMBLY
Fig. 175: Snap Ring At Input Shaft
1. Remove the snap ring (2) that retains the input shaft bearing and sixth
gear to the shaft.
Fig. 176: Press Bearing From Input Shaft
2. Using ...
Without intermediate shaft
NOTE: The inner tripod joints are designed with a retention feature
that prevents the
tripod rollers from coming out of the inner joint housing up to a specific
load. If
this feature is o ...
AUTOSTICK — IF EQUIPPED
AutoStick is a driver-interactive transmission that offers
six manual ratio changes to provide you with more
control of the vehicle. AutoStick allows you to maximize
engine braking, eliminate undes ...
