Dodge Journey: Installation
DIESEL PARTICULATE FILTER
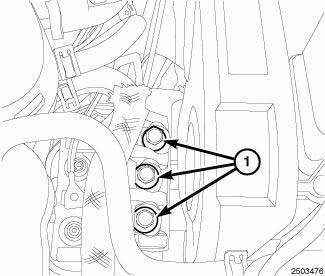
Fig. 12: Engine Support Bracket Bolts
1. Position the DPF and turbocharger gasket into the vehicle. Do not tighten at this time
2. Tighten the three bolts (1) at the right engine support bracket. Tighten the bolts to 45 N.m (33 ft. lbs.)
3. Raise and support the vehicle.
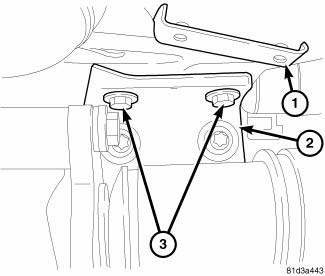
Fig. 13: Removing/Installing Diesel Particulate Filter To Axle Bracket Bolts
- - DPF
- - AXLE SUPPORT BRACKET
- - DPF TO AXLE SUPPORT BRACKET BOLTS
4. Install the DPF to the axle support bolts (3). Tighten the bolts to 25 N.m (18 ft. lbs.).
5. Install the exhaust manifold temperature sensor.
6. Install the lower pressure differential tubing into DPF. Tighten the fitting to 45 N.m (33 ft.lbs.)
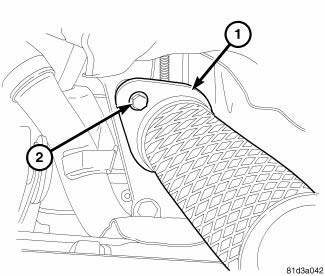
Fig. 14: Removing/Installing Diesel Particulate Filter To Exhaust Pipe
Mounting Bolts
- - FLANGE
- - BOLT
7. Install the exhaust pipe to the DPF. Tighten the bolts (2) to 35 N.m (25 ft. lbs.).
8. Install the exhaust pipe to the muffler and tailpipe assembly. Tighten the bolts (2) to 35 N.m (25 ft. lbs.).
9. Position the DPF heat shield and install the lower DPF heat shield mounting bolts. Tighten the bolts to 5 N.m (44 in. lbs.).
10. Install the lower engine splash shield.
11. Lower the vehicle.
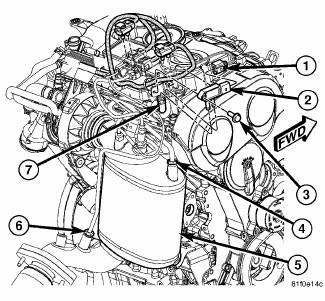
Fig. 15: DPF Components
- - ELECTRICAL CONNECTOR
- - PRESSURE DIFFERENTIAL SENSOR
- - MOUNTING BOLT
- - UPSTREAM PRESSURE TUBE
- - DPF
- - DOWNSTREAM PRESSURE TUBE
- - TUBING
12. Install the DPF (5) , gasket and clamp to the turbocharger. Tighten the clamp nut to 35 N.m (25 ft. lbs.).
13. Install the upper pressure differential tubing (4) into the DPF (5). Tighten the tubing to 45 N.m (33 ft.lbs.).
14. Attach the lower temperature sensor wires to their retainer.
15. Install the oxygen sensor into the top of the DPF (5). Tighten to 45 N.m (33 ft. lbs.).
16. Connect the oxygen sensor electrical connector at the DPF (5).
17. Install the upper temperature sensor to the DPF (5). Tighten the sensor to 45 N.m (33 ft.lbs.).
18. Connect the temperature sensor electrical connectors.
19. Install the right side rear engine harness bracket. Tighten the bolts to 10 N.m (89 in. lbs.).
20. Install the DPF heat shield upper mounting bolts. Tighten the bolts to 5 N.m (44 in. lbs.).
21. Install the differential pressure sensor tube bracket at the diesel particulate filter (DPF) (5).
22. Install the HVAC air intake box assembly.
23. Install the eight nuts to the strut tower brace. Tighten the sensor to 55 N.m (41 ft.lbs.).
24. Install the windshield wiper arm linkage.
25. Install the engine cover.
26. Connect the negative battery cable.
27. Start vehicle and check for leaks. Repair as necessary.
 Removal
DIESEL PARTICULATE FILTER
Fig. 8: DPF Components
- ELECTRICAL CONNECTOR
- PRESSURE DIFFERENTIAL SENSOR
- MOUNTING BOLT
- UPSTREAM PRESSURE TUBE
- DPF
- DOWNSTREAM PRESSURE TUBE
- TU ...
 Muffler, exhaust
REMOVAL
MUFFLER
Fig. 16: Muffler/Exhaust Pipe Assembly - Single Tail Pipe
- INSULATOR
- MUFFLER/EXHAUST PIPE ASSEMBLY
- BAND CLAMP
NOTE: Band clamps (3) are spot welded to exhaust sy ...
See also:
Description
Fig. 46: Left Multifunction Switch
The left (lighting) multi-function switch is located on the left side of the
steering column, just below the steering wheel. This switch is the primary
contro ...
Removal, Installation
REMOVAL
WARNING: To avoid serious or fatal injury on vehicles equipped
with airbags, disable
the Supplemental Restraint System (SRS) before attempting any steering
wheel, steering co ...
Removal
1. Raise and support the vehicle.
NOTE: Perform 2 through 5 on each side of the vehicle to complete pad
set
removal.
Fig. 117: TIRE AND WHEEL MOUNTING
2. Remove the wheel mounting nuts ...
