Dodge Journey: Muffler, exhaust
REMOVAL
MUFFLER
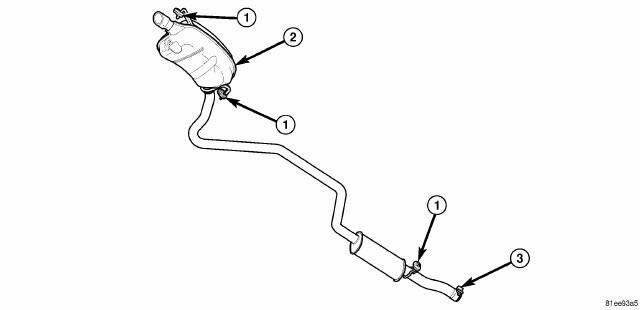
Fig. 16: Muffler/Exhaust Pipe Assembly - Single Tail Pipe
- - INSULATOR
- - MUFFLER/EXHAUST PIPE ASSEMBLY
- - BAND CLAMP
NOTE: Band clamps (3) are spot welded to exhaust system. If a band clamp must be replaced, the spot weld must be ground off the exhaust pipe.
NOTE: When replacement is required on any component of the exhaust system, it is most important that original equipment parts (or their equivalent) be used.

Fig. 17: Muffler/Exhaust Pipe Assembly - Dual Tail Pipe
- - INSULATOR
- - MUFFLER/EXHAUST PIPE ASSEMBLY
- - BAND CLAMP
1. Raise vehicle on hoist.
2. Apply penetrating oil to band clamp (3).
3. Remove band clamp (3).
4. Remove ground strap from muffler (2).
CAUTION: Do not use any tools to remove the rubber isolators-remove by hand only. Soapy water or silicone based lubricant spray may be used to assist removal/installation of isolators. DO NOT use a petroleum based lubricant on the isolators, as damage to the rubber material can occur.
5. Remove support isolators from muffler supports.
6. Remove the one muffler/resonator assembly.
INSTALLATION
MUFFLER
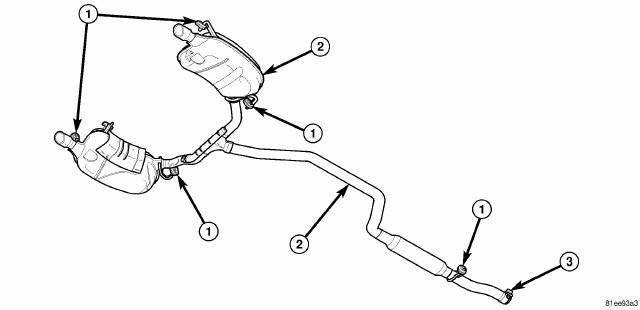
Fig. 18: Muffler/Exhaust Pipe Assembly - Dual Tail Pipe
- - INSULATOR
- - MUFFLER/EXHAUST PIPE ASSEMBLY
- - BAND CLAMP
NOTE: Always work from the front to rear of exhaust system when aligning and tightening exhaust system components.

Fig. 19: Muffler/Exhaust Pipe Assembly - Single Tail Pipe
- - INSULATOR
- - MUFFLER/EXHAUST PIPE ASSEMBLY
- - BAND CLAMP
1. Position muffler/resonator assembly (2) onto exhaust pipe.
2. Install support isolators.
3. Align muffler and resonator assembly to maintain position and proper clearance with underbody parts.
All support isolators should have equal load on them.
4. Install new band clamp (3). Tighten to 54 N.m (40 ft. lbs.).
5. Connect ground strap to muffler (2).
6. Lower vehicle.
7. Start the engine and inspect for exhaust leaks. Repair exhaust leaks as necessary.
8. Check the exhaust system for contact with the body panels. Make the necessary adjustments, if needed.
 Installation
DIESEL PARTICULATE FILTER
Fig. 12: Engine Support Bracket Bolts
1. Position the DPF and turbocharger gasket into the vehicle. Do not tighten
at this time
2. Tighten the three bolts (1) at the ...
 Pipe, exhaust
REMOVAL
2.7L/3.5L
Fig. 20: Exhaust Pipe - 2.7L/3.5L
- EXHAUST PIPE
- NUTS
- CROSS UNDER PIPE
- GASKET
WARNING: The normal operating temperature of the exhaust system is
ver ...
See also:
Installation
CAUTION: Be certain to adjust the refrigerant oil level when
servicing the A/C
refrigerant system. Failure to properly adjust the refrigerant
oil level will prevent the A/C system fro ...
Manifold, intake
Diagnosis and Testing
INTAKE MANIFOLD LEAKS
An intake manifold air leak is characterized by lower than normal manifold
vacuum. Also, one or more
cylinders may not be functioning.
WARNING: ...
Removal, Installation
REMOVAL
1. Remove transmission and torque converter from vehicle.
2. Place a suitable drain pan under the converter housing end of the
transmission.
CAUTION: Verify that transmission is ...
