Dodge Journey: Standard procedure
DRAINING
When servicing the cooling system, it is essential that coolant does not drip onto the accessory drive belts and/or pulleys. Shield the belts with shop towels before working on the cooling system. If coolant contacts the belts or pulleys, flush both with clean water.
WARNING: Make sure engine cooling system is cool before servicing. Do not remove any clamps or hoses , pressure cap, or open the radiator draincock. When the system is hot and under pressure serious burns from coolant can occur.
1. Position a clean collecting container under draincock location.
2. Open radiator draincock located at the lower right side of radiator. Turn draincock counterclockwise until it stops.
3. Remove coolant pressure cap.
4. Raise vehicle on hoist.
5. 2.7L/3.5L: Remove heater hose at heater tube located at the right front inner frame rail and direct coolant flow into container.
FILLING
NOTE: Make sure all hoses are connected and radiator draincock is closed. Draincock should be hand tightened only.
2.4L
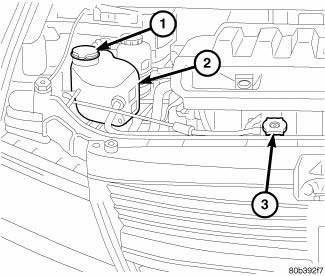
Fig. 6: Cooling System Filling - 2.4L
- - COOLANT RECOVERY CONTAINER
- - FILL LINE
- - RADAITOR PRESSURE CAP
1. Close radiator draincock by turning clockwise.
2. Remove cooling system pressure cap and fill cooling system with recommended coolant mixture.
3. Fill coolant to the top of pressure cap neck.
4. Install cooling system pressure cap.
5. Fill coolant recovery container to the MAX mark.
6. Start engine and allow to run until thermostat opens and radiator fans cycle.
NOTE: It may be necessary to add additional coolant to the coolant recovery container after three or four warm-up/cool down cycles to maintain coolant level between the MIN and MAX marks; as additional trapped air is removed from the system.
2.7L/3.5L/2.0L
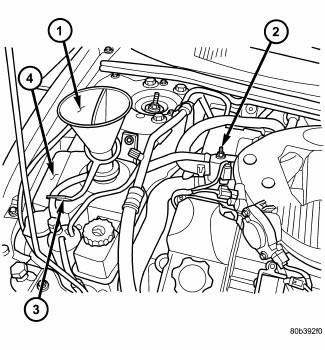
Fig. 7: Cooling System Filling - 2.7L
- - SPECIAL TOOL 8195
- - COOLING SYSTEM BLEED VALVE
- - PINCH OVERFLOW HOSE
- - COOLANT PRESSURE CONTAINER
NOTE: Draincock should be hand tightened only.
1. Close radiator draincock by turning clockwise.
NOTE: It is imperative that the cooling system air bleed valve be opened before any coolant is added to the cooling system. Failure to open the bleed valve first will result in an incomplete fill of the system.
2. Open cooling system bleed valve.
3. Attach a 6.35 mm (0.250 in.) inside diameter clear hose that is 120.0 cm (48 in.) long to the bleed valve.
Route the hose away from accessory drive belts and radiator fan. Position the other end of hose into a clean collecting container. The hose will prevent coolant from contacting accessory drive belts and other components.
4. Remove cooling system pressure cap. Attach Filling Aid Funnel 8195, to coolant pressure container filler neck.
5. Use the supplied clip to pinch overflow hose that connects between the two chambers of the pressure container.
6. Pour coolant into the larger section of Filling Aid Funnel (the smaller section of funnel is to allow air to escape).
7. Slowly continue filling until a steady stream of coolant flows from attached hose on bleed valve.
8. Close bleed valve and continue filling system to top of Filling Aid Funnel. DO NOT overtighten. Tighten to 12.4 N.m (110 lbs. in.).
9. Remove clip from overflow hose.
10. Allow coolant in Filling Aid Funnel to drain into overflow chamber of pressure container.
11. Remove Filling Aid Funnel 8195 and install pressure cap on pressure container.
12. Remove hose from bleed valve.
13. Start engine and allow to run until thermostat opens and radiator fans cycle.
NOTE: The engine cooling system will push any remaining air into the pressure container within about one half hour of normal driving. As a result, a drop in coolant level in the pressure container may occur.
If the engine cooling system overheats and pushes coolant into the overflow chamber of the pressure container, this coolant will be sucked back into the cooling system ONLY IF THE PRESSURE CAP IS LEFT ON THE PRESSURE CONTAINER. Removing the pressure cap breaks the vacuum path between the two chambers of the pressure container and the coolant will not return to the cooling system.
14. Shut off engine and allow it to cool down. This permits coolant to be drawn into the pressure chamber.
15. With engine COLD, observe coolant level in pressure chamber. Coolant level should be within MIN and MAX marks. Adjust coolant level as necessary.
LEVEL CHECK
NOTE: Do not remove pressure cap for routine coolant level inspections.
The coolant bottle provides a quick visual method for determining the coolant level without removing the pressure cap. With the engine cold and not running , simply observe the level of the coolant in the coolant recovery container. The level should be between the MIN and MAX marks.
ADDING ADDITIONAL COOLANT
NOTE: 2.4L - The pressure cap should only be removed if the coolant recovery container is empty.
When additional coolant is needed, it should be added to the coolant recovery container, 2.4L, pressurized coolant recovery container, 2.7L, 3.5L, and 2.0L Diesel.
REVERSE FLUSHING
REVERSE FLUSHING DESCRIPTION
Reverse flushing of the cooling system is the forcing of water through the cooling system. This is done using air pressure in the opposite direction of normal coolant flow. It is usually only necessary with very dirty systems with evidence of partial plugging.
REVERSE FLUSHING RADIATOR
Disconnect the radiator hoses from the radiator inlet and outlet. Attach a section of the radiator hose to the radiator bottom outlet fitting and insert the flushing gun. Connect a water supply hose and air supply hose to the flushing gun.
CAUTION: Internal radiator pressure must not exceed 138 kPa (20 psi) as damage to radiator may result.
Allow the radiator to fill with water. When the radiator is filled, apply air in short blasts. Allow the radiator to refill between blasts. Continue this reverse flushing until clean water flows out through the rear of the radiator cooling tube passages.
REVERSE FLUSHING SYSTEM
Drain the cooling system. Remove the thermostat housing and thermostat. Install the thermostat housing.
Disconnect the radiator upper hose from the radiator and attach the flushing gun to the hose. Disconnect the radiator lower hose from the water pump and attach a lead-away hose to the water pump inlet fitting.
Connect the water supply hose and air supply hose to flushing gun. Allow the engine to fill with water. When the engine is filled, apply air in short blasts, allowing the system to fill between air blasts. Continue until clean water flows through the lead away hose.
Remove the lead away hose, flushing gun, water supply hose and air supply hose. Remove the thermostat housing and install the thermostat. Install the thermostat housing with a replacement gasket. Connect the radiator hoses. Refill the cooling system with the correct antifreeze/water mixture.
CHEMICAL CLEANING
In some instances, use a radiator cleaner (Mopar Radiator Kleen or equivalent) before flushing. This will soften scale and other deposits and aid flushing operation.
CAUTION: Follow manufacturers instructions when using these products.
 Flow check
To determine whether coolant is flowing through the cooling system, use one
of the following procedures:
PREFERRED METHOD
WARNING: Do not remove the cooling system pressure cap or any hose ...
 Cleaning, Inspection
CLEANING
Drain cooling system and refill with clean water. Refer to drain and fill
procedures in this service information .
Run engine with radiator cap installed until upper radiator hose is ho ...
See also:
Description, Diagnosis and Testing
DESCRIPTION
The inner joints of both half shaft assemblies are tripod joints. The outer
joints of both assemblies are Rzeppa
Joints. The tripod joints are true constant velocity (CV) joint assembl ...
Operation
The left (lighting) multi-function switch uses resistor multiplexing to
control the many functions and features it
provides using a minimal number of hard wired circuits. The switch receives
clea ...
Installation
FOOT OPERATED PARKING BRAKE LEVER
Fig. 234: FOOT LEVER MOUNTING
1. Position the parking brake lever (1) over the mounting studs, against the
left lower cowl (3).
2. Install the three mounting ...
