Dodge Journey: Insulator, engine mount, left
Removal

Fig. 228: Belly Pan
1. Disconnect and isolate the negative battery cable.
2. Remove throttle body air inlet hose and air cleaner housing assembly.
3. Remove the belly pan (2).
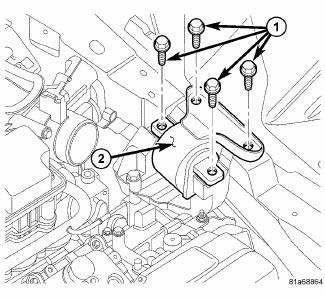
Fig. 229: Left Mount Vertical Bolts
4. Support transmission with floor jack and wooden block.
5. Remove the vertical bolts (1) from the left mount (2) to transmission bracket.
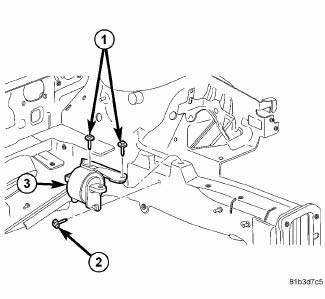
Fig. 230: Mount Isolator Bolts
6. Slightly lower transmission with floor jack to gain access to mount to frame rail fastener (2).
7. Remove mount isolator (3).
Installation

Fig. 231: Mount Isolator Bolts
1. Position mount isolator (3) in place, install bolts (1, 2) and tighten to 50 N.m (37 ft. lbs.).

Fig. 232: Identifying Left Engine Mount
2. Raise transaxle into position, install bolts (2) and tighten to 98 N.m (72 ft. lbs.).
3. Remove floor jack and wooden block.
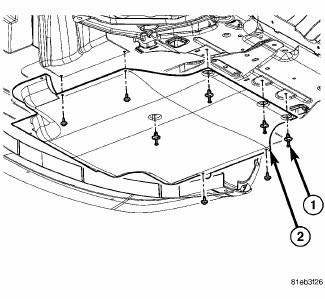
Fig. 233: Belly Pan
4. Install belly pan (2).
5. Install throttle body air inlet hose and air cleaner housing assembly.
6. Connect negative battery cable.
 Insulator, engine mount, front
Removal
1. Raise vehicle.
Fig. 222: Belly Pan
- belly pan fasteners
- belly pan
2. Remove the belly pan (2).
Fig. 223: Front Engine Mount Through Bolt
3. Remove front mount to bracket ...
 Insulator, engine mount, rear
Removal
Fig. 234: Belly Pan
1. Remove throttle body air inlet hose and air cleaner housing assembly.
2. Raise the vehicle.
3. Remove the belly pan (2).
Fig. 235: Identifying Rear Mount B ...
See also:
Diagnosis and testing
BATTERY CABLES
A voltage drop test will determine if there is excessive resistance in the
battery cable terminal connections or
the battery cable. If excessive resistance is found in the battery c ...
Installation
2.7L ENGINE
Fig. 32: Maniverter To Cross Under Fasteners
1. Install the cross under pipe (3). and the front maniverter-to-cross under
fasteners (1) and (2). Tighten to
27 Nm (20 ft. lb.).
Fi ...
WINDSHIELD WIPERS AND WASHERS
The windshield wiper/washer control lever is located on
the right side of the steering column. The front wipers are
operated by rotating a switch, located at the end of the
lever. For information o ...
