Dodge Journey: Sensor, infrared temperature
DESCRIPTION

Fig. 37: Infrared Sensor
The infrared temperature sensor is located in the overhead console and consists of an infrared transducer concealed behind a clear lens (2) in a molded plastic housing with an integral wire connector receptacle (1) and mounting tab (3).
The infrared sensor is used only on models equipped with the automatic temperature control (ATC) heating- A/C system.
OPERATION
The infrared sensor detects thermal radiation emitted by the driver and front passenger seat occupants and surroundings and converts its data into a linear Pulse Width Modulated (PWM) output signal which is read by the Automatic Temperature Control (ATC) A/C-heater control. The ATC A/C-heater control uses the infrared sensor data as one of the inputs necessary to automatically control the interior cabin temperature levels. By using thermal radiation (surface temperature) measurement, rather than an air temperature measurement, the ATC heating-A/C system is able to adjust itself to the comfort level as perceived by the occupants. This allows the ATC system to compensate for other ambient conditions affecting comfort levels, such as solar heat gain or evaporative heat loss.
The ATC system logic responds to the infrared sensor message by calculating and adjusting the air flow temperature and air flow rate needed to properly obtain and maintain the selected comfort level temperature of the occupants. The A/C-heater control continually monitors the infrared sensor circuits, and will store Diagnostic Touble Codes (DTCs) for any problem it detects.
The infrared sensor is diagnosed using a scan tool. The infrared sensor cannot be adjusted or repaired and must be replaced if inoperative or damaged.
REMOVAL
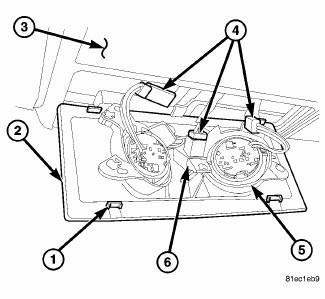
Fig. 38: Infrared Sensor
1. Disconnect and isolate the negative battery cable.
2. Using Trim Stick C-4755 or equivalent, carefully disengage the four retaining tabs (1) that secure the infrared sensor and overhead map/courtesy lamp bezel (2) to the overhead console (3).
3. Disconnect the wire harness connectors (4) from the two overhead map/courtesy lamps (5) and the infrared sensor (6) and remove the sensor, lamp and bezel assembly from the vehicle
INSTALLATION

Fig. 39: Infrared Sensor
1. Position the infrared sensor and overhead map/courtesy lamp bezel (2) to the overhead console (3).
2. Connect the wire harness connectors (4) to the two overhead map/courtesy lamps (5) and the infrared sensor (6).
3. Engage the four retaining tabs (1) that secure the infrared sensor and overhead map/courtesy lamp bezel to the overhead console. Make sure the retaining tabs are fully engaged.
4. Reconnect the negative battery cable.
 Sensor, evaporator temperature
DESCRIPTION
Fig. 34: Evaporator Temperature Sensor-Description
The evaporator temperature sensor measures the temperature of the conditioned
air downstream of the A/C
evaporator. The evaporator ...
 Sensor, sun
DESCRIPTION
Fig. 40: Sensor-Sun
NOTE: Typical sun sensor assembly shown.
The automatic temperature control (ATC) heating-A/C system uses a sun sensor
assembly (1) to measure sun
light int ...
See also:
Installation
LEFT-HAND-DRIVE
Fig. 35: BOOSTER SEAL
NOTE: Before power brake booster (1) installation, be certain a NEW
dash seal (2) is
installed on the booster mounting studs.
Fig. 36: PEDAL AND ...
WINDOWS
Power Windows
The window controls on the driver’s door trim panel
control all of the door windows.
Power Window Switches
There are single window controls on each passenger door
trim panel, wh ...
PUBLICATION ORDER FORMS
To order the following manuals, you may use either the
website or the phone numbers listed below. Visa, Mastercard,
American Express, and Discover orders are accepted.
If you prefer mailing your pa ...
