Dodge Journey: Insulator, engine mount, rear
Removal

Fig. 234: Belly Pan
1. Remove throttle body air inlet hose and air cleaner housing assembly.
2. Raise the vehicle.
3. Remove the belly pan (2).
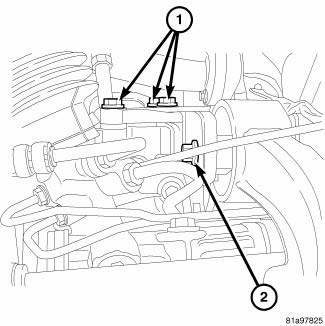
Fig. 235: Identifying Rear Mount Bracket-To-Transaxle Case Bolts
4. Remove three vertical bolts (1) attaching rear mount bracket to transaxle case.
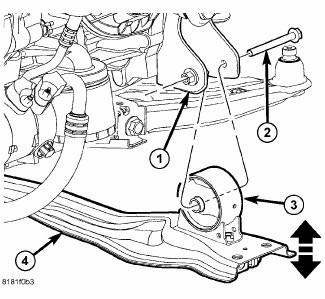
Fig. 236: Front Engine Mount Through Bolt
5. Loosen the front mount through bolt (2).
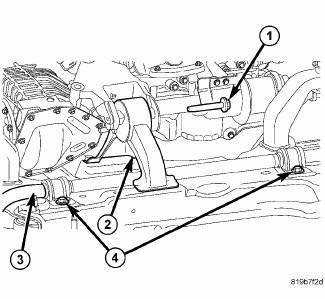
Fig. 237: Rear Engine Mount & Transaxle Bracket
6. Remove rear mount bracket through bolt (1).
7. Remove rear mount bracket from transaxle case.
8. Remove rear isolator to suspension crossmember attaching bolts.
9. Remove rear isolator (2).
Installation

Fig. 238: Rear Isolator On Suspension Crossmember
1. Position rear isolator (2) on suspension crossmember and loosely install bolts.

Fig. 239: Identifying Rear Mount Bracket-To-Transaxle Case Bolts
2. Position rear mount bracket on transaxle and install bolts (1). Tighten bolts to 95 N.m (70 ft. lbs.).
3. Tighten rear isolator to suspension crossmember bolts to 61 N.m (45 ft. lbs.).

Fig. 240: Rear Isolator On Suspension Crossmember
NOTE: Be sure the weight of the engine is static and in rest position.
4. Install rear mount bracket to rear isolator through bolt (1) and tighten to 75 N.m (55 ft. lbs.).

Fig. 241: Front Engine Mount Through Bolt
5. Tighten front mount through bolt (2) to 75 N.m (55 ft. lbs.).
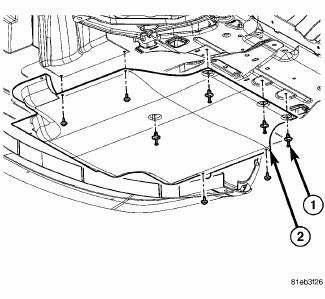
Fig. 242: Belly Pan
6. Install the belly pan (2).
7. Install throttle body air inlet hose and air cleaner housing assembly.
 Insulator, engine mount, left
Removal
Fig. 228: Belly Pan
1. Disconnect and isolate the negative battery cable.
2. Remove throttle body air inlet hose and air cleaner housing assembly.
3. Remove the belly pan (2).
...
 Insulator, engine mount, right
Removal
Fig. 243: Belly Pan
1. Remove the belly pan (2).
Fig. 244: Right Engine Mount
2. Lower vehicle. Remove the load on the engine motor mounts by carefully
supporting the engine assembly ...
See also:
Description, Diagnosis and Testing
DESCRIPTION
This vehicle is equipped with either an equal length halfshaft system,
consisting of short halfshafts on both sides
with an intermediate drive shaft on the right side, or an unequal le ...
Pod, switch
DESCRIPTION
Fig. 10: Accessory Switch Bank Module
The Accessory Switch Bank Module (ASBM) is located in the center stack area
of the instrument panel just
below the heater and air conditioner d ...
Horn
REMOVAL
Fig. 1: Removing / Installing Horns
1. Disconnect and isolate the negative battery cable.
2. Remove the push pin type retainers along the top of the grille assembly and
position the g ...
