Dodge Journey: Lamp, fog, rear export
Removal
BULB

Fig. 11: Rear Fascia Wire Harness Connector
1. Disconnect and isolate the battery negative cable.
2. Remove the rear fog lamp from the rear fascia.
3. Disconnect the rear fascia wire harness connector (1) from the rear fog lamp bulb connector receptacle.
4. Firmly grasp the bulb (2) by the two latch features and squeeze them together to unlock the bulb from the back of the rear fog lamp housing.
5. Pull the bulb straight out from the keyed opening in the housing.
LAMP
NOTE: The following procedure applies only to vehicles manufactured for certain export markets where rear fog lamps are optional or required equipment. Rear fog lamps are not available for vehicles manufactured for North American markets.
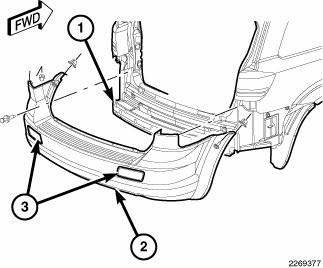
Fig. 12: Rear Bumper Reinforcement
NOTE: The rear fog lamps can be removed without removing the rear fascia. The graphic shows the fascia removed only to clearly identify the involved components.
1. Disconnect and isolate the battery negative cable.
2. From behind the rear fascia (2), reach between the body sheet metal and above the rear bumper reinforcement (1) to access the back of the rear fog lamp (3).
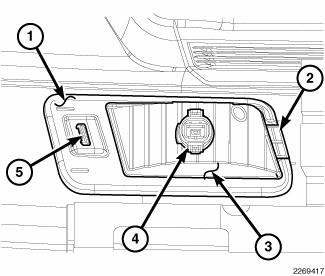
Fig. 13: Integral Latch Feature Of Rear Fog Lamp
3. Locate the integral latch feature (5) of the rear fog lamp (3) protruding through the outboard side of the rear fog lamp seat (1) integral to the rear fascia.
4. Press the latch feature toward the center of the lamp and out through the face of the rear fog lamp seat of the rear fascia.
5. From the face of the rear fascia, pull the lamp outboard far enough to disengage the integral interlocking tab mounting feature (2) from behind the inboard side of the rear fog lamp seat of the fascia.
6. Pull the rear fog lamp out from the rear fascia far enough to access and disconnect the rear fascia wire harness connector from the rear fog lamp bulb connector receptacle (4) on the back of the lamp.
7. Remove the rear fog lamp from the vehicle.
Installation
BULB
CAUTION: Always use the correct bulb size and type for replacement. An incorrect bulb size or type may overheat and cause damage to the lamp, the socket or the lamp wiring.
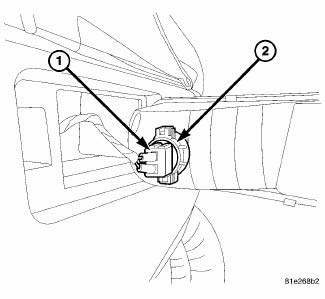
Fig. 14: Rear Fascia Wire Harness Connector
1. Align the index tabs of the rear fog lamp bulb (2) with the slots in the collar of the bulb opening on the back of the rear fog lamp housing.
2. Insert the bulb into the housing until the index tabs are engaged in the slots of the collar.
3. Firmly and evenly push the bulb straight into the lamp housing until both bulb latch features snap into place and are fully engaged.
4. Reconnect the rear fascia wire harness connector (1) to the rear fog lamp bulb connector receptacle.
5. Reinstall the rear fog lamp into the rear fascia. 6. Reconnect the battery negative cable.
LAMP
NOTE: The following procedure applies only to vehicles manufactured for certain export markets where rear fog lamps are optional or required equipment. Rear fog lamps are not available for vehicles manufactured for North American markets.

Fig. 15: Integral Latch Feature Of Rear Fog Lamp
1. From the face of the rear fascia, position the rear fog lamp (3) close enough to the rear fog lamp seat (1) to access and reconnect the rear fascia wire harness connector to the rear fog lamp bulb connector receptacle (4).
2. Engage the integral interlocking tab mounting feature (2) behind the inboard side of the rear fog lamp seat of the fascia.
3. Align the integral latch feature (5) on the outboard side of the rear fog lamp housing with the clearance hole in the rear fog lamp seat of the fascia.
4. Using hand pressure, push the outboard side of the rear fog lamp firmly and evenly into the seat until the latch engages the back of the rear fascia and the lamp is fully seated.
5. Reconnect the battery negative cable.
 Lamp, fog, front
REMOVAL
BULB
CAUTION: Do not contaminate the bulb glass by touching it with
your fingers or by
allowing it to contact other oily surfaces. Shortened bulb life will
result.
...
 Lamp, license plate
REMOVAL
BULB
Fig. 16: License Plate Lamp Bulb Socket
1. Disconnect and isolate the battery negative cable.
2. Remove the license plate lamp from the underside of the liftgate handle and
ligh ...
See also:
Seal, oil pump
REMOVAL
Fig. 367: Removing Oil Pump Seal
- SEAL PULLER C-3981-B
- OIL PUMP SEAL
1. Remove transaxle from vehicle.
2. Using Seal Puller C-3981B (1) , remove oil pump seal (2).
INSTALLA ...
Installation
1. Guide the trailing end of the parking brake cable along the inboard side
of the axle trailing arm up to the
rear brake caliper. Make sure the cable is routed between the brake line and the
tra ...
Installation
NOTE: Before stabilizer bar installation, inspect the cushions and
links for excessive
wear, cracks, damage and distortion. Replace any pieces failing inspection.
NOTE: Before installing the ...
