Dodge Journey: Lamp, license plate
REMOVAL
BULB

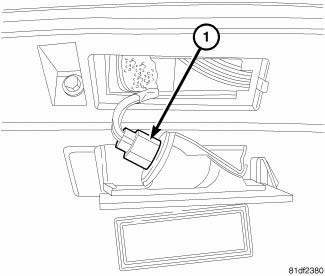
Fig. 16: License Plate Lamp Bulb Socket
1. Disconnect and isolate the battery negative cable.
2. Remove the license plate lamp from the underside of the liftgate handle and light bar assembly.
3. Pull the base of the bulb straight out of the license plate lamp bulb socket (1).
LAMP

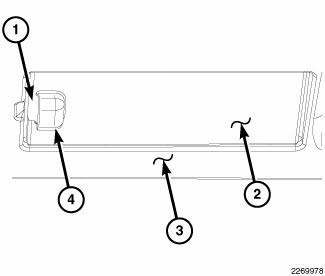
Fig. 17: License Plate Lamps
1. Disconnect and isolate the battery negative cable.
2. Locate the two license plate lamps (2) on the underside of the liftgate handle and light bar assembly (3) above the license plate tub on the liftgate outer panel.
3. Insert the end of a trim stick or a small screwdriver into the open end of the hood formation (4) on one end of the lamp lens to depress the latch tab (1) and pull that end of the lamp down from the handle and light bar assembly.
4. Pull the lamp towards the center of the vehicle far enough to disengage the lamp interlocking tab mounting feature from the outboard edge of the mounting hole.
5. Pull the lamp out of the mounting hole far enough to access the lamp wiring and bulb socket on the top of the lamp housing.
6. Firmly grasp the socket and rotate it counterclockwise about 30 degrees to unlock it.
7. Pull the socket and bulb straight out from the keyed opening in the lamp housing.
8. Remove the lamp from the vehicle.
INSTALLATION
BULB
CAUTION: Always use the correct bulb size and type for replacement. An incorrect bulb size or type may overheat and cause damage to the lamp, the socket or the lamp wiring.

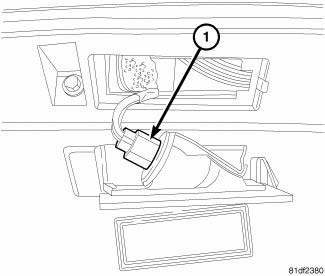
Fig. 18: License Plate Lamp Bulb Socket
1. Align the base of the license plate lamp bulb with the socket (1).
2. Push the bulb straight into the socket until the base is firmly seated.
3. Align the socket and bulb with the keyed opening on the top of the license plate lamp housing.
4. Insert the bulb and socket into the housing until the socket is firmly seated.
5. Rotate the socket clockwise about 30 degrees to lock it into place.
6. Reinstall the lamp into the mounting hole on the underside of the liftgate handle and light bar assembly.
LAMP

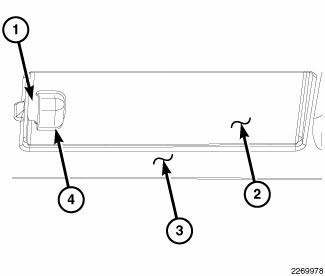
Fig. 19: License Plate Lamps
1. Position the license plate lamp (2) to the underside of the liftgate handle and light bar assembly (3).
2. Align the socket and bulb with the keyed opening on the top of the lamp housing.
3. Insert the bulb and socket into the housing until the socket is firmly seated.
4. Rotate the socket clockwise about 30 degrees to lock it into place.
5. Engage the lamp interlocking tab mounting feature at the end of the lamp housing opposite from the hooded (4) latch (1) with the outboard edge of the mounting hole in the handle and light bar assembly.
6. Push the lamp toward the outboard side of the vehicle while pushing the inboard end of the lamp firmly and evenly into the mounting hole until the lamp latch feature snaps into place.
7. Reconnect the battery negative cable.
 Lamp, fog, rear export
Removal
BULB
Fig. 11: Rear Fascia Wire Harness Connector
1. Disconnect and isolate the battery negative cable.
2. Remove the rear fog lamp from the rear fascia.
3. Disconnect the rear fa ...
 Lamp, side repeater, export
REMOVAL
BULB
NOTE: Side repeater lamps are used only on vehicles manufactured for
certain export
markets where they are required.
Fig. 20: Remove/Install Repeater Lamp Bulb
1. Disconne ...
See also:
Description, Operation
DESCRIPTION
CAUTION: Grid lines can be damaged or scraped off with sharp
instruments. Care
should be taken in cleaning glass or removing foreign materials, decals or
stickers. Normal glass ...
Vehicle emission control information label, trip definition
VEHICLE EMISSION CONTROL INFORMATION LABEL
All vehicles have a Vehicle Emission Control Information (VECI) Label.
Chrysler permanently attaches the
label in the engine compartment. It cannot be re ...
Pulley, idler
Removal
2.4L ENGINE
Fig. 30: ACCESSORY DRIVE BELT IDLER PULLEY - 2.4L
- UPPER PULLEY
- LOWER PULLEY
1. Remove accessory drive belt.
2. Remove upper idler pulley (1) and bolt.
3. Re ...
