Dodge Journey: Lamp, fog, front
REMOVAL
BULB
CAUTION: Do not contaminate the bulb glass by touching it with your fingers or by allowing it to contact other oily surfaces. Shortened bulb life will result.
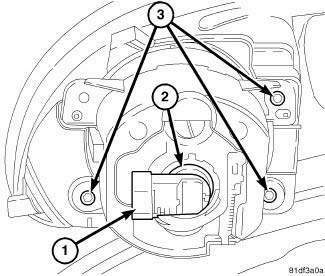
Fig. 7: Front Fog Lamp Bulb Connector Receptacle
1. Disconnect and isolate the battery negative cable.
2. Remove the lower inner front wheel house splash shield.
3. Disconnect the headlamp and dash wire harness connector from the front fog lamp bulb (2) connector receptacle (1).
4. Firmly grasp the bulb on the back of the front fog lamp housing and rotate it counterclockwise about 30 degrees to unlock it.
5. Pull the bulb straight out from the keyed opening in the housing.
LAMP

Fig. 8: Front Fog Lamp Bulb Connector Receptacle
1. Disconnect and isolate the battery negative cable.
2. Remove the lower inner front wheel house splash shield.
3. Disconnect the headlamp and dash wire harness connector from the front fog lamp bulb (2) connector receptacle (1).
4. Remove the three screws (3) that secure the front fog lamp mounting bracket to the fog lamp bezel on the back of the lower front fascia.
5. Remove the front fog lamp from the vehicle.
INSTALLATION
BULB
CAUTION: Always use the correct bulb size and type for replacement. An incorrect bulb size or type may overheat and cause damage to the lamp, the socket or the lamp wiring.
CAUTION: Do not contaminate the bulb glass by touching it with your fingers or by allowing it to contact other oily surfaces. Shortened bulb life will result.

Fig. 9: Front Fog Lamp Bulb Connector Receptacle
1. Align the front fog lamp bulb (2) with the keyed opening on the back of the front fog lamp housing.
2. Insert the bulb into the housing until it is firmly seated.
3. Rotate the bulb clockwise about 30 degrees to lock it into place. The bulb connector receptacle should be pointed outboard and horizontal in orientation.
4. Reconnect the headlamp and dash wire harness connector to the front fog lamp bulb connector receptacle (1).
5. Reinstall the lower inner front wheel house splash shield. 6. Reconnect the battery negative cable.
LAMP

Fig. 10: Front Fog Lamp Bulb Connector Receptacle Screw
1. Position the front fog lamp mounting bracket to the fog lamp bezel on the back of the lower front fascia.
2. Install and tighten the three screws (3) that secure the mounting bracket to the bezel. Tighten the screws securely.
3. Reconnect the headlamp and dash wire harness connector to the front fog lamp bulb (2) connector receptacle (1).
4. Reinstall the lower inner front wheel house splash shield. 5. Reconnect the battery negative cable.
6. Confirm proper fog lamp alignment.
 Lamp, center high mounted stop
REMOVAL
Fig. 5: Center High Mounted Stop Lamp
1. Disconnect and isolate the battery negative cable.
2. Remove the two screws (4) that secure the Center High Mounted Stop Lamp (CHMSL)
(3) to t ...
 Lamp, fog, rear export
Removal
BULB
Fig. 11: Rear Fascia Wire Harness Connector
1. Disconnect and isolate the battery negative cable.
2. Remove the rear fog lamp from the rear fascia.
3. Disconnect the rear fa ...
See also:
REPLACEMENT PARTS
Use of genuine MOPAR parts for normal/scheduled
maintenance and repairs is highly recommended to ensure
the designed performance. Damage or failures
caused by the use of non-MOPAR parts for mainten ...
Description, Diagnosis and Testing
DESCRIPTION
This vehicle is equipped with either an equal length halfshaft system,
consisting of short halfshafts on both sides
with an intermediate drive shaft on the right side, or an unequal le ...
Heated Mirrors
DESCRIPTION
Fig. 1: Rear Window Defogger (EBL) System
NOTE: Manual tri-zone temperature A/C-heater control shown. Other
A/C-heater
controls similar.
When equipped, the heated mirror sys ...
