Dodge Journey: Mechanism, gearshift
REMOVAL

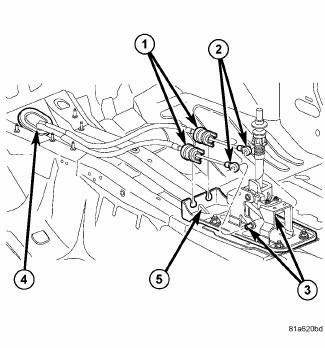
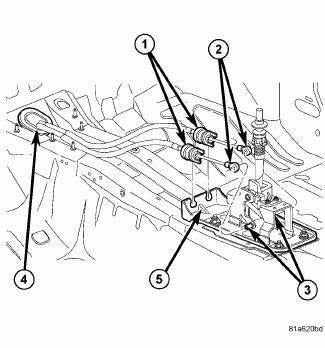
Fig. 193: Shift Cables To Shifter
1. Detach gear shift boot from console.
2. Remove the center console assembly.
3. Remove rear power window switch (if equipped) and disconnect harness from console.
4. Remove cables (2) from shift levers (3).
5. Remove the cables (1) from the bracket (5).

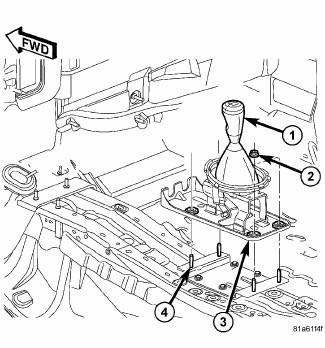
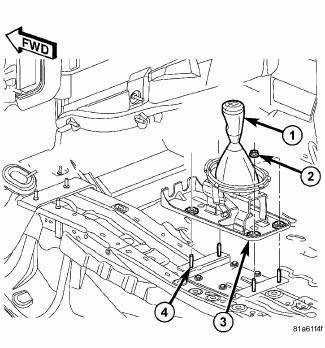
Fig. 194: Manual Transaxle Shifter
6. Remove the shifter assembly nuts (2) and remove shifter (3) from vehicle.
INSTALLATION

Fig. 195: Manual Transaxle Shifter
1. Install shifter assembly (3), Install and tighten nuts (2) to 7 N.m (61 in. lbs.).

Fig. 196: Shift Cables To Shifter
2. Install cables (2) to shifter levers (3) and secure cable to shifter bracket (5).
3. Install center console assembly.
4. Install rear power window switch (if equipped) and fasten harness to console
5. Attach gearshift boot to center console assembly.
6. Verify that shift pattern is aligned properly.
 Lever, shift
REMOVAL
Fig. 183: Air Cleaner And Inlet Tube
Remove the engine cover.
1. Disconnect battery negative cable.
2. Remove air inlet tube (2) and air cleaner assembly (4).
Fig. 184: Nut Crosso ...
 Seal, axle drive shaft
REMOVAL
Fig. 197: Axle Shaft Seal Removal
1. Remove axle shaft.
2. Insert a flat-blade pry tool (2) at outer edge of axle shaft seal (1).
3. Tap on the pry tool (2) with a small hammer and ...
See also:
Description, Operation
DESCRIPTION
Fig. 7: Blend Door Actuators
The blend door actuators (1) for the front heating-A/C system are reversible,
12-volt direct current (DC) servo
motors. Models with the front single zon ...
Actuator, recirculation door
DESCRIPTION
Fig. 15: Blend Door Actuators
The recirculation door actuator (1) is a reversible, 12 volt direct current
(DC) servo motor, which is connected
directly to the pivot shaft lever of t ...
Description
Fig. 297: Underbody Lines
Models equipped with the rear heating-A/C system use metal lines attached to
the vehicle underbody to carry
refrigerant and engine coolant to and from the rear A/C evap ...
