Dodge Journey: Lamp, side repeater, export
REMOVAL
BULB
NOTE: Side repeater lamps are used only on vehicles manufactured for certain export markets where they are required.

Fig. 20: Remove/Install Repeater Lamp Bulb
1. Disconnect and isolate the battery negative cable.
2. Remove the side repeater lamp from the fender mounting hole, but do not disconnect the wire harness connector.
3. Firmly grasp the bulb socket (1) on the back of the lamp lens/housing (4) and rotate it counterclockwise about 30 degrees to unlock it.
4. Pull the socket and bulb straight out from the keyed opening in the lamp housing.
5. Pull the base of the bulb (3) straight out of the socket.
LAMP
NOTE: Side repeater lamps are used only on vehicles manufactured for certain export markets where they are required.
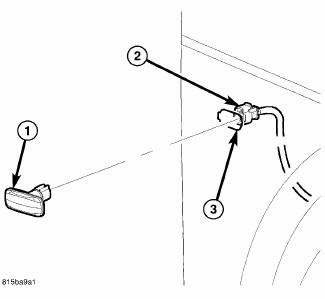
Fig. 21: Remove/Install Repeater Lamp
1. Disconnect and isolate the battery negative cable.
NOTE: The same repeater lamp is used on both sides of the vehicle. Regardless of which side of the vehicle the lamp is mounted on, when properly oriented the fixed hook interlock tab feature integral to the back of the lamp housing is on the right-hand side of the lamp and the latch feature is on the left-hand side.
2. Using hand pressure, press the right edge of the repeater lamp lens/housing (1) toward the left against the spring pressure of the latch feature, then pull the right edge of the lamp outward far enough to disengage the fixed hook interlock tab feature from the right side of the fender mounting hole (3).
3. Pull the lamp out from the fender far enough to access and disconnect the wire harness connector (2) from the connector receptacle of the bulb socket on the back of the lamp lens/housing.
4. Remove the repeater lamp from the fender.
INSTALLATION
BULB
CAUTION: Always use the correct bulb size and type for replacement. An incorrect bulb size or type may overheat and cause damage to the lamp, the socket or the lamp wiring.
NOTE: Side repeater lamps are used only on vehicles manufactured for certain export markets where they are required.
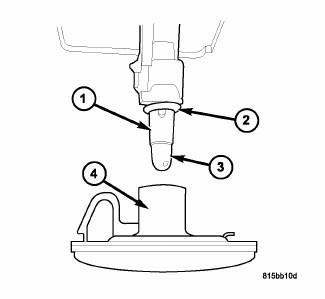
Fig. 22: Remove/Install Repeater Lamp Bulb
1. Align the base of the bulb (3) with the socket (1).
2. Push the bulb straight into the socket until the base is firmly seated.
3. Be certain that a rubber O-ring seal (2) is properly installed and in good condition around the base of the bulb socket.
4. Align the socket and bulb with the keyed opening on the back of the side repeater lamp lens/housing (4).
5. Insert the socket and bulb into the housing until the socket is firmly seated.
6. Rotate the socket clockwise about 30 degrees to lock it into place.
7. Reinstall the side repeater lamp into the fender mounting hole.
8. Reconnect the battery negative cable.
LAMP
NOTE: Side repeater lamps are used only on vehicles manufactured for certain export markets where they are required.

Fig. 23: Remove/Install Repeater Lamp
1. Position the repeater lamp lens/housing (1) close enough to the fender mounting hole (3) to access and reconnect the wire harness connector (2) to the bulb socket on the back of the lamp lens/housing.
NOTE: The same repeater lamp is used on both sides of the vehicle. Regardless of which side of the vehicle the lamp is mounted on, when properly oriented the fixed hook interlock tab features integral to the back of the lamp housing is on the right-hand side of the lamp and the latch feature is on the left-hand side.
2. With the lamp lens/housing properly oriented, engage the fixed hook interlock tab feature on the back of the right side of the lamp with the right edge of the fender mounting hole.
3. Using hand pressure, press the left side of the lamp lens/housing into the mounting hole against the spring pressure of the latch feature until the latch snaps into place.
4. Reconnect the battery negative cable.
 Lamp, license plate
REMOVAL
BULB
Fig. 16: License Plate Lamp Bulb Socket
1. Disconnect and isolate the battery negative cable.
2. Remove the license plate lamp from the underside of the liftgate handle and
ligh ...

See also:
CARGO AREA FEATURES
Rechargeable Flashlight — If Equipped
The rechargeable LED flashlight stores in its charging
station in the left rear quarter trim panel. To remove it,
press on the indent on the side of the flas ...
Reservoir, brake master cylinder
Removal
CAUTION: If at any time the master cylinder is loosened or
removed, you must
perform the master cylinder installation procedure to ensure that the
seal
(o-ring) is still ...
Duct, instrument panel
Removal
WARNING: Disable the airbag system before attempting any steering
wheel, steering
column or instrument panel component diagnosis or service. Disconnect
and isolate the negati ...
