Dodge Journey: Description
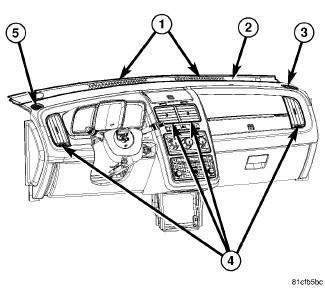
Fig. 142: Instrument Panel Outlets
There are two defroster air outlets (1) in the defroster grille (2) located at the top of the instrument panel. The airflow from the defroster outlets are directed by fixed vanes in the grille and cannot be adjusted. The defroster air outlets are not serviceable from the defroster grille.
There are two side window demister air outlets (3 and 5). One located on each end of the instrument panel. The airflow from the side window demister air outlets is directed by fixed vanes and cannot be adjusted. The side window demister air outlets can be serviced separately from the instrument panel.
There are four instrument panel air outlets (4). One air outlet is located near each outboard end of the instrument panel facing the rear of the vehicle and two air outlets are located at the top of the instrument panel center bezel.
Each of the instrument panel air outlets contain movable vanes that can direct or shut off the flow of the conditioned air leaving the outlets. The instrument panel air outlets can be serviced separately from the instrument panel.
Some models with A/C are equipped with a cooled beverage storage bin located in the instrument panel.
Vehicles so equipped have an outlet, which, when opened with the A/C on, allows cooled air to flow into the bin.

 Removal
BEVERAGE COOLER
WARNING: Disable the airbag system before attempting any steering
wheel, steering
column, or instrument panel component diagnosis or service. Disconnect
and isolate t ...
See also:
Standard procedure
REFRIGERANT SYSTEM SERVICE EQUIPMENT
WARNING: Refer to the applicable warnings and cautions for this
system before
performing the following operation. Failure to follow these instructio ...
Switch, backup lamp
REMOVAL
Fig. 249: Back-Up Lamp Switch
1. Disconnect battery negative cable.
2. Raise vehicle on hoist.
3. Disconnect backup lamp switch connector.
4. Remove backup lamp switch (1).
INSTA ...
Description, Operation
DESCRIPTION
OPERATION
The following procedure has been established to assist technicians in the
field with enabling and running OBD
II Monitors. The order listed in the following procedur ...
