Dodge Journey: Removal
WARNING: Refer to the applicable warnings and cautions for this system before performing the following operation. Failure to follow these instructions may result in serious or fatal injury.
NOTE: The rear heater-A/C housing must be removed from the vehicle for service of the mode door actuator and blend door actuator and it must be disassembled for service of the A/C evaporator and the heater core.
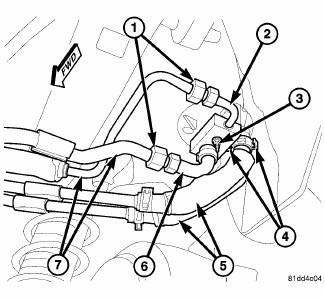
Fig. 162: Underbody Lines to Rear Housing
1. Disconnect and isolate the negative battery cable.
2. Recover the refrigerant from the refrigerant system.
3. Drain the engine cooling system.
4. Raise and support the vehicle.
CAUTION: DO NOT apply excessive force on underbody heater lines or rear heater tubes when disconnecting the connections. Excessive force may damage or deform the tubes and or lines, causing an engine coolant leak.
NOTE: Replacement of the rubber heater hose ends will be required if the rubber hoses are cut for removal.
5. Release the spring type hose clamps (4) and disconnect the underbody heater lines (5) from the rear heater core tubes located behind the right rear wheel housing.
6. Lower the underbody heater lines and drain any residual coolant from the lines into a suitable container.
7. Loosen the fitting nuts (1) that secure the underbody refrigerant lines (7) to the underbody refrigerant extension lines and sealing plate (2 and 6).
8. Disconnect the underbody refrigerant lines from underbody refrigerant extension lines and remove and discard the O-ring seals.
9. Remove the nut (3) that secures the underbody refrigerant extension lines and sealing plate to the rear A/C expansion valve.
10. Disconnect the extension lines and sealing plate from the rear A/C expansion valve and remove and discard the O-ring seals.
11. Install plugs in, or tape over the opened underbody refrigerant line fittings and rear expansion valve ports.
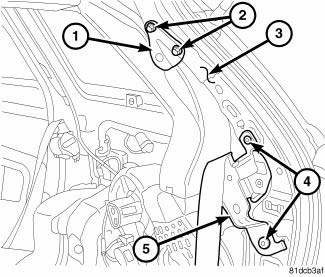
Fig. 163: D-Pillar Seat Belt Bracket
12. Lower the vehicle.
13. Remove the right D-pillar trim panel.
14. Remove right quarter trim panel.
15. Remove the two bolts (2) that secure the upper seat belt bracket (1) to the right D-pillar (3) and remove the bracket.
16. Remove the two bolts (4) that secure the right seat belt retractor (5) to the right D-pillar and remove the retractor.
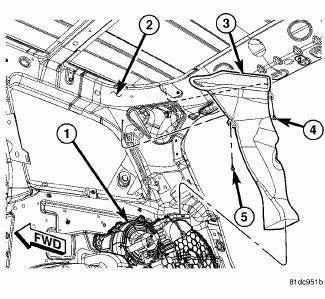
Fig. 164: Rear Ceiling Duct
17. Remove the two retainers (4 and 5) that secure the rear ceiling distribution duct (3) to the right D-pillar (2).
18. Lift the rear ceiling distribution duct upward and disengage it from the rear heater-A/C housing (1).
CAUTION: Use care when removing the rear ceiling distribution duct from the heater-A/C housing to prevent damage to the molded plastic support brace located on the top of the housing outlet. Failure to follow this caution could result in part of, or all of the support brace falling into the rear housing, which may interfere with rear mode door operation.
19. Pull the bottom end of the rear ceiling distribution duct away from the rear heater-A/C housing and remove the duct.
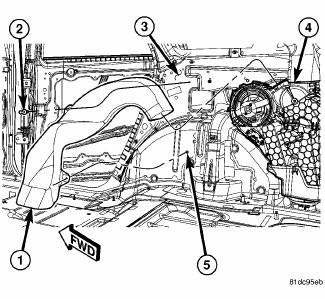
Fig. 165: Rear Floor Distribution Duct
20. Remove the push-pin retainer (2) that secures the rear floor distribution duct (1) to the right inner quarter panel (3).
21. Disengage the rear floor distribution duct from the stud (5) located on the right inner quarter panel.
22. Disengage the rear floor distribution duct from the rear heater-A/C housing (4) and remove the duct.
Fig. 166: Rear Heater AC Housing Removal/Installation
NOTE: MTC rear heater-A/C system shown. ATC system similar.
23. Disconnect the body wire harness connectors (8 and 9) from the rear blower motor (2) and the rear blower motor resistor or power module (3) (depending on control system).
24. Disconnect the body wire harness connector (6) from the rear heater-A/C wire harness connector (5).
25. Remove the two bolts (4 and 10) that secure the rear heater-A/C housing (1) to the right inner quarter panel (7) and remove the housing.
 Description
Fig. 161: Rear Heater AC Housing Description
Models with the rear heating-A/C system use a rear heater-A/C housing (1)
that combines A/C and heating
capabilities into a single unit mounted withi ...
 Disassembly
NOTE: The rear heater-A/C housing must be removed from the vehicle for
service of
the mode door actuator and blend door actuator and it must be disassembled
for service of the A/C evaporator ...
See also:
Insulator, engine mount, rear
Removal
Fig. 234: Belly Pan
1. Remove throttle body air inlet hose and air cleaner housing assembly.
2. Raise the vehicle.
3. Remove the belly pan (2).
Fig. 235: Identifying Rear Mount B ...
Description, Operation
DESCRIPTION
Fig. 265: A/C Expansion Valve Description KA
The A/C expansion valve controls the amount of refrigerant entering the A/C
evaporator. The A/C expansion
valve is of a thermostatic exp ...
LIGHTS
Multifunction Lever
The multifunction lever controls the operation of the
headlights, parking lights, turn signal lights, instrument
panel lights, instrument panel light dimming, interior
lights a ...
