Dodge Journey: Disassembly
NOTE: The rear heater-A/C housing must be removed from the vehicle for service of the mode door actuator and blend door actuator and it must be disassembled for service of the A/C evaporator and the heater core. The blend-air door and mode-air door are only serviced with the respective housing.
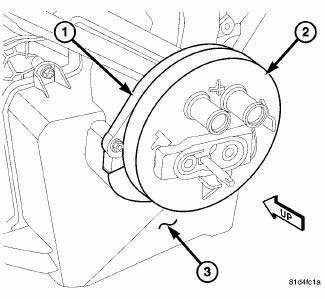
Fig. 167: Rear Housing Flange Seal 09
1. Disconnect and isolate the negative battery cable.
2. Remove the rear heater-A/C housing and place it on a workbench.
3. Remove the rear blower motor resistor or power module (depending on application).
4. Remove the rear blower motor.
5. Remove the foam seal (2) from the flange (1) located at the bottom of the rear heater-A/C housing (3). If the foam seal is deformed or damaged, it must be replaced.
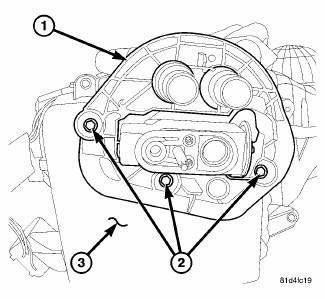
Fig. 168: Rear Housing Flange
6. Remove the three screws (2) that secure the flange (1) to the bottom of the rear heater-A/C housing (3) and remove the flange.
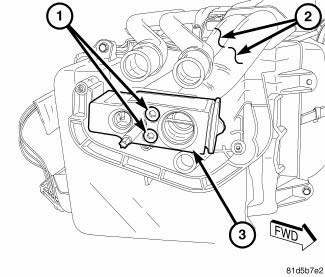
Fig. 169: Rear Expansion Valve Removal/Installation Bench
7. Remove the two screws (1) that secure the rear expansion valve (3) to the tapping plate located on the end of the rear evaporator tubes (2) and remove the valve.
8. Remove and discard the O-ring seals and install plugs in, or tape over the opened evaporator tubes and expansion valve ports.
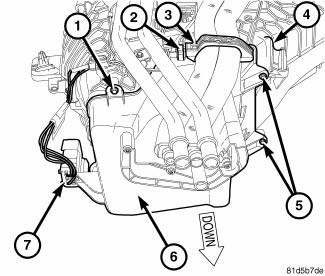
Fig. 170: Lower Rear Housing Removal/Installation
9. Remove the wire harness connector (7) from the lower rear heater-A/C housing (6).
10. Open the evaporator tube retaining bracket (3) located on the outboard side of the lower housing.
11. Remove the metal retaining clip (2) that secures the lower housing to the rear heater-A/C housing (4).
12. Remove the five screws (1 and 5) that secure the lower housing the rear heater-A/C housing and carefully remove the lower housing. Rotate and tilt the lower housing as necessary for removal.
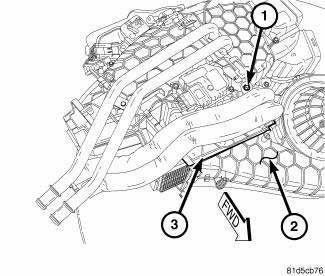
Fig. 171: Rear Evaporator Cover Removal/Installation
13. Remove the screw (1) that secures the rear evaporator cover (3) to the outboard side of the rear heater- A/C housing (2) and remove the cover of the housing.
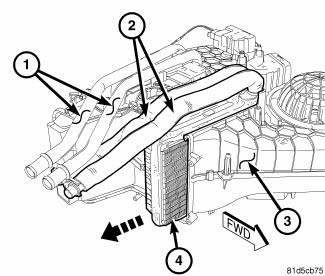
Fig. 172: Rear Evaporator Removal
14. Carefully pull the rear A/C evaporator (4) out the bottom of the rear heater-A/C housing (3). Guide the evaporator tubes (2) past the heater core tubes (1). If the foam seals on the A/C evaporator are deformed or damaged, they must be replaced.
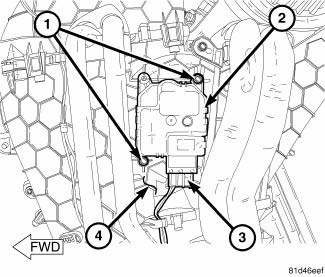
Fig. 173: Rear Blend Door Actuator Removal/Installation
15. Disconnect the wire harness connector (3) from the rear blend door actuator (2) located on the outboard side of the rear heater-A/C housing (4).
16. Remove the two screws (1) that secure the rear blend door actuator to the rear heater-A/C housing and remove the actuator.
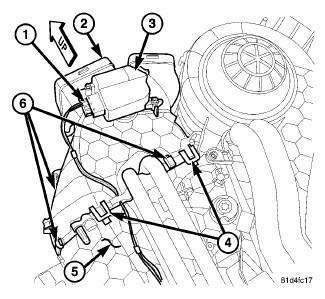
Fig. 174: Rear Distribution Housing Removal/Installation 09
17. Disconnect the rear heater-A/C wire harness connector (1) from the rear mode door actuator (3) located on the outboard side of the rear heater-A/C distribution housing (2) and remove the wire harness from the rear heater-A/C housing (5).
18. Remove the three metal retaining clips (4) that secure the rear distribution housing to the rear heater-A/C housing.
19. Release the five plastic retaining tabs (4) that secure the rear distribution housing and rear heater-A/C housing together and separate the housings.
20. If required, remove the rear mode door actuator from the rear distribution housing.
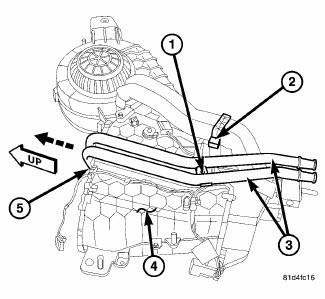
Fig. 175: Rear Heater Core Remove
21. Remove the screw (1) that secures the rear heater core tubes (3) to the outboard side of the rear heater- A/C housing (4).
22. Pull the rear heater core (5) out of the top of the rear heater-A/C housing. If the foam seals on the heater core are deformed or damaged, they must be replaced.
 Removal
WARNING: Refer to the applicable warnings and cautions for this
system before
performing the following operation. Failure to follow these instructions
may
result in serious or fat ...
 Assembly
CAUTION: Be certain to adjust the refrigerant oil level when
servicing the A/C
refrigerant system. Failure to properly adjust the refrigerant
oil level will prevent the A/C system fro ...
See also:
REMOTE STARTING SYSTEM — IF EQUIPPED
This system uses the Remote Keyless Entry (RKE) transmitter
to start the engine conveniently from outside the
vehicle while still maintaining security. The system has a
range of approximately 300 f ...
Description
Fig. 90: HVAC housing assembly
NOTE: LHD model shown RHD model similar.
All models are equipped with a common HVAC housing assembly that combines A/C
and heating capabilities
into a single ...
Relay, trailer tow
DESCRIPTION
Fig. 40: Identifying Relay & Terminals
Vehicles equipped with an optional trailer tow preparation package have four
trailer tow relays, one each for the
trailer tow stop/turn ri ...
