Dodge Journey: Pipe, exhaust
REMOVAL
2.7L/3.5L

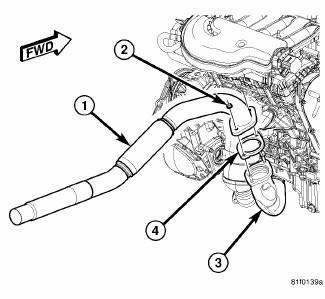
Fig. 20: Exhaust Pipe - 2.7L/3.5L
- - EXHAUST PIPE
- - NUTS
- - CROSS UNDER PIPE
- - GASKET
WARNING: The normal operating temperature of the exhaust system is very high.
Never attempt to service any part of the exhaust system until it is cooled.
Special care should be taken when working near the catalytic converter.
The temperature of the converter rises to a high level after a short period of engine operation time.
1. Raise vehicle on hoist.
2. Apply penetrating oil to exhaust pipe band clamp, and fasteners (2).
3. Loosen band clamp for resonator/pipe assembly.
4. Remove exhaust pipe mounting nuts (2) at cross under pipe (3).
5. Remove exhaust pipe (1) and gasket from vehicle.
6. Discard band clamp.
INSTALLATION
2.7L/3.5L

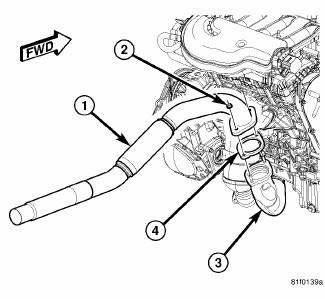
Fig. 21: Exhaust Pipe - 2.7L/3.5L
- - EXHAUST PIPE
- - NUTS
- - CROSS UNDER PIPE
- - GASKET
1. Position exhaust pipe (1) into muffler/resonator assembly.
2. Position exhaust pipe onto cross over pipe.
3. Install exhaust pipe (1) to cross over pipe nuts. Tighten to 28 N.m (250 in. lbs.).
4. Align exhaust pipe (1) and resonator/muffler pipe assembly to maintain position and proper clearance with underbody parts. All support isolators should have equal load on them. Tighten fasteners attaching exhaust pipe (1) to cross-under pipe (3) to 28 N.m (21 ft. lbs.).
5. Install new band clamp. Tighten band clamp to 54 N.m (40 ft. lbs.).
6. Lower vehicle.
7. Start the engine and inspect for exhaust leaks. Repair exhaust leaks as necessary.
8. Check the exhaust system for contact with the body panels. Make the necessary adjustments, if needed.
 Muffler, exhaust
REMOVAL
MUFFLER
Fig. 16: Muffler/Exhaust Pipe Assembly - Single Tail Pipe
- INSULATOR
- MUFFLER/EXHAUST PIPE ASSEMBLY
- BAND CLAMP
NOTE: Band clamps (3) are spot welded to exhaust sy ...
See also:
Task manager
Description
The PCM is responsible for efficiently coordinating the operation of all the
emissions-related components. The
PCM is also responsible for determining if the diagnostic systems are ope ...
Pump, engine oil
Removal
Fig. 275: Oil Pump & Pick-up Tube
- BOLTS
- O-RING
- PICK-UP TUBE
- BOLT
- OIL PUMP
NOTE: The oil pump pressure relief valve can be serviced by removing
the oil pan ...
Removal
2.4L
Fig. 11: Identifying Ignition Coil Electrical Connectors
NOTE: Prior to removing coil, spray compressed air around coil top to
make sure no
dirt drops into the spark plug tube.
The ...

