Dodge Journey: Draincock, radiator
Removal
DRAINCOCK

Fig. 65: DRAINCOCK & RADIATOR TANK
CAUTION: Use of pliers on draincock is not recommended. Damage may occur to radiator or draincock.
NOTE: It is not necessary to remove draincock during a routine coolant drain.
1. Remove belly pan (if equipped).
2. Drain the cooling system.
3. Open the draincock (2) by turning it counterclockwise until it stops.
4. Turn the draincock (2) back (clockwise) 1/8 turn.
5. Pull the draincock (2) from the radiator tank (1).
Installation
DRAINCOCK
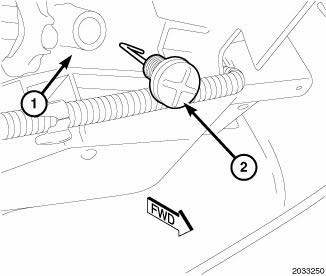
Fig. 66: DRAINCOCK & RADIATOR TANK
1. Align draincock (2) stem to radiator tank (1) opening.
2. Push draincock (2) into the radiator tank (1) opening.
3. Tighten the draincock (2) by turning clockwise until it stops.
4. Fill the cooling system.
5. Install belly pan (if equipped).
 Cooler, EGR
Description
Fig. 62: EGR COOLER
- EGR COOLER TO EGR VALVE TUBE
- MOUNTING SCREWS
- EGR COOLER MOUNTING SCREW
- MOUNTING SCREW
- EGR COOLER BODY
- EGR COOLER MOUNTING NUT
- EGR COOLE ...
 Fan, cooling
Description
Fig. 67: COOLING SYSTEM - OVERVIEW
- WINDSHIELD WASHER RESERVOIR
- UPPER SUPPORT
- FAN SHROUD
- FAN MOTOR
- LOWER RADIATOR HOSE
The radiator fan module includes a support ...
See also:
Task manager
Description
The PCM is responsible for efficiently coordinating the operation of all the
emissions-related components. The
PCM is also responsible for determining if the diagnostic systems are ope ...
Description, Operation
DESCRIPTION
Fig. 29: Removing/Installing ECM - 2.0L Diesel
The ECM (3) is located in the left side of engine compartment attached to the
left inner fender below the air
filter housing.
OPERAT ...
Module, power, front blower motor
DESCRIPTION
Fig. 27: Blower Mtr Pwr Module
A blower motor power module is used on this model when equipped with the
automatic temperature control (ATC) heating-A/C system. Models equipped with t ...
