Dodge Journey: Relay, transmission control
DESCRIPTION
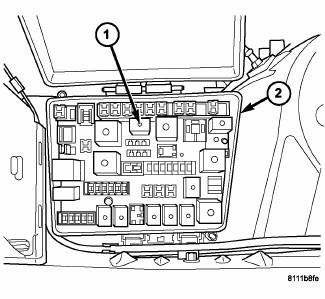
Fig. 366: Locating Transmission Control Relay
- - TRANSMISSION CONTROL RELAY
- - POWER DISTRIBUTION CENTER
The transmission control relay (1) is located in the Power Distribution Center (PDC) (2), which is located on the left side of the engine compartment between the battery and radiator upper support.
OPERATION
The Transmission Control Relay is supplied fused B+ voltage, energized by the PCM, and is used to supply power to the solenoid pack when the transmission is in normal operating mode. When the relay is "off", no power is supplied to the solenoid pack and the transmission is in "limp-in" mode. After a controller reset (ignition key turned to the "run" position or after cranking engine), the PCM energizes the relay. Prior to this, the PCM verifies that the contacts are open by checking for no voltage at the switched battery terminals. After this is verified, the voltage at the solenoid pack pressure switches is checked. After the relay is energized, the PCM monitors the terminals to verify that the voltage is greater than 3 volts.
 Pump, transmission oil
DESCRIPTION
Fig. 359: Identifying Transmission Oil Pump Assembly
- PUMP HOUSING
- OUTER PUMP GEAR
- INNER PUMP GEAR
- REACTION SHAFT SUPPORT
- SEAL RINGS (4)
- REACTION SHAFT
- CRES ...
 Seal, oil pump
REMOVAL
Fig. 367: Removing Oil Pump Seal
- SEAL PULLER C-3981-B
- OIL PUMP SEAL
1. Remove transaxle from vehicle.
2. Using Seal Puller C-3981B (1) , remove oil pump seal (2).
INSTALLA ...
See also:
Removal
1. Remove the engine cover.
2. Release fuel pressure.
3. Disconnect negative battery cable.
4. Drain cooling system.
5. Evacuate the A/C system using a suitable refrigerant recovery machi ...
Removal
WARNING: Refer to the applicable warnings and cautions for this
system before
performing the following operation. Failure to follow these instructions
may result in serious or fatal ...
Switch, evaporative emissions system monitor
Operation
Fig. 29: Evaporative Emissions System Monitor Switch
- Intake Manifold
- Throttle Body
- Purge Solenoid
- Filter
- ESIM
- Vapor Canister
- Control Valve
- Fuel Tank
- ...
