
Dodge Journey: Heated Mirrors
DESCRIPTION
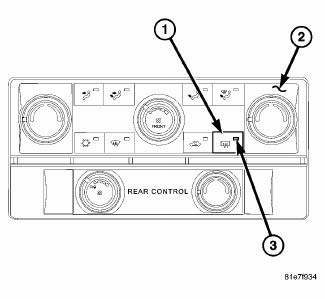
Fig. 1: Rear Window Defogger (EBL) System
NOTE: Manual tri-zone temperature A/C-heater control shown. Other A/C-heater controls similar.
When equipped, the heated mirror system operates in concert with the rear window defogger (EBL) system and is controlled by the rear window defogger switch (1) located in the A/C-heater control (2) in the center of the instrument panel. An amber indicator lamp (3) in the rear window defogger switch will illuminate to indicate when the heated mirror system is turned on.
The heated mirror system will be automatically turned off after an initial programmed time interval of about 10 minutes as long as the ignition switch is in RUN. After the initial time interval has expired, if the rear window defogger switch is pressed to ON again during the same ignition cycle, the heated mirror system will automatically turn off after about 5 minutes. The heated mirror system will also turn off if the ignition switch is turned to any position other than RUN or by manually pressing the rear window defogger switch a second time.
Circuit protection for the heated mirror system is provided by a fuse located in the totally integrated power module (TIPM).
OPERATION
When equipped, the heated mirror system is activated when the rear window defogger (EBL) system is turned on. When the heated mirror system is activated, an electric heater grid located behind the glass of each outside rear view mirror becomes energized and produces heat to help clear the mirror of ice, snow, or fog.
If the outside mirror heating grids are both inoperative. The heating grid behind each outside mirror glass cannot be repaired and the mirror assembly must be replaced if the heating grid is found inoperative or damaged.
 Switch, defogger, rear
DESCRIPTION
Fig. 5: EBL Switch (MTC)
NOTE: Manual tri-zone temperature A/C-heater control shown in
illustration. Other A/Cheater
controls similar.
The momentary push-button swi ...
 Heated Seats
...
See also:
Warning, Caution
WARNING
WARNING: The A/C system contains refrigerant under high pressure.
Repairs should
only be performed by qualified service personnel. Serious or fatal
injury
may result from ...
Seal, crankshaft oil, front
Removal
Fig. 212: Crankshaft Front Oil Seal - Removal
- SPECIAL TOOL 6771
1. Remove crankshaft vibration damper.
2. Install Special Tool 8194, Insert into crankshaft nose. Remove seal us ...
CARGO AREA FEATURES
Rechargeable Flashlight — If Equipped
The rechargeable LED flashlight stores in its charging
station in the left rear quarter trim panel. To remove it,
press on the indent on the side of the flas ...
