Dodge Journey: Amplifier
DESCRIPTION
The optional premium speaker system includes a separate audio power amplifier. The amplifier is an eight channel unit. The amplifier is located behind the right cowl trim panel.
OPERATION
The power amplifier electronically increases the frequency response of the normal audio signal output from the radio amplifier in order to improve the acoustic performance of the speakers. On vehicles equipped with an amplifier, the amplifier information of the radio becomes a pre-amplifier.
The amplifier receives audio signal inputs for speaker channels from the radio, then sends amplified audio outputs through eight separate channels with dedicated feed and return circuits to the individual speakers.
REMOVAL

Fig. 1: Amplifier
1. Disconnect and isolate the battery negative cable.
2. Lower the glove box as necessary to gain access to the amplifier.
3. Disconnect the electrical connectors.
4. Loosen the mounting fasteners and remove the amplifier and bracket.
5. Remove the amplifier from the bracket.
INSTALLATION
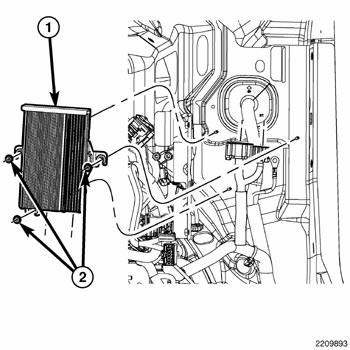
Fig. 2: Amplifier
1. Install the amplifier to the mounting bracket.
2. Install amplifier. Tighten the forward screw to 3 N.m (26.5 in. lbs.) and the rear nut to 2 N.m (18 in. lbs.).
3. Connect the electrical connectors.
4. Raise the glove box.
5. Connect the battery negative cable.
 Diagnosis and Testing
Video
VIDEO SYSTEM DIAGNOSIS
CONDITION
POSSIBLE
CAUSES
CORRECTION
NO VIDEO (DVD
PLAYER WILL NOT LOAD OR EJECT)
1. Fuse inoperative.
1. Check fuses. Replace fuse ...
 Antenna, satellite, audio, video
ANTENNA, SATELLITE, AUDIO
DESCRIPTION
Fig. 3: Satellite Audio
If the vehicle is equipped with satellite audio, a combined antenna for AM/FM
and satellite is used. For
removal. See Removal and ...
See also:
Removal, Installation
REMOVAL
WARNING: Disable the airbag system before attempting any steering
wheel, steering
column, or instrument panel component diagnosis or service. Disconnect
and isolate the negat ...
ELECTRONIC BRAKE CONTROL SYSTEM
Your vehicle is equipped with an advanced electronic
brake control system commonly referred to as ESP. This
system includes Anti-Lock Brake System (ABS), Brake
Assist System (BAS), Traction Control ...
Removal
Fig. 56: BRAKE PEDAL HOLDING TOOL
1. Using a brake pedal holding tool as shown, depress the brake pedal past
its first one inch (25 mm) of
travel and hold it in this position. This will isolate ...
