Dodge Journey: Fluid
STANDARD PROCEDURE
FLUID LEVEL CHECKING
The fluid required for this transaxle is Mopar ATF+4 (Automatic Transmission Fluid). Use of improper or substitute fluids can cause shift problems and/or transaxle failure.
1. Insure the vehicle is level, remove the fill plug and add fluid until the fluid just starts to trickle out.
FLUID DRAIN AND FILL

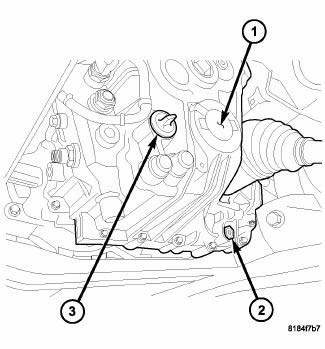
Fig. 174: Drain Plug
NOTE: The fluid required for this transaxle is Mopar ATF+4 (Automatic Transmission Fluid). Use of improper or substitute fluids can cause shift problems and/or transaxle failure.
1. Raise vehicle on hoist.
2. Obtain suitable fluid collection container and place under transaxle.
3. Remove transaxle drain plug (2). Allow fluid to drain into container until empty.
4. Install the drain plug (2) with a new gasket and tighten to 39 N.m (29 ft. lbs.).
5. Remove transaxle rubber fill plug (3).
6. Add the appropriate amount of transaxle fluid to the transaxle.
7. Install the transaxle rubber fill plug (3).
 Differential, transaxle
DESCRIPTION
Fig. 166: Differential Assembly
- RING GEAR
- PINION SHAFT
- DIFFERENTIAL CASE
- PINION GEAR
- SIDE GEAR
The BG6 differential is a conventional open design, and is integr ...
 Input shaft, transmission
DISASSEMBLY
Fig. 175: Snap Ring At Input Shaft
1. Remove the snap ring (2) that retains the input shaft bearing and sixth
gear to the shaft.
Fig. 176: Press Bearing From Input Shaft
2. Using ...
See also:
Description
Vehicle wheel alignment is the positioning of all interrelated front and rear
suspension angles. These angles
affect the handling and steering of the vehicle when it is in motion. Proper
wheel al ...
Description, Operation
DESCRIPTION
CAUTION: Grid lines can be damaged or scraped off with sharp
instruments. Care
should be taken in cleaning glass or removing foreign materials, decals or
stickers. Normal glass ...
HAZARD WARNING FLASHER
The Hazard Warning flasher
switch is located in the
instrument panel switch bank, above the climate controls.
Press the switch to turn on the Hazard Warning
flasher. When the switch is activated, ...
