Dodge Journey: Installation
2.4L
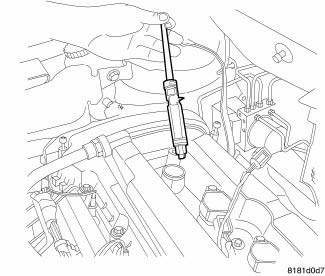
Fig. 65: Removing/Installing Spark Plug
CAUTION: Handle the spark plugs with care. Do not drop or force the spark plugs into the wells, damage to the electrodes and/or porcelain body may occur.
Always start each spark plug by hand in order to avoid cross-threading the spark plug in the cylinder head.
Always tighten spark plugs to the specified torque. Too much or not enough torque will cause damage to the cylinder head and/or spark plug and may lead to poor engine performance.
1. Install each spark plug to the cylinder head. Tighten spark plugs to 27 N.m (20 ft. lbs.).
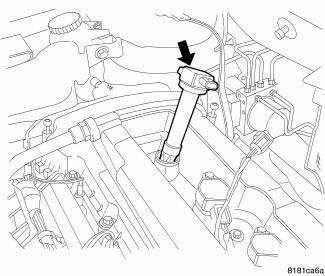
Fig. 66: Removing/Installing Ignition Coil
2. Install ignition coil onto spark plug.
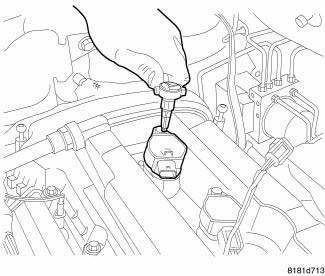
Fig. 67: Removing/Installing Ignition Coil Mounting Bolts
3. Install ignition coil mounting bolt. Tighten to 9 N.m (79.5 in. lbs.).
4. Connect ignition coil electrical connectors.
5. Connect negative battery cable, tighten nut to 5 N.m (45 in. lbs.).
6. Install engine cover.
2.7L
CAUTION: Handle the spark plugs with care. Do not drop or force the spark plugs into the wells, damage to the electrodes and/or porcelain body may occur.
Always start each spark plug by hand in order to avoid cross-threading the spark plug in the cylinder head.
Always tighten spark plugs to the specified torque. Too much or not enough torque will cause damage to the cylinder head and/or spark plug and may lead to poor engine performance.
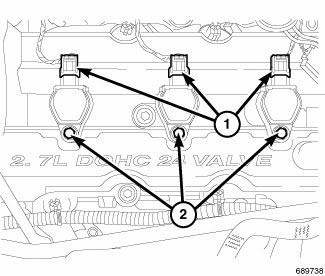
Fig. 68: Removing/Installing Electrical Connectors And Mounting Bolts At
Ignition Coil
1. Install each spark plug to the cylinder head. Tighten spark plugs to 17 N.m (13 ft. lbs.).
2. Align ignition coil with top of spark plug.
3. Twist and push down ignition coil assembly onto spark plug and valve cover. Install mounting bolt (2) and tighten to 7.5 N.m (65 in. lbs.).
4. Connect electrical connector (1) to ignition coil.
5. Install upper intake manifold.
6. Connect negative battery cable.
3.5L
CAUTION: Handle the spark plugs with care. Do not drop or force the spark plugs into the wells, damage to the electrodes and/or porcelain body may occur.
Always start each spark plug by hand in order to avoid cross-threading the spark plug in the cylinder head.
Always tighten spark plugs to the specified torque. Too much or not enough torque will cause damage to the cylinder head and/or spark plug and may lead to poor engine performance.
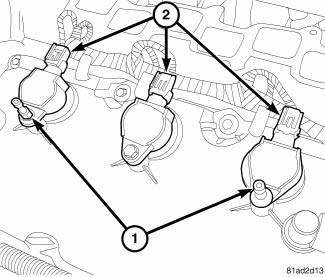
Fig. 69: Ignition Coils
1. To avoid cross threading, start the spark plug into the cylinder head by hand.
2. Tighten spark plugs to 27 N.m (20 ft. lbs.).
3. Install ignition coil.
4. Install engine cover studs (1) in the two outside ignition coils on the front of the engine. Install bolts on the other ignition coils.
5. Tighten studs and bolts to 8 N.m (71 in. lbs.).
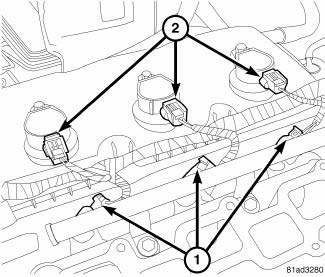
Fig. 70: Identifying Coil & Fuel Injector Connectors
6. Connect electrical connector and lock (2).
7. Install intake manifold.
8. Reconnect the negative battery cable.
9. Install the engine cover.
 Removal
2.4L
Fig. 59: Identifying Ignition Coil Electrical Connectors
NOTE: Prior to removing coil, spray compressed air around coil top to
make sure no
dirt drops into the spark plug tube.
1. ...
 Switch, ignition
DESCRIPTION
This vehicle is equipped with a Wireless Ignition Node (WIN). The WIN, along
with the FOB with Integrated
Key (FOBIK) are the primary components of the keyless ignition system. The onl ...
See also:
Removal
WARNING: Refer to the applicable warnings and cautions for this
system before
performing the following operation. Failure to follow the warnings and
cautions may result in possible se ...
Removal, Installation
REMOVAL
1. Remove transmission and torque converter from vehicle.
2. Place a suitable drain pan under the converter housing end of the
transmission.
CAUTION: Verify that transmission is ...
MOPAR PARTS
MOPAR fluids, lubricants, parts, and accessories are
available from an authorized dealer. They are recommended
for your vehicle in order to help keep the vehicle
operating at its best. ...
