Dodge Journey: Removal
2.4L
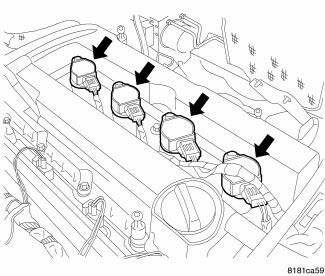
Fig. 59: Identifying Ignition Coil Electrical Connectors
NOTE: Prior to removing coil, spray compressed air around coil top to make sure no dirt drops into the spark plug tube.
1. Disconnect and isolate the negative battery cable.
2. Remove engine cover.
3. Disconnect the electrical connectors from ignition coils.
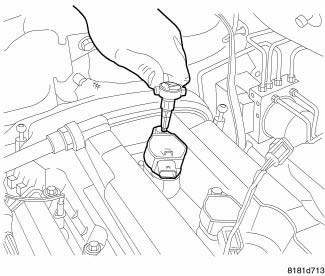
Fig. 60: Removing/Installing Ignition Coil Mounting Bolts
4. Remove the ignition coil mounting bolt.
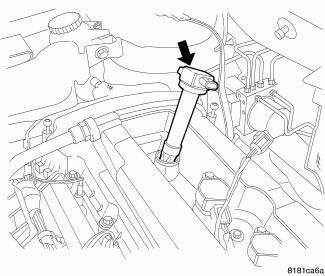
Fig. 61: Removing/Installing Ignition Coil
5. Twist the ignition coil then pull straight up.

Fig. 62: Removing/Installing Spark Plug
NOTE: Prior to loosening the spark plug, use compressed air to blow out any debris that might be in the spark plug tube.
6. Remove the spark plug using a quality socket with a rubber or foam insert.
7. Inspect the spark plug condition.
2.7L
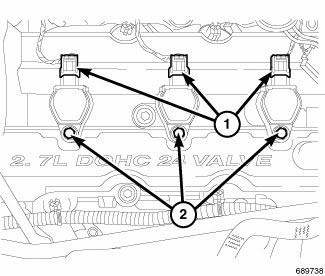
Fig. 63: Removing/Installing Electrical Connectors And Mounting Bolts At
Ignition Coil
NOTE: Always remove the ignition coil assembly by turning the assembly 1/2 turn and pulling straight back in a steady motion.
1. Disconnect the negative battery cable.
2. Remove the upper intake manifold. 3. Disconnect electrical connector (1) from ignition coil.
4. Remove mounting bolt (2) from ignition coil.
CAUTION: Prior to removing the ignition coils, spray compressed air around the coils and spark plugs. If dirt and debris enter the engine, this may cause internal engine damage.
5. Remove the ignition coils.
6. Remove the spark plugs.
3.5L
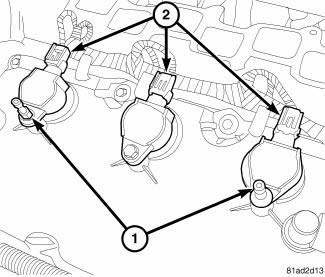
Fig. 64: Ignition Coils
1. Remove engine cover.
2. Disconnect and isolate the negative battery cable.
3. Remove the intake manifold. 4. Unlock and disconnect electrical connector (2) from ignition coils.
5. Remove mounting bolts and engine cover studs (1).
6. Twist, lift and remove ignition coil from engine.
CAUTION: Prior to removing the spark plugs, use compressed air to remove any accumulated dirt and debris. If dirt and debris enter the engine, this may cause internal engine damage.
7. Remove spark plug using a quality socket with a rubber or foam insert.
 Spark plug
...
 Installation
2.4L
Fig. 65: Removing/Installing Spark Plug
CAUTION: Handle the spark plugs with care. Do not drop or force
the spark plugs into
the wells, damage to the electrodes and/or porcelain ...
See also:
Removal, Installation
REMOVAL
REMOVAL - NGC CONTROLLER
Fig. 39: Remove/Install PCM
NOTE: USE THE SCAN TOOL TO REPROGRAM THE NEW POWERTRAIN CONTROL
MODULE (PCM) WITH THE VEHICLES ORIGINAL IDENTIFICATION NUMBER
( ...
HAZARD WARNING FLASHER
The Hazard Warning flasher
switch is located in the
instrument panel switch bank, above the climate controls.
Press the switch to turn on the Hazard Warning
flasher. When the switch is activated, ...
Description, Operation
DESCRIPTION
The A/C refrigerant lines and hoses are used to carry the refrigerant between
the various A/C system
components. The refrigerant lines and hoses for the R-134a A/C system consist of
...
