Dodge Journey: Removal
WITH FOOT LEVER
1. Release the parking brake.
2. Raise and support the vehicle.
3. Manually release the parking brake cable tension.
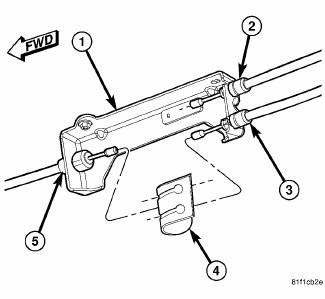
Fig. 186: PARKING BRAKE CABLE EQUALIZER
4. Collapse the front cable retainer fingers at the end of the cable housing where it contacts the intermediate bracket (1). Pull the cable (5) forward and remove it from the intermediate bracket.
5. Push the front cable strand into the housing until it bottoms.

Fig. 187: CABLE MOUNTING TO UNDERBODY WITH FOOT LEVER
6. Remove the nuts (5) securing the front cable routing clamps (1) to the underbody of the vehicle.
7. Remove the cable routing clamps (1) from the cable (4).
8. Lower the vehicle.
9. Remove the left front door opening sill scuff plate.
10. Remove the lower cowl trim.
11. Remove the steering column opening cover.
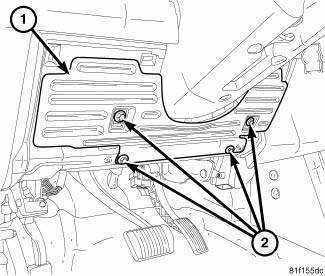
Fig. 188: STEERING COLUMN COVER REINFORCEMENT
12. Remove the steering column cover reinforcement mounting screws (2). Remove the steering column cover reinforcement (1).
13. Pull the parking brake lever pedal up and hold it in this position.
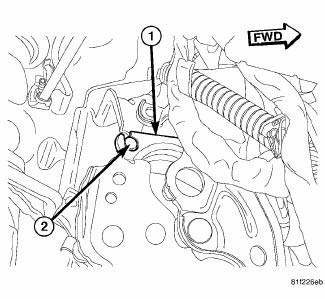
Fig. 189: CABLE BUTTON LOCATED IN LEVER
14. Rotate the cable strand around at the lever mechanism until the strand lines up with the slot, then remove the cable end button (2) from the lever mechanism (1).
NOTE: Prior to removing cable from lever, note cable routing through lever for ease in reassembly.
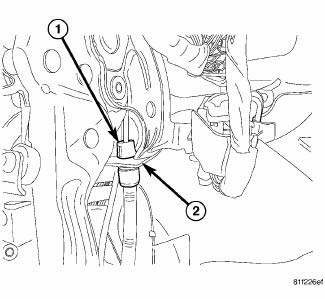
Fig. 190: CABLE HOUSING RETAINED IN LEVER
15. Collapse the front cable retainer fingers on the end of the cable housing (1) at the lever (2).
16. Remove the cable from the parking brake lever (3).
17. Lift back the carpet and pull the cable seal loose from the floor pan.
18. Remove the front parking brake cable from the vehicle through the hole in the floor pan.
WITH HAND LEVER
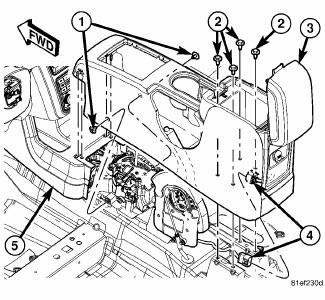
Fig. 191: CENTER CONSOLE
1. Remove the floor center console.
2. Manually release the parking brake cable tension.
3. Raise and support the vehicle.
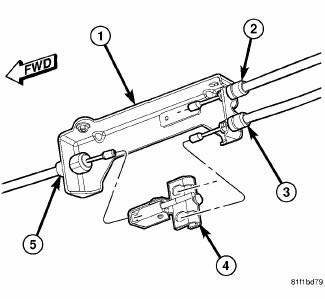
Fig. 192: CABLE EQUALIZER/TENSIONER
4. Remove the parking brake cable equalizer/bent nail tensioner (4) from the three parking brake cables (2, 3, 5).
5. Collapse the front cable retainer fingers at the end of the cable housing where it contacts the intermediate bracket (1). Pull the cable (5) forward and remove it from the intermediate bracket.

Fig. 193: CABLE MOUNTING TO UNDERBODY WITH HAND LEVER
6. Remove the screws (4) securing the front cable routing clamps (1, 5) to the underbody of the vehicle.
7. Remove the cable routing clamps (1, 5) from the cable (6).
8. Lower the vehicle.
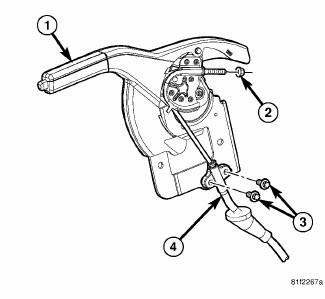
Fig. 194: CABLE MOUNTING TO HAND LEVER
9. Remove the mounting screws (3) fastening the front cable (4) to the side of the parking brake lever (1).
10. Remove the adjusting nut (2) from the end of the front parking brake cable.
11. Remove the cable strand from the lever.
12. Pull the cable seal loose from the floor pan and remove the front parking brake cable from the vehicle through the access hole in the floor pan.

 Installation
WITH FOOT LEVER
1. Pass most of the front parking brake cable down through the access hole in
the floor pan from inside the
vehicle.
Fig. 195: CABLE HOUSING RETAINED IN LEVER
2. Insert the lev ...
See also:
Assembly
HOUSING-AIR DISTRIBUTION
NOTE: LHD model with A/C shown in illustrations. RHD and heater-only
models similar.
Fig. 115: Mode Door Levers-Removal/Installation
1. If removed, install the fo ...
Diagnosis and Testing
ELECTRIC BACKLIGHT (EBL) SYSTEM
NOTE: Illumination of the defogger switch indicator lamp does not
necessarily mean
that electrical current is reaching the rear window glass and/or the outside ...
Installation
Fig. 97: Strut Upper Mounting Nuts
1. Raise the strut assembly (2) into the strut tower, aligning the three
studs on the strut assembly upper
mount with the holes in strut tower. Install the thr ...
