Dodge Journey: Diagnosis and Testing
ELECTRIC BACKLIGHT (EBL) SYSTEM
NOTE: Illumination of the defogger switch indicator lamp does not necessarily mean that electrical current is reaching the rear window glass and/or the outside rear view mirror heating grids (when equipped).
NOTE: See appropriate wiring information for circuit descriptions and diagrams of the rear window defogger (EBL) and heated mirror systems.
Operation of the electrical backlight (EBL) system can be confirmed by the following:
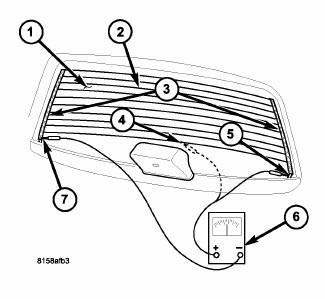
Fig. 3: Rear Window Glass Grid Test
NOTE: Typical heated rear window glass shown in illustration.
1. Use a scan tool and check for diagnostic trouble codes (DTCs) related to the rear window defogger switch and the totally integrated power module (TIPM). If no DTCs are found, go to step 2. If any DTCs are found, repair as required, then proceed to step 2.
2. Turn the ignition switch to RUN. Set the rear window defogger switch to ON. Rear window defogger operation can be checked by feeling the rear window glass (1), or the heated outside rear view mirror glass when equipped with heated mirrors. A distinct difference in temperature between the grid lines (2) and the adjacent clear glass or the heated mirror glass should be detected within 3 to 4 minutes of operation.
3. If a temperature difference is not detected, use a 12-volt DC voltmeter (6) and contact the rear glass heating grid terminal A (5) with the positive lead, and terminal B (7) with the negative lead. The voltmeter should read battery voltage. If the voltmeter does not read battery voltage, check the following:
- Confirm the ignition switch is in RUN.
- Confirm the rear window defogger switch is ON.
- Confirm the EBL feed wire is connected to the heating grid positive terminal and that there is continuity between the TIPM and the heating grid.
- Confirm the EBL ground wire is connected to the heating grid negative terminal and that there is continuity to ground.
- When diagnosing a heated mirror concern, check the heated mirror circuit fuse located in the TIPM. The fuse must be in the receptacle and all electrical connections must be secure.
4. If broken defogger grid lines or bus bars (3) are suspected, use a 12-volt DC voltmeter and contact terminal B with the negative lead and each rear glass heating grid line at its mid-point C (4) with the positive lead. The voltmeter should read approximately 6 volts at each grid line mid-point. If the voltmeter does not read approximately 6 volts, repair the open grid line(s) or bus bar(s). 5. If EBL system operation has been verified but the rear window defogger indicator does not illuminate, replace the A/C-heater control.
 Description, Operation
DESCRIPTION
CAUTION: Grid lines can be damaged or scraped off with sharp
instruments. Care
should be taken in cleaning glass or removing foreign materials, decals or
stickers. Normal glass ...
 Grid, defogger, rear
STANDARD PROCEDURE
GRID LINE AND TERMINAL REPAIR
WARNING: Materials contained in the Repair Kit (Part Number
04549275) may cause
skin or eye irritation. The kit contains epoxy resin an ...
See also:
Switch, remote radio
DESCRIPTION
Remote radio control switches are rocker-type switch units are mounted in the
upper spoke covers of the rear
(instrument panel side) steering wheel trim cover. The switch unit on the l ...
Module, power, rear blower motor
DESCRIPTION
Fig. 59: Rear Blower Power Module Description
A blower motor power module is used on this model when equipped with the
automatic temperature control
(ATC) rear heating-A/C system. M ...
ELECTRONIC SPEED CONTROL — IF EQUIPPED
When engaged, the Electronic Speed Control takes over
the accelerator operation at speeds greater than 25 mph
(40 km/h).
The Electronic Speed Control lever is located on the right
side of the stee ...
