Dodge Journey: Installation
CLUTCH - FIXED DISPLACEMENT A/C COMPRESSOR
NOTE: Typical A/C compressor and clutch assembly shown in illustrations.
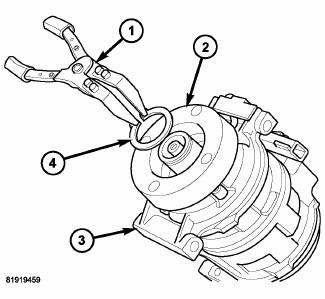
Fig. 214: Clutch Coil & Snap Ring
1. Align the dowel pin on the back of the compressor clutch field coil (2) with the hole in the front of the A/C compressor (3) and position the field coil onto the compressor. Be certain that the compressor clutch field coil wire lead is properly routed so that it is not pinched between the A/C compressor and the field coil.
CAUTION: The snap ring must be fully and properly seated in the groove or it will vibrate out, resulting in a clutch failure and severe damage to the A/C compressor.
NOTE: A new snap ring must be used to secure the compressor clutch field coil to the A/C compressor. The bevel side of the snap ring must face outward and both snap ring eyelets must be oriented to the right or to the left of the field coil dowel pin location on the A/C compressor.
2. Using A/C Snap Ring Pliers 9764 or equivalent (1), install the snap ring (4) that secures the compressor clutch field coil to the front of the A/C compressor. Be certain that the snap ring is fully and properly seated in the groove and oriented correctly.
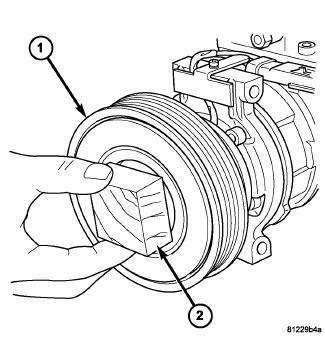
Fig. 215: Clutch Pulley - Installation
CAUTION: Be certain to position the A/C clutch coil wire lead so that it is not damaged during A/C compressor pulley and bearing installation.
CAUTION: When installing the pulley and bearing assembly, DO NOT mar the friction surfaces of the pulley or premature failure of the A/C clutch will result.
3. Install the pulley and bearing assembly (1) onto the front of the A/C compressor. If necessary, tap the pulley gently with a block of wood (2) placed on the pulley friction surface.
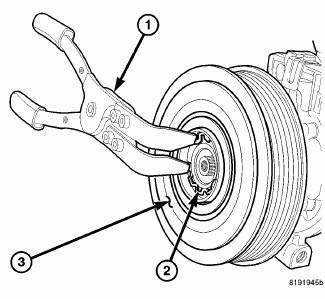
Fig. 216: Clutch Pulley & Snap Ring
CAUTION: The snap ring must be fully and properly seated in the groove or it will vibrate out, resulting in a clutch failure and severe damage to the A/C compressor.
NOTE: A new snap ring must be used to secure the pulley and bearing assembly to the A/C compressor. The bevel side of the snap ring must face outward.
4. Using A/C Snap Ring Pliers 9764 or equivalent (1), install the snap ring (2) that secures the pulley and bearing assembly (3) to the front of the A/C compressor. Be certain that the snap ring is fully and properly seated in the groove.
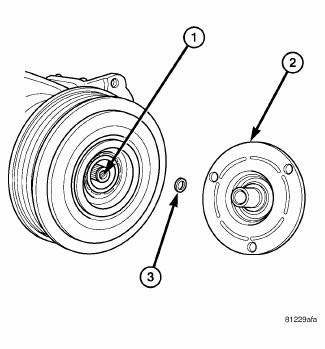
Fig. 217: Clutch Plate & Shim(s)
5. If the original clutch plate (2) and pulley and bearing assembly are to be reused, reinstall the original shim (s) (3) onto the compressor shaft (1). If a new clutch plate and pulley and bearing assembly are being used, install a trial stack of shims 2.54 mm (0.010 in.) thick onto the compressor shaft.
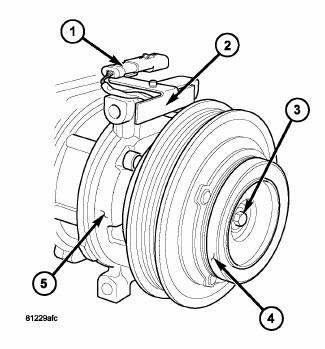
Fig. 218: A/C Compressor Shaft Bolt
6. Install the clutch plate (4) onto the front of the A/C compressor (5).
7. Install the compressor shaft bolt (3). Tighten the bolt to 19 N.m (168 in. lbs.).
NOTE: The shims may compress after tightening the shaft bolt. Check the air gap in four or more places to verify the air gap is correct. Spin the pulley before performing a final check of the air gap.
NOTE: On models with the clutch plate recessed into the pulley, use a 90º wire gap gauge to measure the clutch air gap. On other models, use a blade type feeler gauge to measure the air gap.
8. With the clutch plate assembled tight against the shim(s), measure the air gap between the clutch plate and the pulley and bearing assembly. The air gap should be between 0.35 - 0.60 mm (0.014 - 0.024 in.). If the air gap is not between specifications, add or subtract shims as needed until the correct air gap is obtained.
CAUTION: Be certain that the compressor clutch coil wire lead is routed so that it is not pinched between the A/C compressor and the coil connector bracket.
9. Carefully route the compressor clutch field coil wire lead behind the connector bracket (2).
10. Install the compressor clutch field coil connector (1) onto the connector bracket.
11. Reinstall the A/C compressor onto the engine if removed for A/C clutch service.
12. Connect the engine wire harness to the compressor clutch field coil connector.
13. Install the accessory drive belt.
14. Install the splash shield onto the right side frame rail.
15. Lower the vehicle.
16. Reconnect the negative battery cable.
A/C COMPRESSOR
CAUTION: If the A/C compressor is being replaced, be certain to adjust the refrigerant system oil level. Failure to properly adjust the refrigerant oil level will prevent the A/C system from operating as designed and can cause serious A/C compressor damage.
CAUTION: The A/C receiver/drier must be replaced if an internal failure of the A/C compressor has occurred. Failure to replace the A/C receiver/drier can cause serious damage to the replacement A/C compressor.
NOTE: When replacing multiple A/C system components, see the REFRIGERANT OIL CAPACITIES to determine how much oil should be removed from the new A/C compressor. NOTE: Replacement of the refrigerant line O-ring seals and gaskets is required anytime a refrigerant line is disconnected. Failure to replace the rubber O-ring seals and metal gaskets may result in a refrigerant system leak.
NOTE: Variable displacement compressor shown in illustrations. Fixed displacement similar.
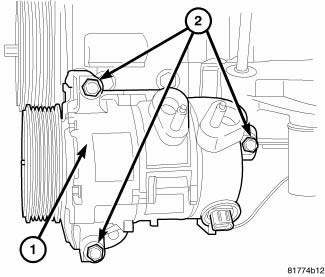
Fig. 219: A/C Compressor-Removal/Installation
1. If the A/C compressor (1) is being replaced, refrigerant oil must first be drained from the new A/C compressor. When replacing multiple A/C system components, see the REFRIGERANT OIL CAPACITIES to determine how much oil should be added to the refrigerant system. Use only refrigerant oil of the type recommended for the A/C compressor in the vehicle.
2. Position the A/C compressor into the engine compartment.
3. Install the three bolts (2) that secure the A/C compressor to the engine. Tighten the bolts to 25 N.m (18 ft.lbs.).
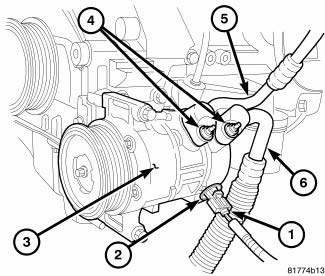
Fig. 220: A/C Compressor-Refrigerant Lines
4. Remove the tape or plugs from the compressor ports and the refrigerant line fittings.
5. Lubricate new rubber O-ring seals with clean refrigerant oil and install them and new gaskets onto the refrigerant line fittings. Use only the specified O-rings as they are made of a special material for the R- 134a system. Use only refrigerant oil of the type recommended for the A/C compressor in the vehicle.
6. Connect the A/C discharge line (5) and the A/C suction line (6) to the A/C compressor (3).
7. Install the nuts (4) that secure the A/C suction and discharge lines to the A/C compressor. Tighten the nuts to 20 N.m (15 ft. lbs.).
8. Connect the engine wire harness (1) to the clutch coil or compressor control valve (2), depending on application.
9. Install the accessory drive belt.
10. Install the splash shield onto the right side frame rail.
11. Lower the vehicle.
12. Reconnect the negative battery cable.
CAUTION: Do NOT run the engine with a vacuum pump in operation or with a vacuum present within the A/C system when equipped with the Denso 6SEU16 variable displacement compressor. Failure to follow this caution will result in serious A/C compressor damage.
13. Evacuate and charge the refrigerant system.
 Inspection
CLUTCH INSPECTION - FIXED DISPLACEMENT A/C COMPRESSOR
Fig. 212: Identifying Compressor Shaft, Clutch Plate & Shim
Examine the friction surfaces of the pulley and the clutch plate (2) for
wea ...
 Condenser, A/C
...
See also:
Lamp, center high mounted stop
REMOVAL
Fig. 5: Center High Mounted Stop Lamp
1. Disconnect and isolate the battery negative cable.
2. Remove the two screws (4) that secure the Center High Mounted Stop Lamp (CHMSL)
(3) to t ...
Removal
Fig. 93: Accessory Drive Belt System - 2.7L
- GENERATOR
- IDLER/TENSIONER
1. Perform fuel pressure release procedure before attempting any repairs.
2. Disconnect negative cable from rem ...
Removal
2.4L
Fig. 59: Identifying Ignition Coil Electrical Connectors
NOTE: Prior to removing coil, spray compressed air around coil top to
make sure no
dirt drops into the spark plug tube.
1. ...
