Dodge Journey: Fluid
STANDARD PROCEDURE
FLUID LEVEL AND CONDITION CHECK
FLUID LEVEL CHECK

Fig. 351: Identifying Fluid Level Indicator
- - FLUID LEVEL INDICATOR
NOTE: Only transmission fluid of the type labeled Mopar ATF+4 (Automatic Transmission Fluid) should be used in this transaxle.
The transmission sump has a fluid level indicator (dipstick) to check oil similar to most automatic transmissions. It is located on the left side of the engine. Be sure to wipe all dirt from dipstick handle before removing.
The torque converter fills in both the P Park and N Neutral positions. Place the selector lever in P Park to be sure that the fluid level check is accurate. The engine should be running at idle speed for at least one minute, with the vehicle on level ground. At normal operating temperature 82º C (180º F), the fluid level is correct if it is in the HOT region on the oil level indicator (1) . The fluid level should be within the COLD region of the dipstick at 27º C (80º F) fluid temperature.
FLUID LEVEL CHECK USING DRB
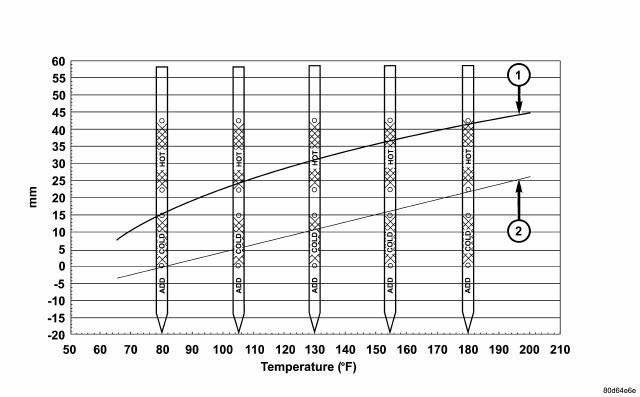
Fig. 352: Transmission Fluid Temperature Chart
- - MAX. LEVEL
- - MIN. LEVEL
NOTE: Engine and Transaxle should be at normal operating temperature before performing this procedure.
1. Start engine and apply parking brake.
2. Hook up DRB scan tool and select transmission.
3. Select sensors.
4. Read the transmission temperature value.
5. Compare the fluid temperature value with the fluid temperature chart (1,2) .
6. Adjust transmission fluid level shown on the indicator according to Fig. 352.
7. Check transmission for leaks.
Low fluid level can cause a variety of conditions because it allows the pump to take in air along with the fluid.
As in any hydraulic system, air bubbles make the fluid spongy, therefore, pressures will be low and build up slowly.
Improper filling can also raise the fluid level too high. When the transaxle has too much fluid, the gears churn up foam and cause the same conditions which occur with a low fluid level.
In either case, air bubbles can cause overheating and/or fluid oxidation, and varnishing. This can interfere with normal valve, clutch, and accumulator operation. Foaming can also result in fluid escaping from the transaxle vent where it may be mistaken for a leak.
FLUID CONDITION
Along with fluid level, it is important to check the condition of the fluid. When the fluid smells burned, and is contaminated with metal or friction material particles, a complete transaxle recondition is probably required. Be sure to examine the fluid on the dipstick closely. If there is any doubt about its condition, drain out a sample for a double check.
Mopar ATF+4 (Automatic Transmission Fluid), when new, is red in color. The ATF is dyed red so it can be identified from other fluids used in the vehicle such as engine oil or antifreeze. The red color is not permanent and is not an indicator of fluid condition. As the vehicle is driven, the ATF will begin to look darker in color and may eventually become brown. This is normal. ATF+4 also has a unique odor that may change with age.
Consequently, odor and color cannot be used to indicate the fluid condition or the need for a fluid change.
After the fluid has been checked, seat the dipstick fully to seal out water and dirt.
FLUID AND FILTER SERVICE
FLUID/FILTER SERVICE (RECOMMENDED)
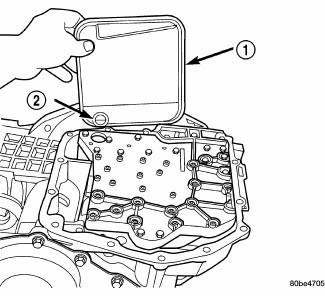
Fig. 353: Identifying Filter & O-Ring
- - OIL FILTER
- - O-RING
NOTE: Refer to MAINTENANCE SCHEDULES for the recommended maintenance (fluid/filter change) intervals for this transaxle.
NOTE: Only fluids of the type labeled Mopar ATF+4 should be used. A filter change should be made at the time of the transmission oil change. The magnet (on the inside of the oil pan) should also be cleaned with a clean, dry cloth.
NOTE: If the transaxle is disassembled for any reason, the fluid and filter should be changed.
1. Raise vehicle on a hoist. Place a drain container with a large opening, under transaxle oil pan.
2. Remove both engine mount-to-engine crossmember cradle nuts. Using suitable screw jack and wood block, raise engine and transmission slightly to facilitate transaxle oil pan removal and installation.
3. Loosen pan bolts and tap the pan at one corner to break it loose allowing fluid to drain, then remove the oil pan.
4. Install a new filter and o-ring on bottom of the valve body .
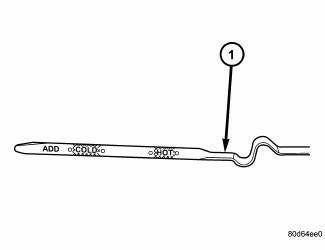
Fig. 354: Identifying Fluid Level Indicator
- - FLUID LEVEL INDICATOR
5. Clean the oil pan and magnet. Reinstall pan using new Mopar Silicone Adhesive sealant. Tighten oil pan bolts to 19 N.m (165 in. lbs.).
6. Pour four Quarts of Mopar ATF+4 through the dipstick opening.
7. Start engine and allow to idle for at least one minute. Then, with parking and service brakes applied, move selector lever momentarily to each position, ending in the park or neutral position.
8. Check the transaxle fluid level and add an appropriate amount to bring the transaxle fluid level to 3mm (1/8 in.) below the lowest mark on the dipstick .
9. Recheck the fluid level after the transaxle has reached normal operating temperature (180ºF.[82ºC]).
10. To prevent dirt from entering transaxle, make certain that dipstick is fully seated into the dipstick opening.
DIPSTICK TUBE FLUID SUCTION METHOD (ALTERNATIVE)
1. When performing the fluid suction method, make sure the transaxle is at full operating temperature.
2. To perform the dipstick tube fluid suction method, use a suitable fluid suction device (Vacula or equivalent).
3. Insert the fluid suction line into the dipstick tube.
NOTE: Verify that the suction line is inserted to the lowest point of the transaxle oil pan. This will ensure complete evacuation of the fluid in the pan.
4. Follow the manufacturers recommended procedure and evacuate the fluid from the transaxle.
5. Remove the suction line from the dipstick tube.
6. Pour four Quarts of Mopar ATF+4 through the dipstick opening.
7. Start engine and allow to idle for at least one minute. Then, with parking and service brakes applied, move selector lever momentarily to each position, ending in the park or neutral position.
8. Check the transaxle fluid level and add an appropriate amount to bring the transaxle fluid level to 3mm (1/8 in.) below the lowest mark on the dipstick .
9. Recheck the fluid level after the transaxle has reached normal operating temperature (180ºF.[82ºC]). 10. To prevent dirt from entering transaxle, make certain that dipstick is fully seated into the dipstick opening.
 Driving clutches
DESCRIPTION
Fig. 350: Identifying Input Clutch Assembly
- INPUT SHAFT
- UNDERDRIVE CLUTCH
- OVERDRIVE CLUTCH
- REVERSE CLUTCH
- OVERDRIVE SHAFT
- UNDERDRIVE SHAFT
Three hydraulical ...
 Geartrain, planetary
DESCRIPTION
Fig. 355: Identifying Planetary Geartrain Components
- FRONT SUN GEAR ASSEMBLY
- #6 THRUST BEARING
- #7 THRUST BEARING
- REAR CARRIER/FRONT ANNULUS ASSEMBLY
- REAR SUN GEAR
...
See also:
Description, Operation
DESCRIPTION
Fig. 238: Evaporator Description
NOTE: LHD model shown. RHD model similar.
The A/C evaporator (1) for the heating-A/C system is mounted in the HVAC
housing, which is located be ...
Description, Operation
DESCRIPTION
Fig. 1: COOLING SYSTEM - OVERVIEW
- WINDSHIELD WASHER RESERVOIR
- UPPER SUPPORT
- FAN SHROUD
- FAN MOTOR
- LOWER RADIATOR HOSE
The cooling system consists of an engine co ...
Description, Operation
DESCRIPTION
OPERATION
The following procedure has been established to assist technicians in the
field with enabling and running OBD
II Monitors. The order listed in the following procedur ...
