Dodge Journey: Driving clutches
DESCRIPTION
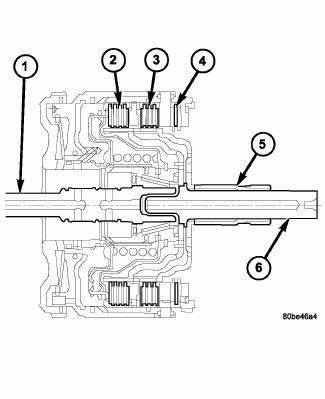
Fig. 350: Identifying Input Clutch Assembly
- - INPUT SHAFT
- - UNDERDRIVE CLUTCH
- - OVERDRIVE CLUTCH
- - REVERSE CLUTCH
- - OVERDRIVE SHAFT
- - UNDERDRIVE SHAFT
Three hydraulically applied input clutches are used to drive planetary components. The underdrive, overdrive, and reverse clutches are considered input clutches and are contained within the input clutch assembly . The input clutch assembly also contains:
- Input shaft
- Input hub
- Clutch retainer
- Underdrive piston
- Overdrive/reverse piston
- Overdrive hub
- Underdrive hub
OPERATION
The three input clutches are responsible for driving different components of the planetary geartrain.
NOTE: Refer to ELEMENTS IN USE AT EACH POSITION OF SELECTOR LEVER for a collective view of which clutch elements are applied at each position of the selector lever.
UNDERDRIVE CLUTCH
The underdrive clutch is hydraulically applied in first, second, and third (direct) gears by pressurized fluid against the underdrive piston. When the underdrive clutch is applied, the underdrive hub drives the rear sun gear.
OVERDRIVE CLUTCH
The overdrive clutch is hydraulically applied in third (direct) and overdrive gears by pressurized fluid against the overdrive/reverse piston. When the overdrive clutch is applied, the overdrive hub drives the front planet carrier.
REVERSE CLUTCH
The reverse clutch is hydraulically applied in reverse gear only by pressurized fluid against the overdrive/reverse piston. When the reverse clutch is applied, the front sun gear assembly is driven.
 Adjustments
NOTE: Perform all differential bearing preload measurements with the
transfer shaft
and gear removed.
DIFFERENTIAL BEARING PRELOAD ADJUSTMENT USING EXISTING SHIM
Fig. 348: Installing Too ...
 Fluid
Fluid
STANDARD PROCEDURE
FLUID LEVEL AND CONDITION CHECK
FLUID LEVEL CHECK
Fig. 351: Identifying Fluid Level Indicator
- FLUID LEVEL INDICATOR
NOTE: Only transmission fluid of the type labele ...
See also:
Description, Operation, Diagnosis and Testing
DESCRIPTION
The dual-note horn system features two electromagnetic horn units. The horn
system includes the following
major components:
Horn - The two horns are located at the front center of ...
Description, Operation
DESCRIPTION
The EGR system reduces oxides of nitrogen (NOx) in the engine exhaust. This
is accomplished by allowing a
predetermined amount of hot exhaust gas to recirculate and dilute the incoming ...
Removal
2.4L
Fig. 3: Capacitor 2.4L
- Bolt
- Capacitor
- Connector
1. Disconnect and isolate negative battery cable at battery.
2. Remove engine cover.
3. Remove electrical connector (3).
...
