Dodge Journey: Duct, floor distribution, rear
REMOVAL
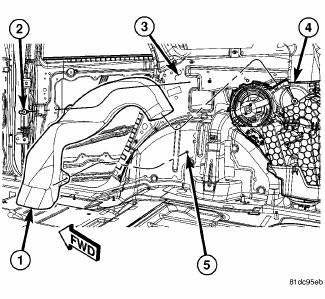
Fig. 159: Rear Floor Distribution Duct
1. Remove right quarter trim panel.
2. Remove the push-pin retainer (2) that secures the rear floor distribution duct (1) to the right inner quarter panel (3).
3. Disengage the rear floor distribution duct from the stud (5) located on the right inner quarter panel.
4. Disengage the rear floor distribution duct from the rear heater-A/C housing (4) and remove the duct.
INSTALLATION

Fig. 160: Rear Floor Distribution Duct
1. Install the rear floor distribution duct (1) onto rear heater-A/C housing (4). Make sure the duct is fully engaged to the housing.
2. Engage the rear floor distribution duct to the stud (5) located on the right inner quarter panel (3).
3. Install the push-pin retainer (2) that secures the rear floor distribution duct to the right inner quarter panel.
4. Install the right quarter panel trim.
 Duct, ceiling distribution
REMOVAL
WARNING: Disable the airbag system before attempting any steering
wheel, steering
column or instrument panel component diagnosis or service. Disconnect
and isolate the negati ...

See also:
Cable, gearshift control
REMOVAL
Fig. 161: Shift Cables & Bracket
1. Remove the shifter.
2. Raise hood.
3. Remove the resonator.
4. Remove engine cover.
5. Remove air cleaner assembly.
6. Disconnect ne ...
Standard procedure, Cleaning, Inspection
Standard procedure
BATTERY RECONNECTION
NOTE: This reconnection procedure is to be performed anytime the
battery has been
disconnected.
1. Connect the negative battery cable remote termin ...
Description
Fig. 46: Left Multifunction Switch
The left (lighting) multi-function switch is located on the left side of the
steering column, just below the steering wheel. This switch is the primary
contro ...
