Dodge Journey: Installation
2.4L

Fig. 7: Capacitor 2.4L
- - Bolt
- - Capacitor
- - Connector
1. Install ignition coil capacitor (2) and bolt (1), tighten bolt to 10 N.m (88.5 ft. lbs.).
2. Connect electrical connector (3).
3. Install engine cover.
4. Connect negative battery cable, tighten nut to 5 N.m (45 in. lbs.).
2.7L 1st
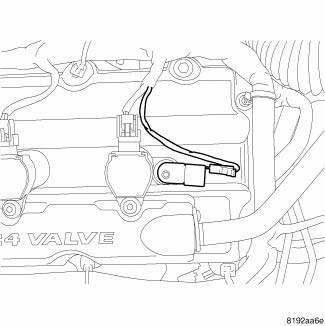
Fig. 8: 1st Ignition Capacitor - 2.7L
1. Install ignition coil capacitor and nut.
2. Tighten nut to 10 N.m (88.5 in. lbs.).
3. Attach electrical connector to capacitor.
4. Connect negative battery cable and tighten nut to 5 N.m (45 in. lbs.).
2.7L 2nd
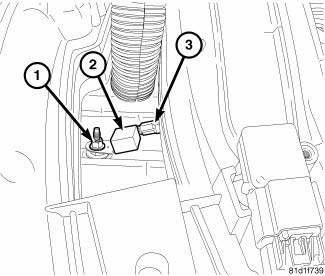
Fig. 9: 2nd Ignition Capacitor - 2.7L
1. Install ignition coil capacitor (2) and bolt (1).
2. Tighten bolt to 28 N.m (20.5 ft. lbs.).
3. Connect electrical connector (3).
4. Connect negative battery cable and tighten nut to 5 N.m (45 in. lbs.).
3.5L
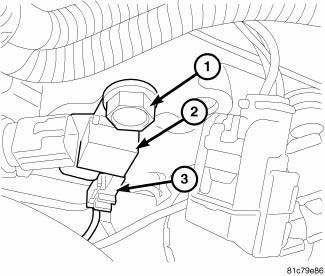
Fig. 10: Ignition Capacitor - 3.5L
1. Install ignition coil capacitor (2) and bolt (1).
2. Tighten bolt to 28 N.m (20.5 ft. lbs.).
3. Connect electrical connector (3).
4. Connect negative battery cable and tighten nut to 5 N.m (45 in. lbs.).
 Removal
2.4L
Fig. 3: Capacitor 2.4L
- Bolt
- Capacitor
- Connector
1. Disconnect and isolate negative battery cable at battery.
2. Remove engine cover.
3. Remove electrical connector (3).
...
 Coil, ignition
...
See also:
Diagnosis and Testing
BASE BRAKE SYSTEM
NOTE: There are three diagnosis charts following that cover the RED
BRAKE
WARNING INDICATOR LAMP, BRAKE NOISE and OTHER BRAKE CONDITIONS.
RED BRAKE WARNING INDICATOR LAMP ...
Description, Diagnosis and Testing
DESCRIPTION
Fig. 91: Cylinder Head, Valves & Springs
- VALVE KEEPER
- SPRING RETAINER
- VALVE KEEPER
- VALVE SPRING-EXHAUST
- SPRING RETAINER
- VALVE STEM SEAL
- VALVE-EXHAUST
...
Hydraulic pressure tests
Fig. 4: Identifying Transmission Electrical Connectors
NOTE: Before preforming the hydraulic pressure tests be certain to
disconnect the
Variable Line Pressure (VLP) electrical connector (2 ...
