Dodge Journey: Reservoir, brake master cylinder
Removal
CAUTION: If at any time the master cylinder is loosened or removed, you must perform the master cylinder installation procedure to ensure that the seal (o-ring) is still on the hub of the master cylinder.
NOTE: The brake fluid level switch is mounted through the center of the fluid reservoir.
The switch can be serviced separately from the master cylinder fluid reservoir.

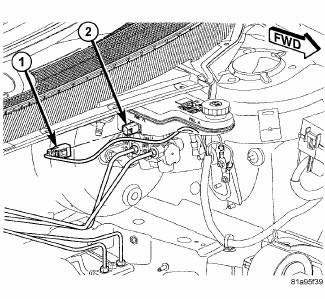
Fig. 150: BRAKE FLUID LEVEL SWITCH CONNECTOR
1. Remove the outer and inner cowl covers.
2. Remove the front wiper motor module.
3. Clean the master cylinder housing and brake fluid reservoir. Use only Mopar Brake Parts Cleaner or equivalent.
4. Remove the wiring harness connector (1) from the brake fluid level switch (2) in the master cylinder brake fluid reservoir.
5. Remove the brake fluid reservoir cap. Using a syringe or equivalent type tool, empty as much brake fluid as possible from the reservoir.

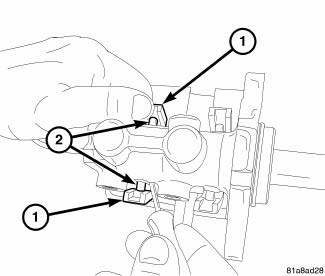
Fig. 151: REMOVING RESERVOIR FROM MASTER CYLINDER PINS
6. Remove the four reservoir retaining tabs from the mounting posts on the master cylinder housing.
7. Pull the reservoir straight up and remove it from the grommet seals in master cylinder housing.
Installation
NOTE: The brake fluid level switch is mounted through the center of the fluid reservoir.
The switch can be serviced separately from the master cylinder fluid reservoir.

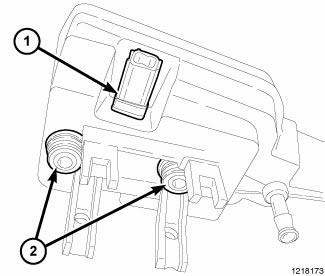
Fig. 152: Grommet Seals
1. Lubricate the reservoir mounting area with fresh clean brake fluid. With the grommet seals (2) on the fluid reservoir spigots, place the reservoir in position over the master cylinder. Install the fluid reservoir by firmly pressing down on the fluid reservoir. Once installed, make sure the fluid reservoir is touching the top of both grommet seals.
2. Push the reservoir retaining tabs over the mounting posts on the master cylinder housing. Make sure the retaining tabs are securely engaged.
3. Fill the brake fluid reservoir with fresh Mopar Brake Fluid DOT 3 Motor Vehicle, or equivalent.
4. Install the front wiper motor module.
5. Install the inner and outer cowl covers.
 Installation
LEFT-HAND-DRIVE
Fig. 140: PEDAL AND BOOSTER MOUNTING - LHD
1. Carefully install the brake pedal and bracket assembly (1) in the vehicle
lining up the bracket with the
power brake booster mounti ...
 Rotor, brake
...
See also:
Standard procedure, Removal
STANDARD PROCEDURE
FRONT LAMP UNIT MOISTURE CLEARING
Some occasional moisture accumulation inside a vented front lamp unit is
normal and appears as a fogging on
the inside of the lamp lens, simil ...
Module, power, rear blower motor
DESCRIPTION
Fig. 59: Rear Blower Power Module Description
A blower motor power module is used on this model when equipped with the
automatic temperature control
(ATC) rear heating-A/C system. M ...
Installation
Fig. 40: Seal Protector
- HALFSHAFT
- SEAL PROTECTOR
1. Install halfshaft to hub/bearing assembly. Install hub nut and washer but
do not tighten at this time.
2. Using Seal Protector 9 ...
