Dodge Journey: Belt, serpentine, power steering
Removal
2.7L ENGINE
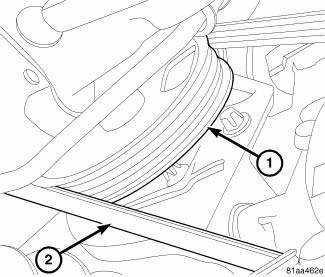
Fig. 28: STRETCH TO FIT POWER STEERING BELT REMOVAL
- - POWER STEERING PULLEY
- - STRETCH TO FIT POWER STEERING BELT
1. Raise and support the vehicle.
2. Remove RH wheelhouse splash shield.
3. Use a socket and ratchet to rotate the crankshaft clockwise.
4. While rotating the crankshaft clockwise, walk the power steering drive belt (2) off of the power steering pulley (1)
5. Remove the power steering drive belt (2).
Installation
2.7L ENGINE
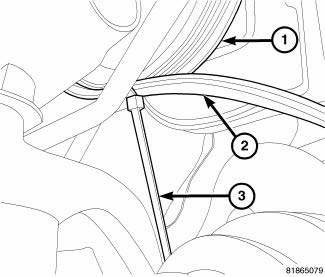
Fig. 29: POWER STEERING DRIVE BELT INSTALLATION
- - P/S PUMP PULLEY
- - POWER STEERING BELT
- - NYLON WIRE TIE
1. Position the power steering drive belt (2) on the crankshaft pulley. Make sure the belt (2) is fully seated in the crankshaft pulley grooves.
2. Position the bottom of the drive belt (2) on the bottom of the power steering pulley (1).
NOTE: Use only wire ties with nylon locks, not metal.
3. Working from the back side of the power steering pulley (1), insert a nylon wire tie (3), 7.75X1/8x0.050 in. through one of the holes in the pulley (1).
4. Tighten the wire tie to hold the drive belt (2) in position.
5. While holding the drive belt (2) to make sure it stays in position, slowly rotate the engine clockwise.
6. Once the belt is in position on the pulley (1), continue rotating the engine until the wire tie snaps (3).
7. Remove the wire tie (3) from the vehicle.
8. Install the RH wheelhouse splash shield.
 Belt, serpentine
Description
Fig. 15: ACCESSORY DRIVE BELT - WORLD ENGINE
- POWER STEERING PUMP
- ACCESSORY DRIVE BELT
- GENERATOR
- CRANKSHAFT PULLEY
- LOWER IDLER PULLEY
- CRANKSHAFT PULLEY
- WATE ...
 Pulley, idler
Removal
2.4L ENGINE
Fig. 30: ACCESSORY DRIVE BELT IDLER PULLEY - 2.4L
- UPPER PULLEY
- LOWER PULLEY
1. Remove accessory drive belt.
2. Remove upper idler pulley (1) and bolt.
3. Re ...
See also:
Description, Operation
DESCRIPTION
A diesel particulate filter (DPF) is installed for exhaust gas
after-treatment. The DPF filters, stores and burns
particulate matter (soot) that is generated during the combustion proc ...
TO OPEN AND CLOSE THE HOOD
Two latches must be released to open the hood.
1. Pull the hood release lever located under the left side
of the instrument panel.
Hood Release
2. Outside of the vehicle, locate the safety latch ...
CLIMATE CONTROLS
The Climate Control System allows you to regulate the
temperature, amount, and direction of air circulating
throughout the vehicle. The controls are located in the
center stack of the instrument pa ...
