Dodge Journey: Description, Standard procedure
DESCRIPTION
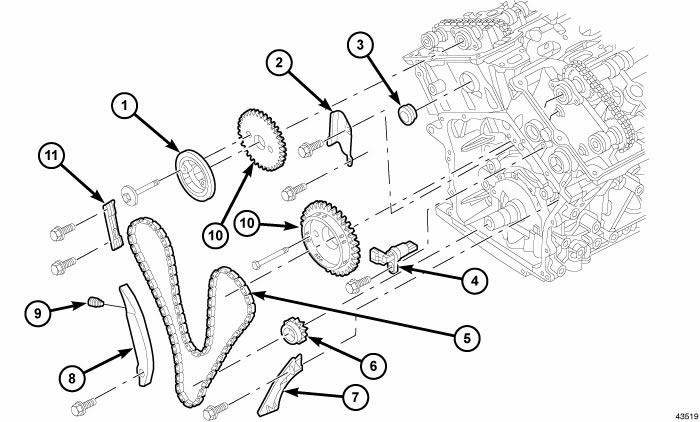
Fig. 331: Identifying Timing Drive System Components
The timing drive system has been designed to provide quiet performance and reliability to support a NON freewheeling engine. The system consists of a primary (5) drive chain and a secondary chain drive.
The primary timing chain (5) is a double-flexure, inverted tooth type chain. The primary chain drives both of the intake camshafts directly from a sprocket mounted on the crankshaft. In addition, the water pump is driven by the "back side" of the primary chain, necessitating the double-flexure type chain.
The chain is controlled by three fixed chain guides (2), (7), (11) and a pivoting tensioner arm (8). These guides utilize low-friction and long wearing nylon plastic wear faces. To tension the primary chain, a fully automatic spring-loaded, engine oil-fed, hydraulic tensioner (9) is used. The tensioner (9) is mounted in the right cylinder head with the plunger contacting the pivoting tensioner arm (8). A mechanical ratchet mechanism inside the tensioner prevents excessive chain slack upon engine start-up as the chain wears. The tensioner is designed with an internal oil reservoir to assure noise-free performance, even during engine start-up before oil pressure reaches the tensioner.
For lubrication the primary chain utilizes oil leakage from the front of the oil pump. This oil spills on the crankshaft sprocket, which is then carried by the chain throughout the primary drive.

Fig. 332: Camshaft & Valvetrain Components
The secondary timing chain (11) drive system uses either two conventional roller-type chains (early production) or two silent type chains (late production), one at each cylinder bank. The purpose of the secondary chain (11) is to provide a mechanical driven connection between the intake and exhaust camshafts. The intake camshafts drive the exhaust camshafts. The sprockets for both intake and exhaust camshafts are a press-fit and are only serviced as an assembly with the camshafts.
To tension the secondary chain, spring-loaded, hydraulic tensioners (7) are used at each bank and attach to each cylinder head between the intake and exhaust camshafts. The tensioner (7) incorporates upper and lower chain guide faces. The lower guide face is attached directly to the tensioner's hydraulic plunger. Also, the tensioner uses an internal oil reservoir design to prevent engine start-up noise. The secondary chains are lubricated via an oil passage through the upper guide face on each tensioner.
STANDARD PROCEDURE
ENGINE TIMING - VERIFICATION
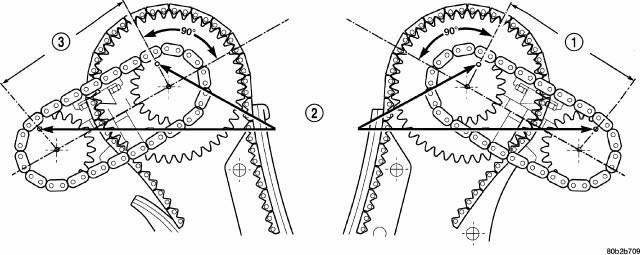
Fig. 333: ENGINE TIMING
- - 12 PINS
- - CAMSHAFT TIMING MARKS
- - 12 PINS
NOTE: Note: The engine timing verification procedure is the same for both conventional roller-type (early production) or silent type (late production) secondary timing chains.
Correct timing is critical for the NON free-wheeling designed, 2.7L engine. Engine timing can be verified by using the following procedures:
1. Remove cylinder head covers.
2. Rotate engine until number one cylinder is at TDC on the EXHAUST stroke.
3. View the intake camshaft sprocket timing mark. The mark should be 90º from the cylinder head cover sealing surface on both right and left cylinder banks.
4. Count the chain pins between the timing marks (2) on the intake camshaft and the exhaust camshaft.
Engine is timed correctly when there are 12 chain pins between the timing marks (2) on the intake camshaft and exhaust camshaft.
5. If marks are not correctly aligned, proceed to Engine/Valve Timing/CHAIN and SPROCKETS, Timing - Removal.
 Valve timing
...
 Chain and sprockets, timing
Removal
TIMING CHAIN AND CAM SPROCKETS
Fig. 334: TIMING MARK ALIGNMENT
- CAMSHAFT TIMING MARKS
- CRANKSHAFT TIMING MARKS
1. Disconnect negative battery cable.
2. Drain cooling system.
...
See also:
Line, A/C discharge
DESCRIPTION
Fig. 241: Discharge Line Description
NOTE: 2.7L shown. Other engines similar.
The A/C discharge line (2) is the refrigerant line that carries refrigerant
from the A/C compresso ...
Removal, Installation
REMOVAL
Fig. 48: Lower Instrument Panel Knee Blocker
1. Disconnect and isolate the battery negative cable.
2. Remove the lower instrument panel knee blocker.
3. Remove upper steering colu ...
HOW TO USE THIS MANUAL
Consult the Table of Contents to determine which section
contains the information you desire.
The detailed Index at the back of this manual contains a
complete listing of all subjects.
Consult the ...
