Dodge Journey: Removal
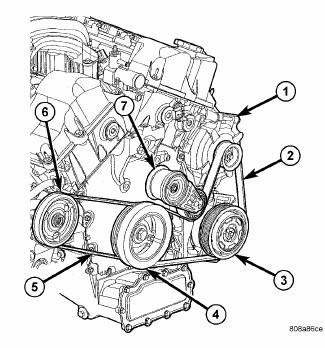
Fig. 93: Accessory Drive Belt System - 2.7L
- - GENERATOR
- - IDLER/TENSIONER
1. Perform fuel pressure release procedure before attempting any repairs.
2. Disconnect negative cable from remote jumper terminal.
3. Drain cooling system.
4. Remove accessory drive belts.
5. Remove the vibration damper.
6. Remove exhaust cross-under pipe.
7. Remove the maniverter.
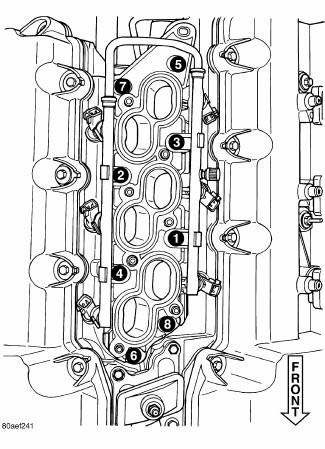
Fig. 94: Lower Intake Manifold Tightening Sequence
8. Remove oil pressure sensor heat shield. Disconnect oil pressure sensor connector.
9. Remove upper and lower intake manifolds.
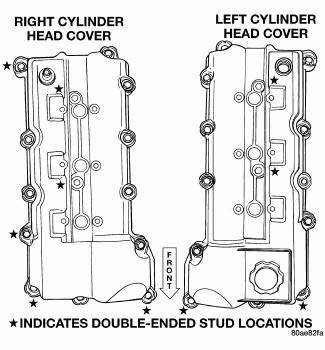
Fig. 95: Cylinder Head Covers
10. Remove cylinder head covers.
11. Disconnect camshaft position sensor and crankshaft position sensor connectors.
12. Reposition engine wiring harness to left side of vehicle.
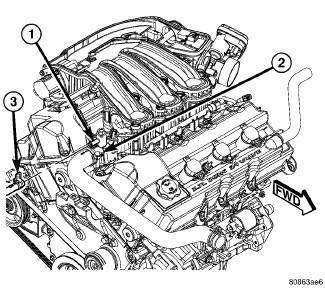
Fig. 96: Coolant Outlet Connector - 2.7L
- - BOLT (2)
- - BOLT (2)
- - COOLANT OUTLET CONNECTOR
13. Remove coolant outlet connector (3).
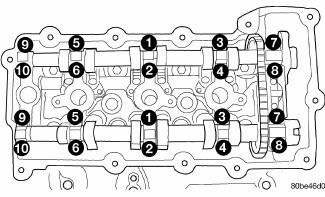
Fig. 97: Camshaft Bearing Cap Tightening Sequence
14. Remove timing chain cover.
15. Rotate crankshaft until crankshaft sprocket timing mark aligns with timing mark on oil pump housing.
16. Remove primary timing chain.
17. Remove upper primary timing chain guides.
18. Remove camshaft bearing caps gradually in REVERSE sequence of installation (10-1).
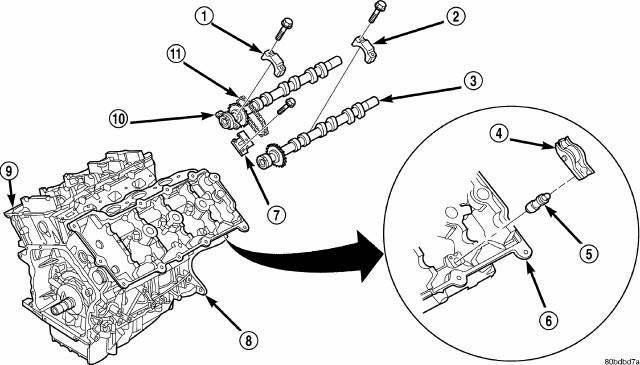
Fig. 98: Camshaft & Valvetrain Components
- - CAMSHAFT BEARING CAP - INTAKE
- - CAMSHAFT BEARING CAP - EXHAUST
- - CAMSHAFT - EXHAUST
- - ROCKER ARM
- - HYDRAULIC LIFTER
- - CYLINDER HEAD
- - CAMSHAFT (SECONDARY) CHAIN TENSIONER
- - CYLINDER BLOCK
- - CYLINDER HEAD
- - CAMSHAFT - INTAKE
- - CAMSHAFT (SECONDARY) TIMING CHAIN
19. Remove camshafts (10) and valvetrain components from cylinder head. Note component locations for reinstallation in original locations.
20. For left cylinder head removal:
- Remove fastener securing engine oil dipstick tube to cylinder head. Remove engine oil dipstick tube.
- Remove generator.
21. For right cylinder head removal:
- Remove cylinder head ground strap.
- Disconnect EGR valve electrical connector (if equipped).
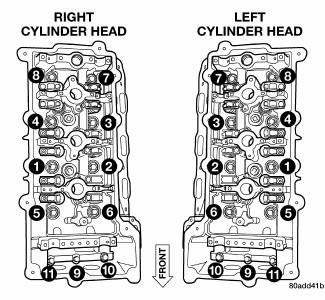
Fig. 99: Cylinder Head Tightening Sequence
CAUTION: Ensure cylinder head bolts 11-9 are removed before attempting the removal of cylinder head, as damage to cylinder head and/or block may occur.
22. Remove cylinder head bolts in reverse sequence of installation starting with bolts 11-9, then bolts 8-1.
23. Remove cylinder head(s).
24. Remove and discard cylinder head gasket.
25. Clean cylinder head and block sealing surfaces.
 Standard procedure
CYLINDER HEAD OIL GALLERY CUP PLUG SERVICE
Fig. 92: Oil Gallery Cup Plug
- CUP PLUG BORE CHAMFER
- ORIGINAL CUP PLUG
- NEW CUP PLUG
- 1-2 mm
NOTE: DETERMINE WHICH CUP PLUG IS LEAKIN ...
 Cleaning, inspection
CLEANING
To ensure engine gasket sealing, proper surface preparation must be
performed, especially with the use of
aluminum engine components and multi-layer steel cylinder head gaskets.
NOTE: ...
See also:
Disassembly, Assembly
Disassembly
NOTE: Before disassembling the brake caliper, remove it from the
vehicle.
NOTE: Before disassembling the brake caliper, clean and inspect it.
WARNING: Under no condition sh ...
Assembly
NOTE: If the coil spring has been removed from the spring compressor,
proceed with
the next step, otherwise, proceed with 3.
NOTE: To determine the flat coil end of the coil spring for the ...
Switch, backup lamp
REMOVAL
Fig. 249: Back-Up Lamp Switch
1. Disconnect battery negative cable.
2. Raise vehicle on hoist.
3. Disconnect backup lamp switch connector.
4. Remove backup lamp switch (1).
INSTA ...
