Dodge Journey: Crankshaft
Description
The crankshaft is constructed of a forged micro alloy steel. The six throw, nine counterweight crankshaft is supported by four select fit main bearings with the number three serving as the thrust washer location. The select fit identification markings will be on the rear side of the number nine (rearmost) counterweight. The six separate connecting rod throws are an even-firing design which reduces torque fluctuations while a vibration damper is used to control torsional vibration.
The crankshaft oil seals are a one piece design. The front seal is retained by the timing chain cover, and the rear seal in a housing that attaches to the cylinder block.
Standard Procedure
CRANKSHAFT END PLAY
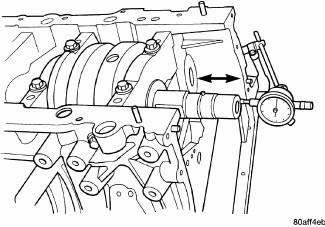
Fig. 178: CHECKING CRANKSHAFT END PLAY
1. Mount a dial indicator to a stationary point at front of engine. Locate the probe perpendicular against nose of crankshaft.
2. Move crankshaft all the way to the rear of its travel.
3. Zero the dial indicator.
4. Move crankshaft all the way to the front and read the dial indicator.
Removal

Fig. 179: Cylinder Head Cover Fasteners
1. Drain engine oil and remove oil filter.
2. Remove engine from vehicle.
3. Mount engine on an engine stand.
4. Remove oil pan and oil pick-up tube.
5. Remove idler pulley bracket for accessory drive belt.
6. Remove upper intake manifold.
7. Remove cylinder head covers.
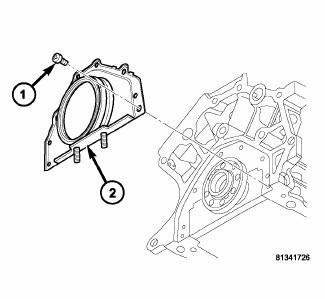
Fig. 180: Oil Seal Retainer
8. Remove timing chain cover.
9. Remove primary timing chain.
10. Remove crankshaft sprocket.
11. Remove oil pump.
12. Remove crankshaft rear oil seal retainer (2).
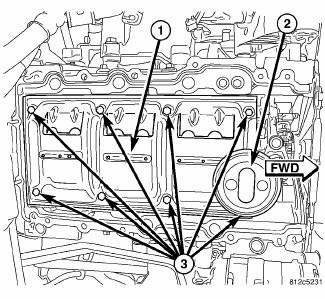
Fig. 181: Windage Tray
13. Remove windage tray (1).
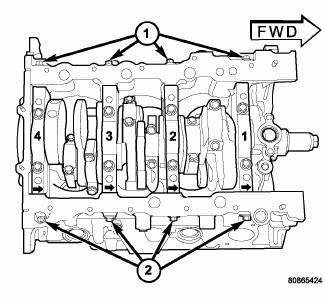
Fig. 182: Main Bearing Cap Identification
14. Turn crankshaft until connecting rod cap to be removed is accessible.
NOTE: Connecting rod bearing caps are not interchangeable and should be marked before removing to ensure correct reassembly.
CAUTION: DO NOT use a number stamp or a punch to mark connecting rods.
Damage to connecting rod could occur.
15. Mark connecting rod bearing cap positions using a permanent ink marker or scribe tool. Also scribe a location reference mark from the #3 main bearing cap to the engine block to use as a guide during reassembly.
16. Remove connecting rod bearing caps. Use care to prevent damage to the crankshaft bearing surfaces.
CAUTION: Care should be taken not to damage the fractured rod and cap joint face surfaces or damage to the engine may occur.
17. Remove main bearing tie bolts (1) and (2).

Fig. 183: Cylinder Block & Crankshaft
18. Remove main bearing cap bolts (1) and main bearing caps (2).
CAUTION: When removing crankshaft, use care not to damage bearing surfaces on the crankshaft.
19. Remove crankshaft (7) from cylinder block (6).
Installation
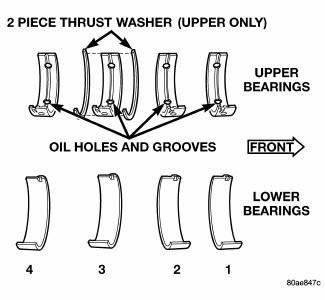
Fig. 184: Main Bearing Identification
NOTE: Upper and lower bearing halves are NOT interchangeable.
CAUTION: Main bearings are select fit.
1. Install crankshaft upper main bearings in cylinder block. Ensure the tangs engage the slots in the block and oil holes in bearings line up with oil holes in cylinder block.
2. Lubricate upper main bearing halves with engine oil.
CAUTION: When installing crankshaft, use care not to damage bearing surfaces on the crankshaft.
3. Install crankshaft.
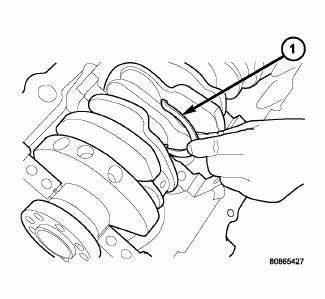
Fig. 185: Thrust Washer - Installation
NOTE: Make sure that the coated and oil groove side of crankshaft thrust washer faces the crankshaft thrust surface.
4. Push crankshaft forward. Lubricate and install the front thrust washer (1) by rolling the thrust washer onto the machined shelf between the No. 3 upper main bulk head and crankshaft thrust surface.
5. Move crankshaft rearward. Lubricate and install the rear thrust washer by rolling the thrust washer onto the machined shelf between the No. 3 upper main bulk head and crankshaft thrust surface.
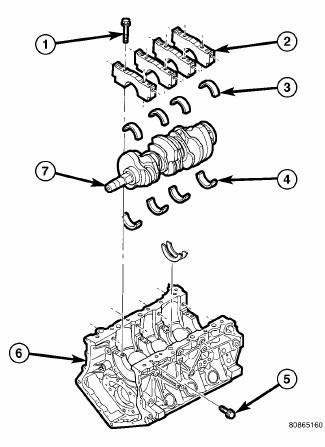
Fig. 186: Cylinder Block & Crankshaft
6. Install lower main bearings (3) into main bearing caps (2).
7. Lubricate lower main bearings (3) with clean engine oil.
NOTE: Lubricate main bearing cap bolts with engine oil before installation.
8. Install each main cap (2) and tighten inner bolts (1) finger tight. Align the location reference mark scribed on the #3 main bearing cap during disassembly.
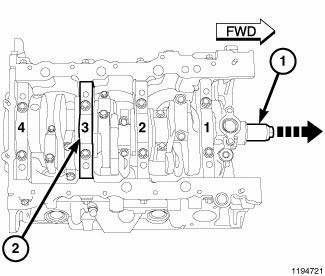
Fig. 187: Moving Crankshaft Forward So Crankshaft Face Is Tight Against
Thrust Bearing
CAUTION: The #3 main bearing cap must be centered over the inner bolt holes located on the block. Failure to center the bearing cap can result in contact with the crankshaft counterweights and thrust bearing failure.
9. Verify that the #3 main bearing cap is properly centered over the inner bolt holes located in the block:
- Tighten main bearing cap inner bolts to 20 N.m (15 ft. lbs.).
- Move crankshaft (1) forward to limit of travel so that crankshaft thrust face (2) is tight against thrust bearing.
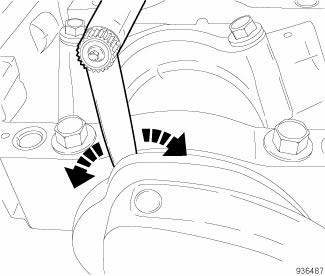
Fig. 188: Sliding Feeler Gauge Side-To-Side Across Bearing Cap
- Verify that a 0.25 mm (0.010 inch) shim or feeler gage will fit between the #3 main cap (rear face) and the crankshaft thrust face. Slide the gage side-to-side all of the way across the cap making sure that the clearance at all areas exceeds 0.25 mm (0.010 inch). The feeler gage should slide all the way down to the #3 main journal.
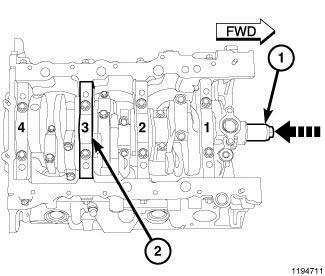
Fig. 189: Moving Crankshaft Rearward So Crankshaft Face Is Tight Against
Thrust Bearing
- Move crankshaft (1) rearward to limit of travel so that crankshaft thrust face (2) is tight against thrust bearing.
- Verify that a 0.25 mm (0.010 inch) shim or feeler gage will fit between the #3 main cap (front face) and the crankshaft thrust face. Slide the gage side-to-side all of the way across the cap making sure that the clearance at all areas exceeds 0.25 mm (0.010 inch). The feeler gage should slide all the way down to the #3 main journal.
- A properly centered #3 main bearing cap has a minimum of 0.25 mm (0.010 inch) clearance in both the forward and rearward crankshaft positions. If measured clearance is less than 0.25 mm (0.010 inch), loosen and reposition #3 main bearing cap until this minimum clearance can be verified by repeating this procedure.
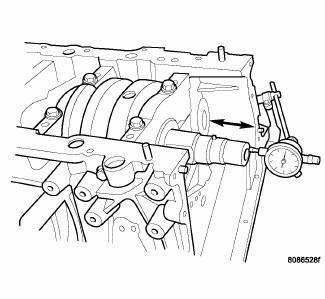
Fig. 190: CHECKING CRANKSHAFT END PLAY
10. Following verification of proper #3 bearing cap centering, finish tightening the main bearing cap inner bolts an additional 90º turn.
11. Measure crankshaft end play.
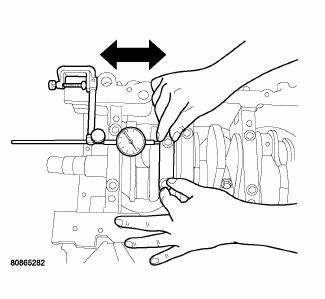
Fig. 191: Measuring Connecting Rod Side Clearance
12. Install connecting rods and measure side clearance.

Fig. 192: Windage Tray
NOTE: The main bearing cap bolts must be tightened in the proper sequence.
First the inner main cap bolts, secondly the windage tray bolts, and lastly the main cap tie (horizontal) bolts.
13. Install windage tray (1) with the slots to right side of engine. Lubricate bolts (3) with engine oil and tighten to 27 N.m + 90º Turn (20 ft. lbs. + 90º turn).

Fig. 193: Main Bearing Cap Identification
14. Install the main cap tie (horizontal) bolts (1) and (2) and tighten to 28 N.m (250 in. lbs.).
15. Install rear crankshaft oil seal retainer and oil seal assembly.

Fig. 194: Oil Pump & Pick-up Tube
16. Install oil pump assembly (5).
17. Install oil pick-up tube (3) and O-ring (2). Tighten bolts (4) to 28 N.m (250 in. lbs.).
18. Install oil pan gasket, oil pan, and oil filter.
19. Install crankshaft sprocket.
20. Install timing chain.
21. Install timing chain cover.
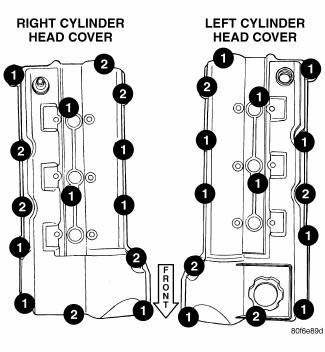
Fig. 195: Cylinder Head Cover Fasteners
22. Install cylinder head covers.
23. Install oil dipstick tube.
24. Install engine assembly.
25. Fill engine crankcase with proper oil to correct level.
26. Fill with coolant.
27. Start engine and check for leaks.
 Cover, structural dust
Removal
Fig. 172: Belly Pan
1. Raise and secure the vehicle on a hoist.
2. Remove the belly pan (2), if equipped.
Fig. 173: Front Engine Mount Through Bolt
3. Remove the fore/aft crossmemb ...
 Damper, vibration
Removal
Fig. 196: Vibration Damper - Removal
- SPECIAL TOOL 8454 PULLER
- SPECIAL TOOL 8194 INSERT
1. Disconnect negative battery cable.
2. Remove right front wheel and belt splash shie ...
See also:
Transmission
COOLER, TRANSMISSION OIL
Description
Fig. 128: TRANSMISSION OIL COOLER
- Air Conditioning Condenser/Transmission Oil Cooler
- Transmission Cooler Outlet
- Transmission Cooler Inlet
- Air ...
ROOF LUGGAGE RACK — IF EQUIPPED
The roof rack cross rails and side rails are designed to
carry cargo weight. The load must not exceed 150 lbs
(68 kg), and it should be distributed uniformly over the
cross rails. In addition, the ...
Installation
FOOT OPERATED PARKING BRAKE LEVER
Fig. 234: FOOT LEVER MOUNTING
1. Position the parking brake lever (1) over the mounting studs, against the
left lower cowl (3).
2. Install the three mounting ...
