Dodge Journey: Fascia, rear
REMOVAL

Fig. 15: Push Pins
1. Open the hatch.
2. Remove the 6 pushpins (1) securing the fascia (2).

Fig. 16: Rivets
3. Remove the rivets (2) and the Torx screw (3) around the wheel well for the fascia (1).
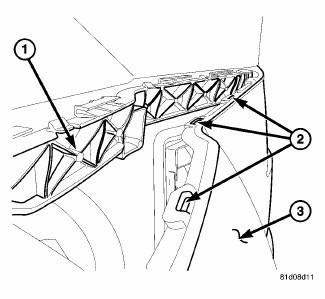
Fig. 17: Tabs, Fascia & Bracket
4. Separate the tabs (2) securing the fascia (3) to the bracket (1).

Fig. 18: Tail Light Push Pin
5. Remove the push pin (2) under the taillight (1) to the fascia (3).
6. Remove fascia (3) from vehicle.
INSTALLATION
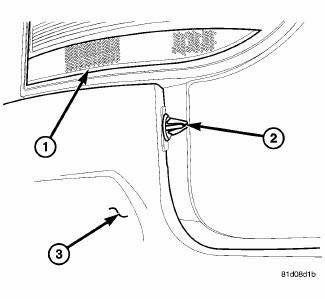
Fig. 19: Tail Light Push Pin
1. Install the fascia (3) to the vehicle and install the pushpin (2) at the tailight (1) to the body.

Fig. 20: Tabs, Fascia & Bracket
2. Clip the fascia (3) into the tabs (2) to the bracket (1).
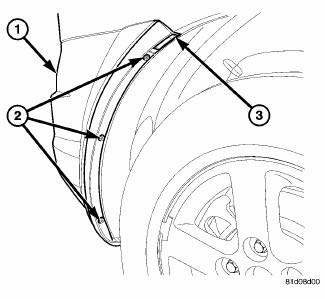
Fig. 21: Rivets
3. Install the Torx screw (3) for the fascia top the wheel opening and then install the pop rivets (2).

Fig. 22: Push Pins
4. Install the 6 push pins (1) to secure the fascia (2) to the body.
5. Close the hatch and check for fit.
 Fascia, front lower, closeout
REMOVAL
Fig. 11: Lower Fascia
1. Remove fasteners (5) to lower closeout.
Fig. 12: Push Pins - Front Lower Fascia
2. Remove push pins (1) to lower closeout.
3. Remove the front lower fascia.
...
 Reinforcement, bumper, front
REMOVAL
Fig. 23: Front Bumper Reinforcement
1. Remove the front fascia. See Removal .
2. Support bumper reinforcement (3) on a suitable lifting device.
3. Mark the position of the bolts (1) ...
See also:
ELECTRONIC VEHICLE INFORMATION CENTER (EVIC) — IF EQUIPPED
The Electronic Vehicle Information Center (EVIC) features
a driver-interactive display. It is located in the
instrument cluster below the fuel and temperature
gauges. Vehicles equipped with steerin ...
Belt, serpentine
Description
Fig. 15: ACCESSORY DRIVE BELT - WORLD ENGINE
- POWER STEERING PUMP
- ACCESSORY DRIVE BELT
- GENERATOR
- CRANKSHAFT PULLEY
- LOWER IDLER PULLEY
- CRANKSHAFT PULLEY
- WATE ...
FREEING A STUCK VEHICLE
If your vehicle becomes stuck in mud, sand, or snow, it
can often be moved by a rocking motion. Turn your
steering wheel right and left to clear the area around the
front wheels. Then shift back an ...
