Dodge Journey: Synchronizer
DISASSEMBLY
Place synchronizer in a clean shop towel and wrap. Press on inner hub. Carefully open up shop towel and remove springs, balls, keys, hub, and sleeve.
CLEANING
Do not attempt to clean the blocking rings in solvent. The friction material will become contaminated. Place synchronizer components in a suitable holder and clean and air dry.
INSPECTION
Proper inspection of components involve:
- Teeth, for wear, scuffed, nicked, burred, or broken teeth
- Keys, for wear or distortion
- Balls and springs, for distortion, cracks, or wear
If any of these conditions exist in these components, replace as necessary.
ASSEMBLY

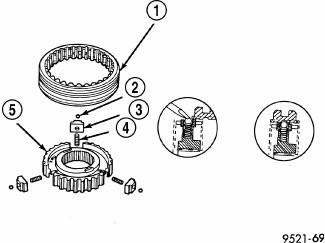
Fig. 251: Synchronizer Assembly
- - SLEEVE
- - BALL
- - KEY
- - SPRING
- - HUB
1. Position synchronizer hub (5) onto a suitable holding fixture (input shaft). The synchronizer hubs (5) are directional. The hubs must be installed with the U facing upward.
2. Install springs (4) into hub slot.

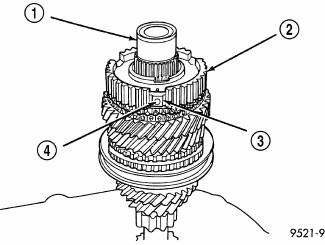
Fig. 252: Inserting Synchronizer Balls Into Keys
- - INPUT SHAFT
- - HUB
- - KEY
- - BALL
3. Insert key (3) into hub (2) and spring.
4. Apply petroleum jelly to the hole in the key. Insert balls (4) into each key.

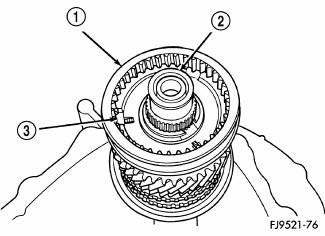
Fig. 253: Identifying Synchronizer Sleeve, Input Shaft, & Key
- - SLEEVE
- - INPUT SHAFT
- - KEY
5. Slide sleeve (1) over the hub and depress balls as you carefully slip the sleeve into position .

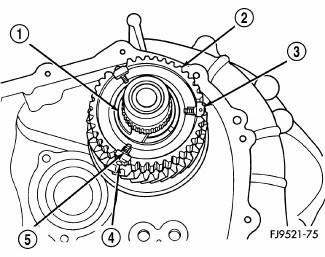
Fig. 254: Centering Synchronizer Keys & Balls By Pushing On Both Stop Rings
- - SNAP RING
- - CLUTCH
- - KEY
- - BALL
- - SPRING
6. Line up stop ring tang over the keys in the hub, install stop rings, center the keys (3) and balls (4) by pushing on both stop rings.
 Switch, backup lamp
REMOVAL
Fig. 249: Back-Up Lamp Switch
1. Disconnect battery negative cable.
2. Raise vehicle on hoist.
3. Disconnect backup lamp switch connector.
4. Remove backup lamp switch (1).
INSTA ...
See also:
Cooler and lines, oil
Description
Fig. 250: Oil Cooler Fasteners
Some 2.7L engines may be equipped with an engine oil cooler (2) that is
mounted to the rear transmission
mount bracket. Oil lines route oil from the e ...
Actuator, blend door, rear
DESCRIPTION
Fig. 47: Rear Actuator Description
The blend door actuator (1) for the rear heating-A/C system is a reversible,
12 volt direct current (DC), servo
motor. The rear blend door actuato ...
Air cleaner
REMOVAL
Fig. 85: Air Filter Housing Clips
1. Disengage the air filter housing clips (1).
2. Slide the air filter housing cover (2) forward slightly to disengage tabs
from the bottom of the ai ...
