Dodge Journey: Seal, axle drive shaft
REMOVAL
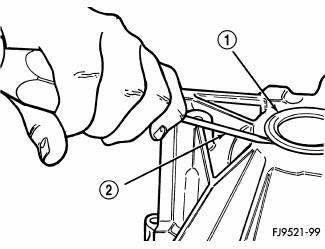
Fig. 197: Axle Shaft Seal Removal
1. Remove axle shaft.
2. Insert a flat-blade pry tool (2) at outer edge of axle shaft seal (1).
3. Tap on the pry tool (2) with a small hammer and remove axle shaft seal (1).
INSTALLATION
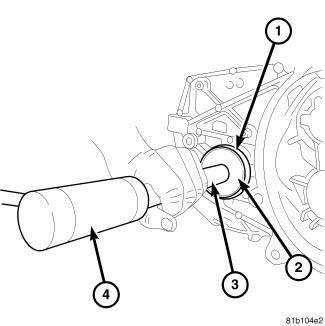
Fig. 198: Aligning Axle Shaft Seal With Axle Shaft Seal Bore
1. Clean axle shaft seal bore of any excess sealant.
2. Align (bellhousing side) axle shaft seal with axle shaft seal bore.
3. Install axle seal on Seal Installer 9928 and Handle C-4171 and insert into axle shaft seal bore.
4. Tap seal into position until seated against transaxle case.
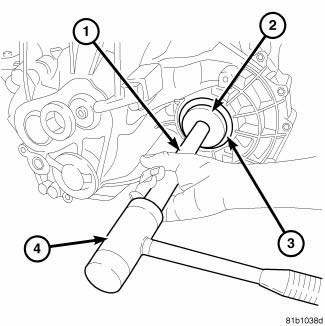
Fig. 199: Differential Side Seal
5. Align axle shaft seal with axle shaft seal bore.
6. Install (case side) axle seal on Seal Installer 9934 and Handle C-4171 and insert into axle shaft seal bore.
7. Tap seal into position until seated against transaxle case.
8. Install axle shaft.
9. Check transaxle fluid level and adjust as necessary.
 Mechanism, gearshift
REMOVAL
Fig. 193: Shift Cables To Shifter
1. Detach gear shift boot from console.
2. Remove the center console assembly.
3. Remove rear power window switch (if equipped) and disconnect ha ...

See also:
Description
MANUAL TEMPERATURE CONTROL (MTC) SINGLE ZONE
The A/C-heater control for the front Manual Temperature Control (MTC) single
zone system allows one
temperature setting for the entire vehicle. All con ...
POWER SUNROOF — IF EQUIPPED
The power sunroof switch is located between the sun
visors on the overhead console.
Power sunroof Switch
WARNING:
• Never leave children in a vehicle with the key in
the ignition switch. Occu ...
Diagnosis and Testing
BASE BRAKE SYSTEM
NOTE: There are three diagnosis charts following that cover the RED
BRAKE
WARNING INDICATOR LAMP, BRAKE NOISE and OTHER BRAKE CONDITIONS.
RED BRAKE WARNING INDICATOR LAMP ...
