Dodge Journey: Description, Operation
DESCRIPTION

Fig. 418: Identifying Ignition Key/Switch Positions
- - LOCK
- - ACC
- - ON
- - START
The Brake Transmission Shifter/Ignition Interlock (BTSI) is a solenoid operated system that prevents the transmission gear shifter from being moved out of PARK without a driver in place.
OPERATION
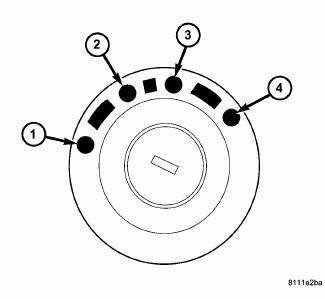
Fig. 419: Identifying Ignition Key/Switch Positions
- - LOCK
- - ACC
- - ON
- - START
The Brake Transmission Shifter/Ignition Interlock (BTSI) is engaged whenever the ignition switch is in the LOCK or ACC position. An additional electrically activated feature will prevent shifting out of the PARK position unless the brake pedal is depressed at least one-half inch. When the key is in the ON position and the brake pedal is depressed, the shifter is unlocked and will move into any position.
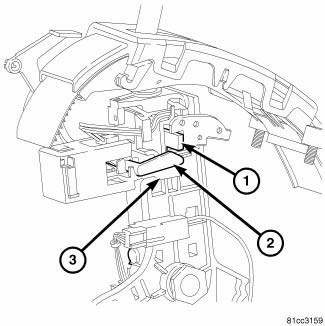
Fig. 420: Identifying Rotating Arm, Blocking Arm, & Shifter Gate Pin
When service brake pedal is not depressed the solenoid rotating arm (2) is free to rotate. The shifter gate pin (1) hits the blocking arm (3) and is prevented from moving from park.
When service brake is applied the rotating arm (2) is prevented from rotating by magnetic force within the solenoid. The shifter gate pin (1) pushes the rotating arm (2) and blocker arm (3) allowing the shifter to move out of park.

 Diagnosis and testing
SHIFT INTERLOCK SYSTEM
Fig. 421: Identifying Ignition Key/Switch Positions
- LOCK
- ACC
- ON
- START
The Shifter Response Table describes the normal operation of the
Brak ...
See also:
Removal
WARNING: Review safety precautions and warnings in this part
before performing
this procedure. See Heating and Air Conditioning/Plumbing - Warning
and. Failure to
follow the warnin ...
Tube, exhaust gas recirculation (EGR)
Removal
2.7L - LOWER TUBE
Fig. 50: Lower Exhaust Gas Recirculation Tube - 2.7L
WARNING: The normal operating temperature of the exhaust gas
recirculate (EGR)
valve and tube is very ...
Installation
NOTE: Perform 1 through 5 on each side of the vehicle to complete pad
set installation,
then proceed to 6.
NOTE: Make sure that the audible wear indicator (if equipped) is placed
toward ...
