Dodge Journey: Sensor, speed, output
DESCRIPTION
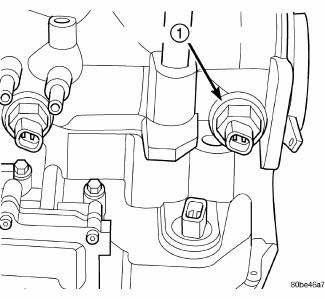
Fig. 378: Identifying Output Speed Sensor
- - OUTPUT SPEED SENSOR
The Output Speed Sensor (1) is a two-wire magnetic pickup device that generates an AC signal as rotation occurs. It is threaded into the transaxle case.
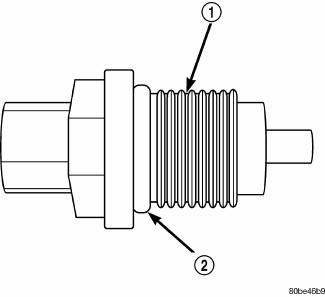
Fig. 379: Identifying Output Speed Sensor & O-Ring
- - OUTPUT SPEED SENSOR
- - O-RING
The Output Speed Sensor (1) is sealed with an O-ring (2) , and is considered a primary input to the Powertrain/Transmission Control.
OPERATION
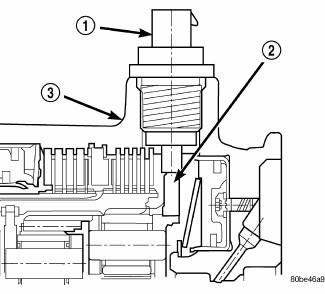
Fig. 380: Identifying Output Speed Sensor & Rear Planet Carrier/Output Shaft
Assembly
- - OUTPUT SPEED SENSOR
- - REAR PLANET CARRIER/OUTPUT SHAFT ASSEMBLY
- - TRANSAXLE CASE
The Output Speed Sensor (1) provides information on how fast the output shaft is rotating. As the rear planetary carrier park pawl lugs pass by the sensor coil, an AC voltage is generated and sent to the PCM/TCM. The PCM/TCM interprets this information as output shaft RPM.
The PCM/TCM compares the input and output speed signals to determine the following:
- Transmission gear ratio
- Speed ratio error detection
- CVI calculation
VEHICLE SPEED SIGNAL
The vehicle speed signal is taken from the Output Speed Sensor. The PCM converts this signal into a pulse per mile signal and sends the vehicle speed message across the communication bus to the BCM. The BCM sends this signal to the Instrument Cluster to display vehicle speed to the driver. The vehicle speed signal pulse is roughly 8000 pulses per mile.
REMOVAL
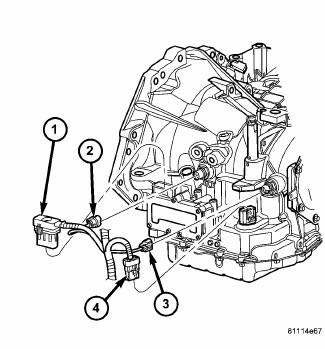
Fig. 381: Identifying Transmission Connectors
- - SOLENOID PACK CONNECTOR
- - INPUT SPEED SENSOR CONNECTOR
- - OUTPUT SPEED SENSOR CONNECTOR
- - TRANSMISSION RANGE SENSOR CONNECTOR
1. Disconnect battery negative cable.
2. Raise vehicle on hoist.
3. Disconnect output speed sensor connector (3) .
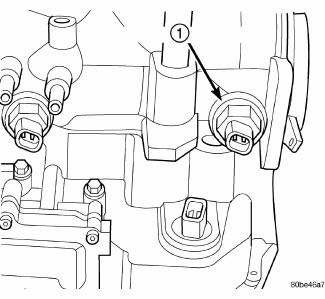
Fig. 382: Identifying Output Speed Sensor
- - OUTPUT SPEED SENSOR
4. Unscrew and remove output speed sensor (1) .
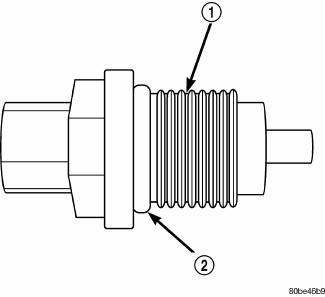
Fig. 383: Identifying Output Speed Sensor & O-Ring
- - OUTPUT SPEED SENSOR
- - O-RING
5. Inspect speed sensor O-ring (2) and replace if necessary.
INSTALLATION
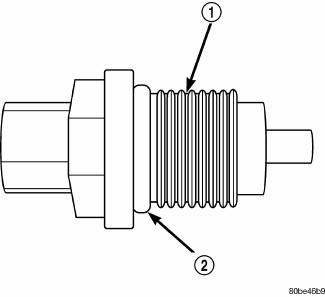
Fig. 384: Identifying Output Speed Sensor & O-Ring
- - OUTPUT SPEED SENSOR
- - O-RING
1. Verify o-ring (2) is installed into position.
2. Install and tighten output speed sensor (1) to 27 N.m (20 ft. lbs.).
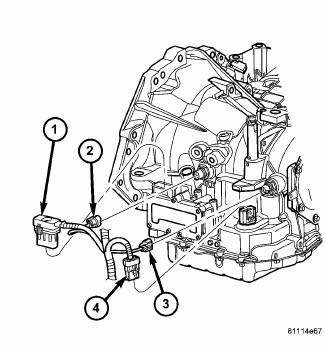
Fig. 385: Identifying Transmission Connectors
- - SOLENOID PACK CONNECTOR
- - INPUT SPEED SENSOR CONNECTOR
- - OUTPUT SPEED SENSOR CONNECTOR
- - TRANSMISSION RANGE SENSOR CONNECTOR
3. Connect speed sensor connector.
4. Connect battery negative cable.
 Sensor, speed, input
DESCRIPTION
Fig. 369: Removing/Installing Input Speed Sensor
- INPUT SPEED SENSOR
The Input Speed Sensor (1) , is a two-wire magnetic pickup device that
generates AC signals as rotation oc ...
 Sensor, transmission range
DESCRIPTION
Fig. 386: Locating Transmission Range Sensor (TRS)
- TRANSMISSION RANGE SENSOR
The Transmission Range Sensor (TRS) (1) is mounted to the top of the valve
body inside the transa ...
See also:
Removal
FRONT
1. Raise and support the vehicle.
Fig. 163: TIRE AND WHEEL MOUNTING
2. Remove the wheel mounting nuts (3), then the tire and wheel assembly (1).
NOTE: In some cases, it may be necessary ...
Lifter(s), hydraulic
Diagnosis and Testing
DIAGNOSIS AND TESTING - HYDRAULIC LASH ADJUSTER NOISE DIAGNOSIS
Proper noise diagnosis is essential in locating the source of a NVH
complaint. Locating a lash adjuster (tappe ...
OCCUPANT RESTRAINTS
Some of the most important safety features in your
vehicle are the restraint systems:
• Three-point lap and shoulder belts for all seating
positions.
• Advanced Front Airbags for driver and fr ...
