
Dodge Journey: Toe
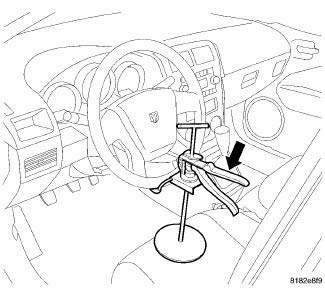
Fig. 115: Steering Wheel Holding Tool
1. Center the steering wheel and lock it in place using a steering wheel clamp.
NOTE: When setting toe, make sure to set rear toe to the preferred specifications before setting front toe to the preferred specifications
NOTE: Perform the following at each rear wheel as necessary.
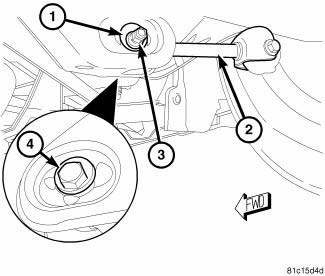
Fig. 116: Rear Toe Adjustment Cam Bolt
NOTE: Perform the following at each front wheel as necessary.
CAUTION: Do not twist the inner tie rod-to-steering gear boot (bellows) while turning the inner tie rod during front toe adjustment. It may be necessary to remove the clamp where the boot meets the inner tie rod.
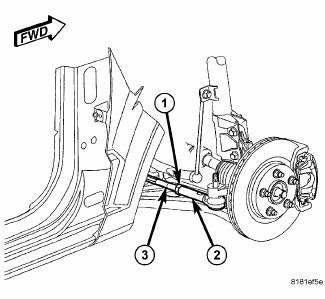
Fig. 117: Tie Rod Jam Nut
REAR TOE
NOTE: Perform the following at each rear wheel as necessary.
Fig. 118: Rear Toe Adjustment Cam Bolt
2. While holding the cam bolt head (4) stationary, loosen the toe link mounting cam bolt nut (3).
3. Rotate the cam bolt head (4) left or right until the rear wheel toe for that rear wheel is set to the preferred specification. 4. While holding the cam bolt head (4) stationary, tighten the toe link mounting cam bolt nut (3) to 100 N.m (74 ft. lbs.).
FRONT TOE
NOTE: Perform the following at each front wheel as necessary.
CAUTION: Do not twist the inner tie rod-to-steering gear boot (bellows) while turning the inner tie rod during front toe adjustment. It may be necessary to remove the clamp where the boot meets the inner tie rod.
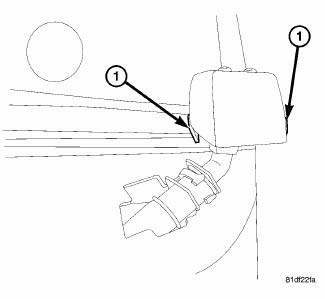
Fig. 119: Tie Rod Jam Nut
5. Loosen the tie rod adjusting jam nut (1). Grasp the inner tie rod (3) and rotate it one way or the other until the front wheel toe is set to the preferred specification.
6. Tighten the tie rod adjusting jam nut to of 75 N.m (55 ft. lbs.).
7. Make sure the inner tie rod-to-steering gear boot is not twisted. If removed, reinstall the clamp where the boot meets the inner tie rod.
ALL
8. Remove the steering wheel clamp.
9. Remove the alignment equipment.
10. Road test the vehicle to verify the steering wheel is straight and the vehicle does not pull or wander.
SPECIFICATIONS
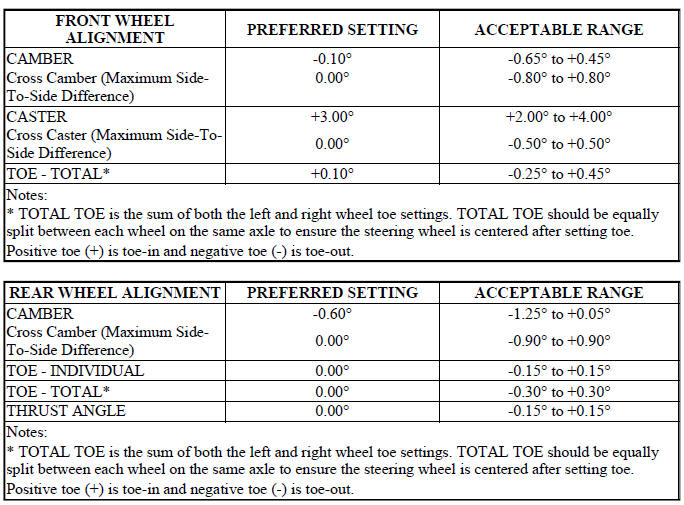
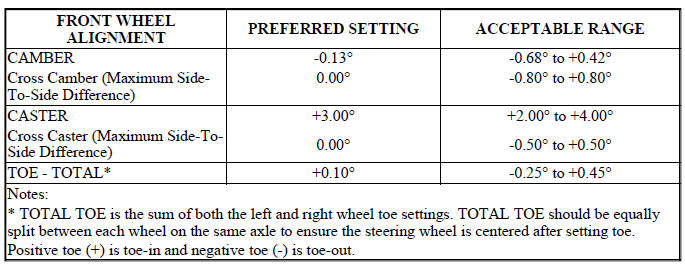
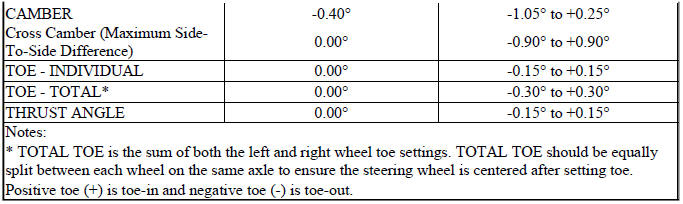
WHEEL ALIGNMENT
NOTE: All specifications are given in degrees.
NOTE: All wheel alignments are to be set with the vehicle at curb height.
NOTE: Curb (ride) height specifications can be found in the Curb Height Measurement procedure.
ALL EXCEPT EXPORT
EXPORT

 Wheel alignment
PRE-WHEEL ALIGNMENT INSPECTION
Before any attempt is made to change or correct the wheel alignment, the
following inspection and necessary
corrections must be made to the vehicle to ensure proper ...
 Transmission
...
See also:
JACKING AND TIRE CHANGING
WARNING:
• Do not attempt to change a tire on the side of the
vehicle close to moving traffic. Pull far enough off
the road to avoid the danger of being hit when
operating the jack or changing t ...
REAR WINDOW FEATURES
Rear Window Wiper/Washer
The rear window wiper/washer control is located on the
right side of the steering column.
Rear Window Wiper/Washer Control
Rotate the switch upward to the
“On” pos ...
Spring(s), valve
Description
The valve springs are made from high strength, chrome-silicon steel. The
springs are common for intake and
exhaust applications. The valve spring seat is integral with the valve stem
...
