Dodge Journey: Disassembly
NOTE: The strut assembly must be removed from the vehicle for it to be disassembled and assembled.
For the disassembly and assembly of the strut assembly, use strut spring compressor, team PSE tool 223-7400, or the equivalent, to compress the coil spring. Follow the manufacturer's instructions closely.
WARNING: Do not remove the strut rod nut before the coil spring is properly compressed. The coil spring is held under pressure. The coil spring must be compressed, removing spring tension from the upper mount and bearing, before the strut rod nut is removed.
1. If both struts are being serviced at the same time, mark both the coil spring and strut assembly according to which side of the vehicle the strut is being removed from.
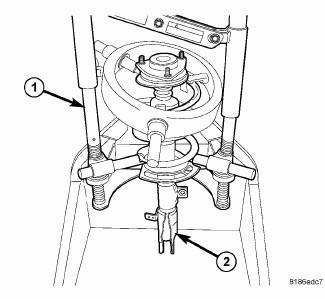
Fig. 88: Identifying Strut Assembly Positioned In Strut Coil Spring
Compressor
2. Position the strut assembly (2) in the strut coil spring compressor (1) following the manufacturer's instructions and set the lower and upper hooks of the compressor on the coil spring. Position the strut clevis bracket (2) straight outward, away from the compressor.
3. Compress the coil spring until all coil spring tension is removed from the upper mount and bearing.
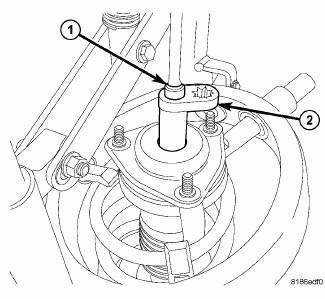
Fig. 89: Special Tools On Strut Rod Nut
CAUTION: Never use impact or high speed tools to remove the strut rod nut.
Damage to the strut internal bearings can occur.
4. Once the spring is sufficiently compressed, install Strut Nut Wrench (2) 9362, on the strut rod nut. Next, install a deep socket (1) on the end of the strut rod. While holding the strut rod from turning, remove the nut using the strut nut wrench.
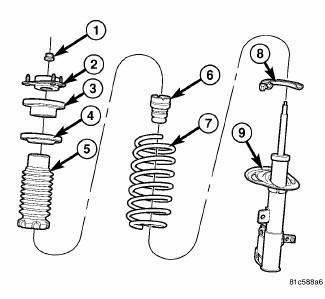
Fig. 90: Strut Assembly (Exploded)
5. Remove the clamp (if installed) from the bottom of the coil spring and remove the strut (damper) (9) out through the bottom of the coil spring.
6. Remove the lower spring isolator (8) from the strut seat.
7. remove the dust shield (5) and jounce bumper (6).
8. Remove the upper strut mount (2) from the top of the bearing and upper spring seat (3).
9. Remove the upper spring seat (3) and isolator (4) from the top of the coil spring (5).
NOTE: If the coil spring needs to be serviced, proceed with the next step, otherwise, proceed with 11.
10. Release the tension from the coil spring by backing off the compressor drive completely. Push back the compressor hooks and remove the coil spring.

Fig. 91: Strut Assembly (Exploded)
11. Inspect the strut assembly components for the following and replace as necessary:
NOTE: For reassembly.
- Inspect the strut (damper) (9) for shaft binding over the full stroke of the shaft.
- Inspect the jounce bumper (6) for cracks and signs of deterioration.
- Inspect the dust shield (5) for cracks and tears.
- Check the upper mount (2) for cracks and distortion and its retaining studs for any sign of damage.
- Check the bearing and upper spring seat (3) for any binding.
- Inspect the upper and lower spring isolators (4, 8) for material deterioration and distortion.
- Inspect the coil spring (7) for any sign of damage to the coating.
 Removal
1. Remove the engine appearance cover.
Fig. 82: Cowl Top Screen
2. Remove the two push-pins (1) securing the cowl top screen at the ends.
Remove the remaining push-pins
(2). Remove the cowl top ...
 Assembly
NOTE: If the coil spring has been removed from the spring compressor,
proceed with
the next step, otherwise, proceed with 3.
NOTE: To determine the flat coil end of the coil spring for the ...
See also:
CUPHOLDERS
There are two cupholders, located in the center floor
console, for the front passengers.
Center Console Cupholders
For passengers in the second row there are two cupholders,
located in the cente ...
Description, Operation
DESCRIPTION
Fig. 1: Identifying 41TE Automatic Transaxle Components
- TRANSAXLE CASE
- TORQUE CONVERTER
- OIL PUMP
- INPUT SPEED SENSOR
- UNDERDRIVE CLUTCH
- OVERDRIVE CLUTCH
- REVE ...
Removal
BULB
Each rear lamp unit for this vehicle consists of two pieces. An outer rear
lamp unit that is secured at the rear of
each quarter panel includes bulbs for the park (or tail) lamps, the brake ( ...
