Dodge Journey: Installation
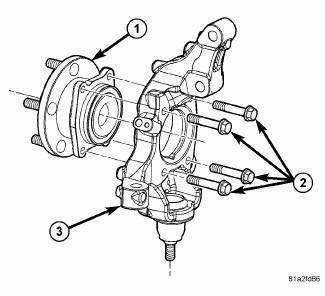
Fig. 51: Front Hub And Bearing Mounting
1. If required, install the hub and bearing (1) by sliding it into the knuckle.
2. If installing hub and bearing, install the four bolts (2) fastening the hub and bearing (1) to the knuckle (3).
Tighten the four bolts to 82 N.m (60 ft. lbs.).
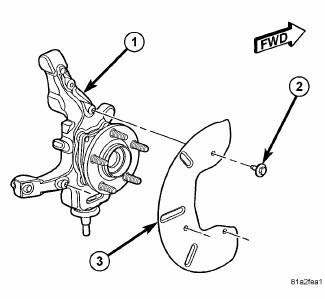
Fig. 52: Shield Mounting
3. If required, install the shield on the knuckle. Install and tighten the three mounting screws (2) to 10 N.m (89 in. lbs.).

Fig. 53: Front Knuckle Mounting
4. Slide the hub and bearing in the knuckle (2) onto the splines of the half shaft outer C/V joint (1).
5. Insert the lower ball joint stud into the mounting hole in the lower control arm.
6. Install a NEW ball joint stud nut (4). Tighten the nut to 95 N.m (70 ft. lbs.).
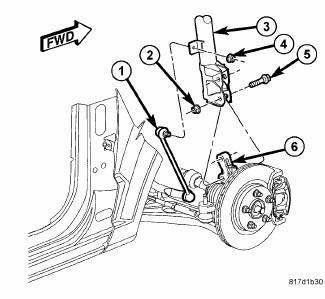
Fig. 54: Strut Mounting To Knuckle
CAUTION: The strut clevis-to-knuckle bolts (5) are serrated and must not be turned during installation. Install the nuts while holding the bolts stationary in the steering knuckle. Refer to the following step.
7. Position the lower end of the strut assembly (3) in line with the upper end of the knuckle (6), aligning the mounting holes. Install the two mounting bolts (5).
8. Install the nuts (2) on the two bolts (5). While holding the bolts in place, tighten the nuts to 140 N.m (103 ft. lbs.).
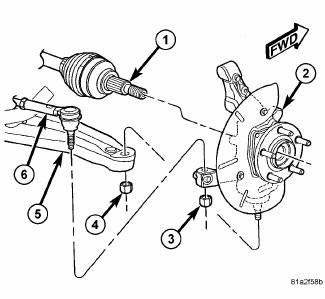
Fig. 55: Front Knuckle Mounting
9. Install the outer tie rod (6) ball stud into the hole in the knuckle (2) arm. Start the tie rod end-to-knuckle nut (4) onto the stud. While holding the tie rod end stud with a wrench, tighten the nut with a wrench or crowfoot wrench to 85 N.m (63 ft. lbs.).
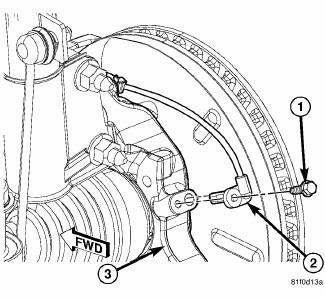
Fig. 56: Front Wheel Speed Sensor
10. Install the wheel speed sensor head (2) into the knuckle (3). Install the mounting screw (1) and tighten it to 12 N.m (106 in. lbs.).
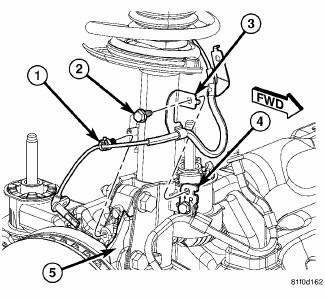
Fig. 57: Wheel Speed Sensor Routing & Brake Flex Hose Bracket
11. Install the routing clip (1) securing the wheel speed sensor cable to the knuckle (5).
12. Install the brake rotor, disc brake caliper and adapter.
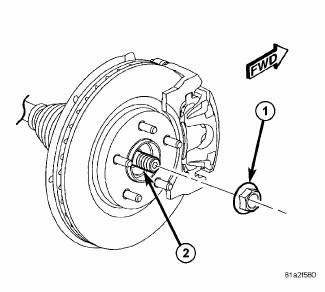
Fig. 58: View Of Hub Nut & Axle Shaft
NOTE: Always install a new hub nut. The original hub nut is one-time use only and should be discarded when removed.
13. Clean all foreign matter from the threads of the half shaft outer C/V joint.
14. Install the hub nut (1) on the end of the half shaft (2) and snug it.
15. While a helper applies the brakes to keep the hub from rotating, tighten the hub nut (3) to 132 N.m (97 ft.lbs.).
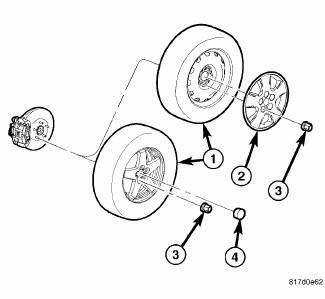
Fig. 59: TIRE AND WHEEL MOUNTING
16. Install the tire and wheel assembly (1). Install and tighten wheel mounting nuts (3) to 135 N.m (100 ft. lbs.).
17. Lower the vehicle.
18. Perform wheel alignment as necessary.
 Removal
NOTE: Before proceeding, review all Warnings and Cautions.
1. Raise and support the vehicle.
Fig. 39: TIRE AND WHEEL MOUNTING
2. Remove the wheel mounting nuts (3), then the tire and wheel a ...
 Link, stabilizer bar
REMOVAL
1. Raise and support the vehicle.
Fig. 60: TIRE AND WHEEL MOUNTING
2. Remove the wheel mounting nuts (3), then the tire and wheel assembly (1).
Fig. 61: Strut Mounting To Knuckle
3. W ...
See also:
Module, heated seat
DESCRIPTION
Fig. 35: Locating Heated Seat Module
The heated seat module (2) is located under the driver front seat. It has a
single electrical connector (1) and a
push pin style retainer that s ...
Removal
NOTE: Before proceeding, review all Warnings and Cautions.
1. Raise and support the vehicle.
Fig. 39: TIRE AND WHEEL MOUNTING
2. Remove the wheel mounting nuts (3), then the tire and wheel a ...
Connector, data link
DESCRIPTION
Fig. 1: Data Link Connector
The Data Link Connector (DLC) (2) is a 16-way molded plastic connector
insulator on a dedicated take out of
the instrument panel wire harness. This conne ...
