Dodge Journey: Removal
NOTE: Before proceeding, review all Warnings and Cautions.
1. Raise and support the vehicle.
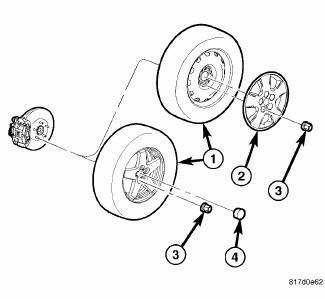
Fig. 39: TIRE AND WHEEL MOUNTING
2. Remove the wheel mounting nuts (3), then the tire and wheel assembly (1).
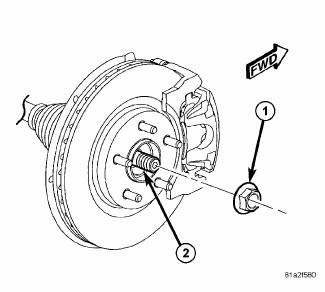
Fig. 40: View Of Hub Nut & Axle Shaft
3. While a helper applies the brakes to keep the hub from rotating, remove the hub nut (1) from the axle half shaft (2).
4. Access and remove the front brake rotor.
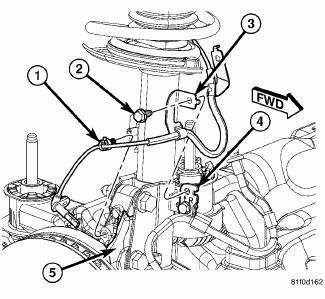
Fig. 41: Wheel Speed Sensor Routing & Brake Flex Hose Bracket
5. Remove the routing clip (1) securing wheel speed sensor cable to the knuckle (5).
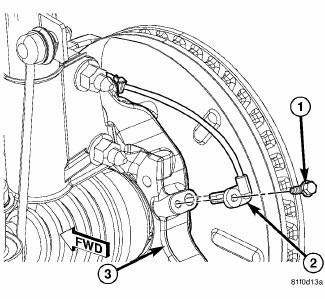
Fig. 42: Front Wheel Speed Sensor
6. Remove the screw (1) fastening the wheel speed sensor head (2) to the knuckle (3). Pull the sensor head out of the knuckle.

Fig. 43: Front Knuckle Mounting
7. Remove the nut (3) attaching the outer tie rod (6) to the knuckle (2). To do this it might be necessary to hold the tie rod end stud with a wrench while loosening and removing the nut with a standard wrench or crowfoot wrench.
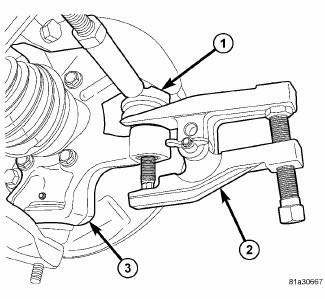
Fig. 44: Using 9360 On Tie Rod End
8. Release the outer tie rod end (1) from the knuckle (3) using Remover (2), Special Tool 9360.
9. Remove the outer tie rod from the knuckle.
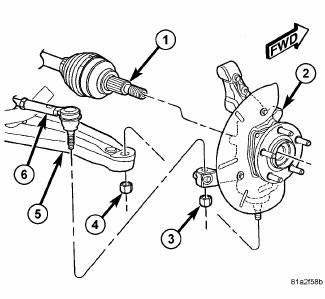
Fig. 45: Front Knuckle Mounting
10. Remove the nut (4) attaching the lower ball joint to the lower control arm (5).

Fig. 46: Using 9360 On Lower Ball Joint
11. Release the lower ball joint (3) from the lower control arm (1) using Remover (2), Special Tool 9360. Do not lift the knuckle out of the lower control arm at this time.
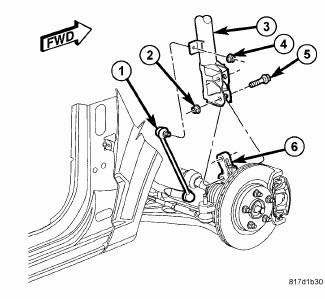
Fig. 47: Strut Mounting To Knuckle
CAUTION: The strut assembly-to-knuckle attaching bolts (5) are serrated and must not be turned during removal. Proper removal is required. Refer to the following steps for the correct method.
12. While holding the bolt heads stationary, remove the two nuts (2) from the bolts (5) attaching the strut (3) to the knuckle (6).
13. Remove the two bolts (5) attaching the strut (3) to the knuckle (6) using a pin punch.

Fig. 48: Front Knuckle Mounting
NOTE: Do not allow the half shaft (1) to hang by the inner C/V joint; it must be supported to keep the joint from separating during this operation.
14. Pull the knuckle (2) off the half shaft (1) outer C/V joint splines and remove the knuckle from the vehicle.
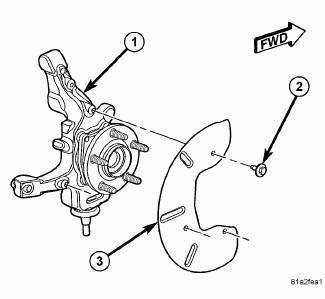
Fig. 49: Shield Mounting
15. If required, remove the three screws (2) fastening the shield (3) to the knuckle (1). Remove the shield.
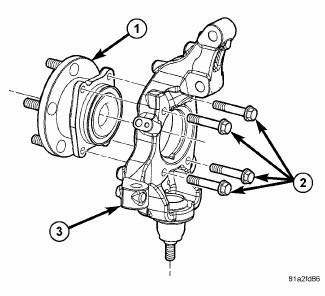
Fig. 50: Front Hub And Bearing Mounting
16. If required, remove the four bolts (2) fastening the hub and bearing (1) to the knuckle (3).
17. If required, slide the hub and bearing (1) out of the knuckle.
 Description, Diagnosis and Testing
DESCRIPTION
Fig. 38: Front Hub And Bearing Mounting
The knuckle (3) is a single casting with legs machined for attachment to the
front strut assembly on the top and
steering linkage on the trai ...
 Installation
Fig. 51: Front Hub And Bearing Mounting
1. If required, install the hub and bearing (1) by sliding it into the
knuckle.
2. If installing hub and bearing, install the four bolts (2) fastening t ...
See also:
Diagnosis and testing
ON-BOARD DIAGNOSTIC SYSTEM
The Powertrain Control Module (PCM) monitors critical input and output
circuits of the charging system,
making sure they are operational. A Diagnostic Trouble Code (DTC) ...
Removal
WARNING: Refer to the applicable warnings and cautions for this
system before
performing the following operation. Failure to follow the warnings and
cautions may result in possible se ...
Disassembly, Assembly
Disassembly
NOTE: Before disassembling the brake caliper, remove it from the
vehicle.
NOTE: Before disassembling the brake caliper, clean and inspect it.
WARNING: Under no condition sh ...
