Dodge Journey: Removal
WARNING: Disable the airbag system before attempting any steering wheel, steering column, or instrument panel component diagnosis or service. Disconnect and isolate the battery negative (ground) cable, then wait two minutes for the airbag system capacitor to discharge before performing further diagnosis or service. This is the only sure way to disable the airbag system. Failure to take the proper precautions could result in an accidental airbag deployment and possible serious or fatal injury.
NOTE: LHD model shown in illustrations. RHD model similar.
RIGHT FRONT FLOOR DUCT

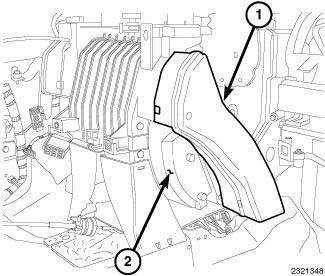
Fig. 67: Duct-Right Front Floor PM
NOTE: Illustration shown with instrument panel removed for clarity.
1. On LHD models, remove the glove box bin.
2. Disconnect the right floor duct (1) from the right side of the HVAC housing (2) and remove the duct.
LEFT FRONT FLOOR DUCT

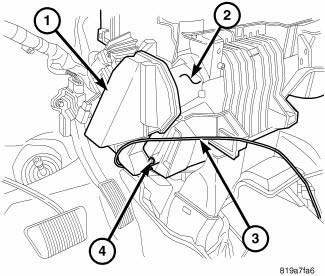
Fig. 68: Duct-Left Front Floor
NOTE: Illustration shown with instrument panel removed for clarity.
1. On RHD models, remove the glove box bin.
2. On LHD models, disconnect the shift interlock cable (3) from the left floor duct (1) and position the cable out of the way.
3. Remove the screw (4) that secures the left floor duct to the left side of the HVAC housing (2).
4. Disconnect the left floor duct from the HVAC housing and remove the duct.
REAR FLOOR DISTRIBUTION DUCTS

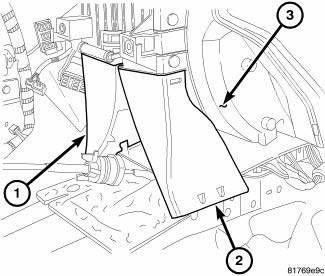
Fig. 69: Ducts-Rear Floor Distribution PM
1. Remove the instrument panel.
2. Remove the rear seat floor ducts. Refer to REAR SEAT FLOOR DUCTS.
3. Disconnect the left rear floor distribution duct (1) and the right rear floor distribution duct (2) as required from the HVAC housing (3) and remove the duct(s).
REAR SEAT FLOOR DUCTS

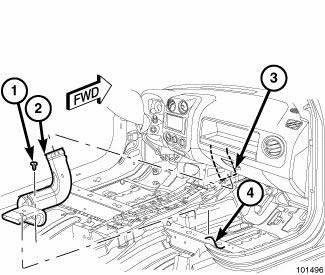
Fig. 70: Ducts-Rear Seat Floor PM
NOTE: Right side rear floor duct shown. Left side duct similar.
1. Remove the center floor console.
2. Remove the front seat from the side of the vehicle being serviced. 3. Pull the carpet back to gain access to the rear seat floor duct (2). 4. Remove the screw (1) and disengage the retainer that secures the rear seat floor duct to the floor support (4).
5. Disconnect the rear seat floor duct from the rear floor distribution duct (3) and remove the rear seat duct (s).
 Installation
NOTE: LHD model shown in illustrations. RHD model similar.
RIGHT FRONT FLOOR DUCT
Fig. 71: Duct-Right Front Floor PM
NOTE: Illustration shown with instrument panel removed for clarity.
...
See also:
Removal
WARNING: Review safety precautions and warnings in this part
before performing
this procedure. Failure to
follow the warnings and cautions could result in possible serious or
fata ...
Description, Diagnosis and Testing
Description
Fig. 17: PEDAL AND BOOSTER MOUNTING - LHD
The power brake booster (3) is mounted to the engine side of the dash panel.
The master cylinder is bolted to
the front of the booster. A v ...
Refrigerant
DESCRIPTION
The refrigerant used in this air conditioning system is a HydroFluoroCarbon (HFC),
type R-134a. Unlike R-12,
which is a ChloroFluoroCarbon (CFC), R-134a refrigerant does not contain
...

