Dodge Journey: Actuator, blend door, rear
DESCRIPTION

Fig. 47: Rear Actuator Description
The blend door actuator (1) for the rear heating-A/C system is a reversible, 12 volt direct current (DC), servo motor. The rear blend door actuator is located on the outboard side of the rear heater-A/C housing.
The rear blend door actuator is contained within a black molded plastic housing with an integral wire connector receptacle (2), an output shaft with splines (3) connect it to the rear blend-air door and three integral mounting tabs (4) allow the actuator to be secured to the rear heater-A/C housing. The blend door actuator does not require mechanical indexing to the blend door linkage, as it is electronically calibrated by the A/C-heater control.
The A/C-heater control must be recalibrated each time an actuator motor is replaced.
The rear blend door actuator is interchangeable with the actuator for the rear mode-air door.
OPERATION
The rear blend door actuator is connected to the A/C-heater control through the vehicle electrical system by a dedicated two-wire lead and connector of the rear heater-A/C wire harness. The rear blend door actuator can move the rear blend-air door in two directions. When the A/C-heater control pulls the voltage on one side of the motor connection high and the other connection low, the rear blend-air door will move in one direction. When the A/C-heater control reverses the polarity of the voltage to the motor, the rear blend-air door moves in the opposite direction. When the front A/C-heater control makes the voltage to both connections high or both connections low, the rear blend-air door stops and will not move.
The front A/C-heater control uses a pulse-count positioning system to monitor the operation and relative position of the rear blend door actuator and the rear blend-air door. The front A/C-heater control learns the rear blend-air door stop positions during the calibration procedure and will store a diagnostic trouble code (DTC) for any problems it detects in the rear blend door actuator circuits.
The rear blend door actuator is diagnosed using a scan tool.
The rear blend door actuator cannot be adjusted or repaired and must be replaced if inoperative or damaged.
REMOVAL
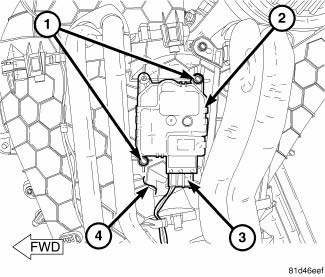
Fig. 48: Rear Blend Door Actuator Removal/Installation
1. Disconnect and isolate the negative battery cable.
2. Remove rear heater-A/C housing (4) and place it on a workbench.
3. Disconnect the wire harness connector (3) from the rear blend door actuator (2) located on the outboard side of the rear heater-A/C housing.
4. Remove the two screws (1) that secure the rear blend door actuator to the rear heater-A/C housing and remove the actuator.
INSTALLATION
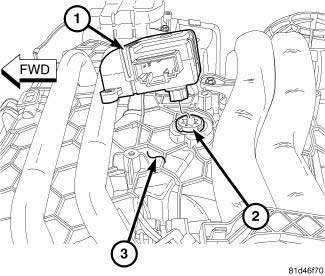
Fig. 49: Rear Blend Door Actuator Align
1. Position the rear blend door actuator (1) onto the rear heater-A/C housing (3). If necessary, rotate the actuator slightly to align the splines on the actuator output shaft with those on the rear blend-air door pivot shaft (2).

Fig. 50: Rear Blend Door Actuator Removal/Installation
2. Install the two screws (1) that secure the rear blend door actuator (2) to the rear heater-A/C housing (4).
Tighten the screws to 1.2 N.m (10 in. lbs.).
3. Connect the wire harness connector (3) to the rear blend door actuator.
4. Install the rear heater-A/C housing.
5. Initiate the Actuator Calibrationfunction using a scan tool.
 Controls, rear
...
 Actuator, mode door, rear
DESCRIPTION
Fig. 51: Rear Actuator Description
The mode door actuator (1) for the rear heater-A/C system is a reversible, 12
volt direct current (DC), servo
motor. The rear mode door actuator i ...
See also:
Description
Fig. 246: Liquid/Suction Line Assembly with Rear A/C
NOTE: A/C liquid and suction line assembly with rear A/C shown. Front
A/C only line
assembly similar.
The A/C liquid line is serviced ...
Module, power, front blower motor
DESCRIPTION
Fig. 27: Blower Mtr Pwr Module
A blower motor power module is used on this model when equipped with the
automatic temperature control (ATC) heating-A/C system. Models equipped with t ...
Description, Operation
DESCRIPTION
Fig. 284: Rear Evaporator Description
The rear A/C evaporator (4) is located within the rear heater-A/C housing,
behind the right interior quarter panel
trim. The rear A/C evaporato ...
